Over the last few years, Microsoft has gotten aggressive with the online account requirement on both Windows 10 and 11. So much so that Microsoft altogether removed the option to create a local account on Windows 11 Home for fresh installations. And now, the company has removed the local account option for Windows 11 Pro as well, starting with Windows 11 22H2 build. Many users are frustrated with the “Offline account” option missing on both Windows 11 Home and Pro editions. Having said that, you don’t need to worry about it, as we are here to help. In this guide, we have added four ways to create a local account on Windows 11. You will be able to install Windows 11 without a Microsoft account or an internet connection. So on that note, let’s go ahead and check out the instructions.
Note: All methods have been tested on the latest Windows 11 Dev Build 23493 (June 29, 2023) and they work as intended.
Method 1: Install Windows 11 Without a Microsoft Account (Home and Pro)
This is the easiest way to install Windows without a Microsoft account. You don’t need to open Command Prompt, run commands, or disable the internet connection here. It’s a tried-and-tested method, and it just works without any fuss. Here’s how to go about it.
1. First, connect to the Wi-Fi and proceed with the setup normally. If you have a wired Ethernet connection, keep it connected.

2. When you reach the Microsoft sign-in screen, enter a@a.com under the email field and click on “Next”. Do not worry, it’s a locked dummy account used for bypassing the Microsoft account requirement. You can also enter User in place of a@a.com.

3. On the next page, enter any password you like just to complete the steps. Now, click on “Sign in“.

3. Since it’s a locked account, Microsoft will straight away start setting up a local account for you. You will see an “Oops, something went wrong” error, and then you can create a local account on Windows 11. Simply click on “Next”.

4. And now, you can create a local account on Windows 11 with ease. How cool is this workaround, right? You can now use Windows 11 without logging into your Microsoft account.

Method 2: Bypass Microsoft Account on Windows 11 With CMD
There is also a CMD method that lets you bypass the online Microsoft account requirement on Windows 11 during fresh installation. Here are the steps to follow.
1. After reaching the Microsoft sign-in page, press “Shift + F10” to open Command Prompt. Now, type the below command in CMD and hit Enter.
netsh interface show interface

2. After that run the below command to disable the Wi-Fi interface if you are connected to a Wi-Fi network. Change Wi-Fi to Ethernet if you have a wired connection.
netsh interface set interface Wi-Fi disable

3. Now, close the CMD window and click on the “Back” button.

4. And there you have it! You can now create a local account on Windows 11 without the online Microsoft account requirement.

5. You also need to enable Wi-Fi after setting up your PC. Press “Windows + R” to open the Run prompt. Here, type ncpa.cpl and hit Enter. This will open the Network Connections window.

6. Here, right-click on the Wi-Fi interface (or Ethernet) and enable it. Now, you can connect to a Wi-Fi network.

Method 3: Bypass Windows 11 Online Account Requirement With Rufus
If the above method didn’t work for you, I suggest creating a Windows 11 bootable USB drive with Rufus, a free and open-source program. With the recent update, Rufus now allows you to disable the Microsoft account requirement during a fresh installation. It does not tamper with the ISO image completely; it only removes the restriction and flashes the image. So if you want to create a local account on Windows 11, use Rufus and remove the online account requirement.
1. Go ahead and download Rufus from the link here. Make sure you download Rufus version 3.18 or later. Now, plug in the USB thumb drive into your PC.

2. Next, click on “Select” and add the Windows 11 ISO image. You can learn how to officially download Windows 11 ISO from our linked article.

3. After that, click on “START,” and you will see a pop-up appear on the screen.

4. Here, make sure to enable the “Remove requirement for an online Microsoft account” checkbox. Then, click on “OK”. Further, if you want to set a local account name, disable data collection, and bypass other Windows 11 requirements, you can do that too.

5. Finally, Rufus will start flashing the image. After it’s done, boot from the USB drive, and install Windows 11. Post-installation, the online Microsoft account page will not appear at all. You can create a local account and proceed ahead without any issues.

Method 4: Create a Local Account on Windows 11 After Installation
If you have already installed Windows 11 and wish to create a separate local account on Windows 11, follow our instructions below. It works for both Windows 11 Home and Pro users. Here are the steps you need to follow:
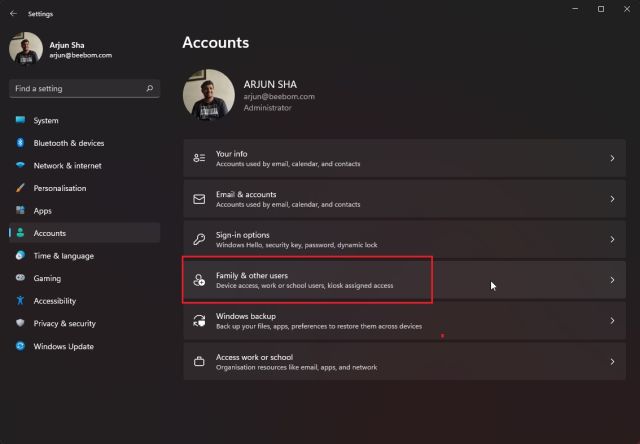
1. Press the Windows 11 keyboard shortcut “Windows + I” to open the Settings app. Here, move to “Accounts” from the left sidebar and select “Family and other users” on the right pane.
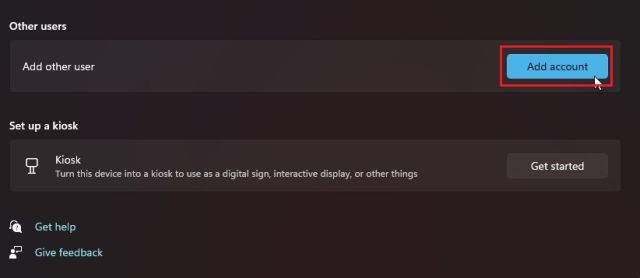
2. Next, click on the “Add account” button under “Other users”.
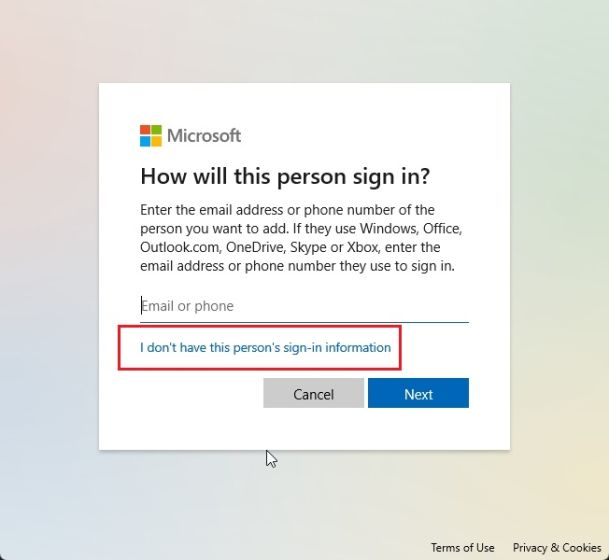
3. From the pop-up that appears, click on “I don’t have this person’s sign-in information” to create a local account.
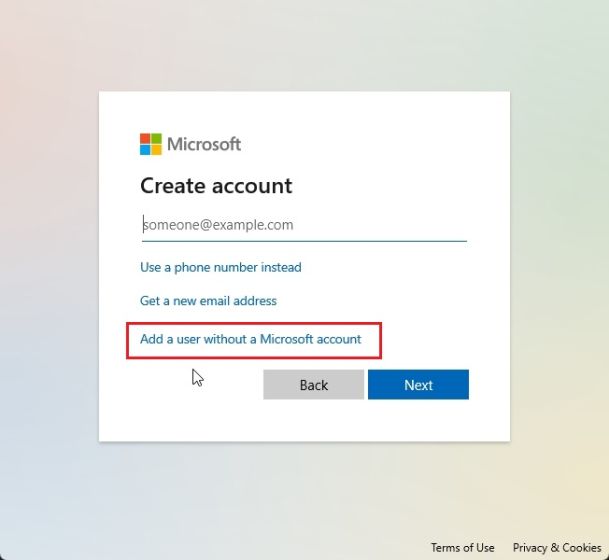
4. After that, click on “Add a user without a Microsoft account“.
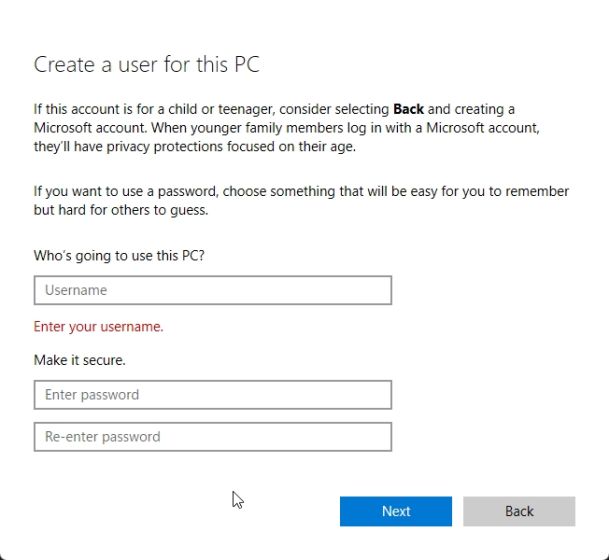
5. Now, enter the name and password for the new local account and click on “Next“. And that’s it. You have successfully set up a new local account on your Windows 11 PC.
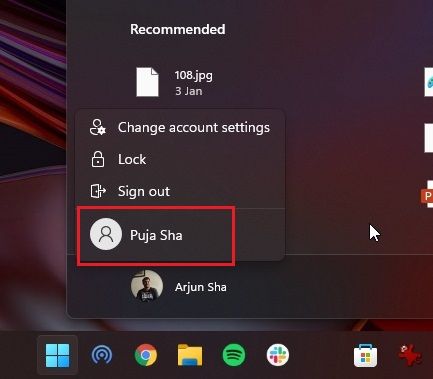
6. You can now switch to the new local user on Windows 11 from the Start menu just like that.
Method 5: Switch From Microsoft Account to a Local Account on Windows 11
If you have signed in with your online Microsoft account on an existing Windows 11 installation and wish to move to a local account, you can do that easily. We have already published a detailed guide on how to remove a Microsoft account from Windows 11, but we will briefly demonstrate the steps for your convenience.
1. Use the “Windows + I” keyboard shortcut to open Windows Settings. Here, move to “Accounts” in the left sidebar and select “Your Info” from the right panel.

2. Under the “Account settings” section, click on “Sign in with a local account instead“.

3. A pop-up window will now open up to confirm your action. Here, click on “Next“.

4. Now, enter the PIN or password for your Microsoft account and press Enter.

5. On the next page, enter the username and password for the local account, and you are done. You will successfully move from an online Microsoft account to a local account on your Windows 11 PC instantly.


