You can change the DNS server for your internet connection on all modern PC and smartphone operating systems, including Windows, macOS, Linux, Android and iOS. Today, we will learn how you can change DNS settings in Windows 10 in a few simple steps. Alongside that, we will also talk about what DNS is, how it powers your internet connection and why it is advisable to switch DNS from the default provided by your ISP (Internet Service Provider) to something like Open DNS or Google DNS that are faster, more efficient and more private.
Change DNS in Windows 10 Computers
Changing the DNS server for your internet connection has a lot of benefits, including enhanced privacy, increased speed, lower latency and more. In this article, we will discuss how we can change DNS settings easily in Windows 10, but before that, we’ll learn more about DNS as a technology and how it is a critical step in connecting us to our favorite websites and services across the world wide web.
If you don’t want to read the extra stuff, you can use the table of content below to directly jump to the tutorial.
What is DNS?
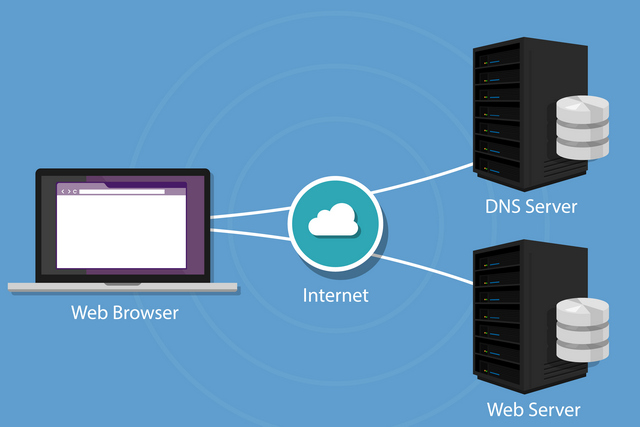
DNS, or Domain Name System, is a decentralized naming system for computers or other devices connected to the internet. Often described as the phone book of the internet, it helps web browsers and other web-facing software to interact through Internet Protocol (IP) addresses. In short, a DNS resolver converts domain names like ‘google.com’ or ‘beebom.com’ that humans can understand to IP addresses like 216.58.217.36 (IPV4 address for Google.com) or 104.17.8.12 (IPV4 address for Beebom.com) that computers can understand. DNS servers ensure there is no need to remember complex numeric (IPV4) or alphanumeric (IPV6) IP addresses.
What DNS Am I Using?
If you’re asking this question, it probably means that your computer or smartphone is using the default DNS resolver of your internet service provider. Your computer could be using several different DNS servers, based on the active connections and your settings. Typically, the Dynamic Host Configuration Protocol (DHCP) will be enabled by default on your PC, automatically configuring the system to use the IP addresses of your ISP’s domain name servers. However, you can change the DNS settings in your operating system or device to use the DNS IP addresses of your choice.
How to Check My DNS Server?
On all modern Windows versions, including Windows 10, you can check the DNS server for your connection from the Command Prompt.
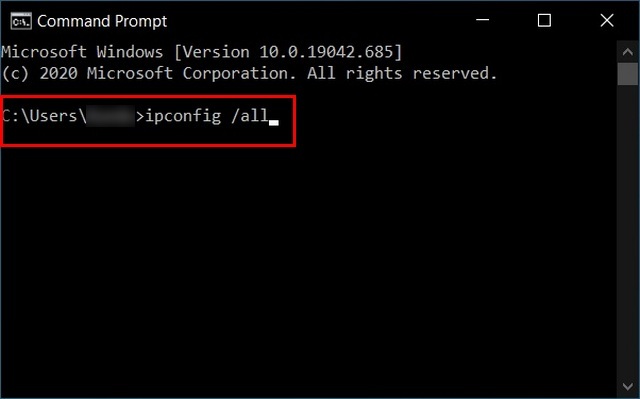
- On your Windows PC, open Command Prompt (or Windows PowerShell). Now type “ipconfig /all” (without quotes) and hit Enter.
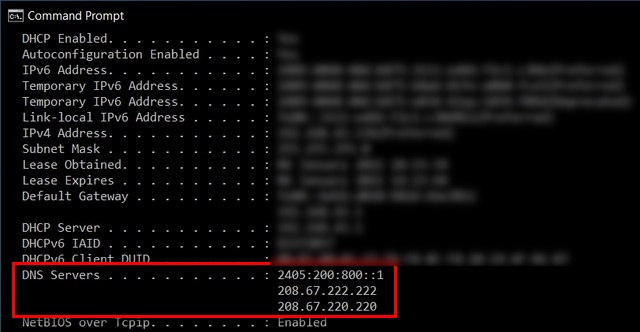
- Locate the listing for ‘DNS Servers’ on the left to know what DNS resolver you’re using. In my case, these are Open DNS addresses.
Benefits of Using Third-party DNS
Using a third-party DNS server can offer you better speeds and lower latency. It will also ensure that your ISP won’t be able to log your internet browsing history. Using third-party DNS servers can also help you unlock region-blocked content and bypass censorship, given that much of the censored websites are blocked via DNS. Last, but definitely not the least, some third-party DNS servers will also protect you against malicious sites and other forms of cyber threats. OpenDNS also offers parental control and custom filtering options.
How to Change DNS in Windows 10?
You can manually configure DNS settings in Windows 10 in a few simple steps. I’ll show you how you can configure your PC to use Open DNS, but you can choose the DNS resolver of your choice by going through our list of the best third-party DNS servers.
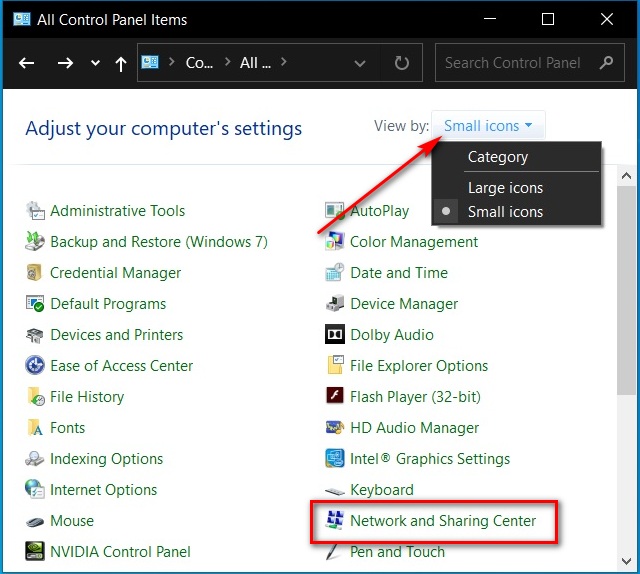
- First off, open Control Panel. Now switch to ‘Small icons’ from the drop-down menu on the top-right and click on ‘Network and Sharing Center’
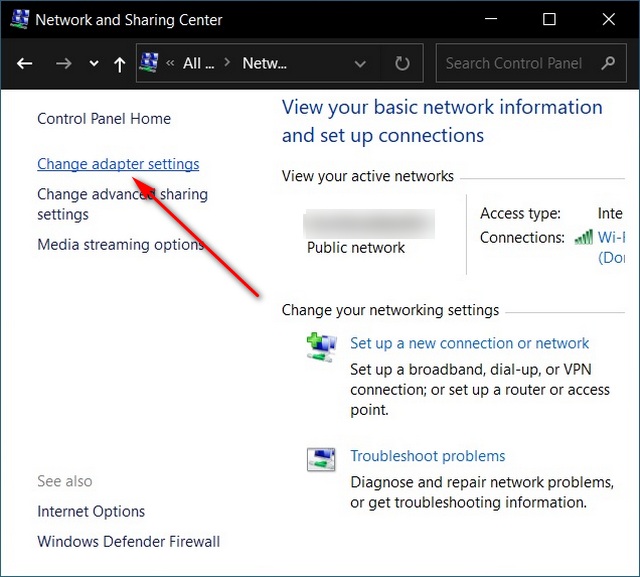
- On the left pane of the next window, click on ‘Change adapter settings’
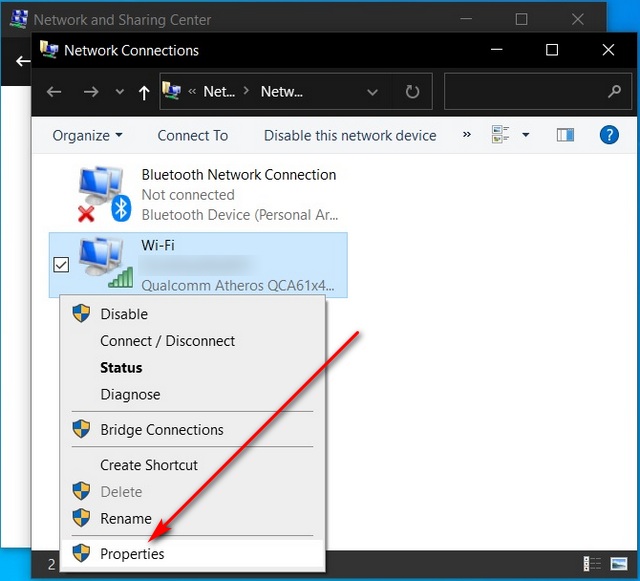
- Right-click the network interface connected to the internet, then click ‘Properties’
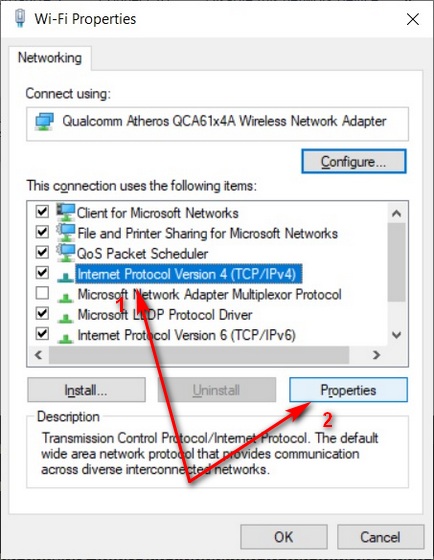
- Now choose Internet Protocol Version 4 (TCP/IPv4) > Properties
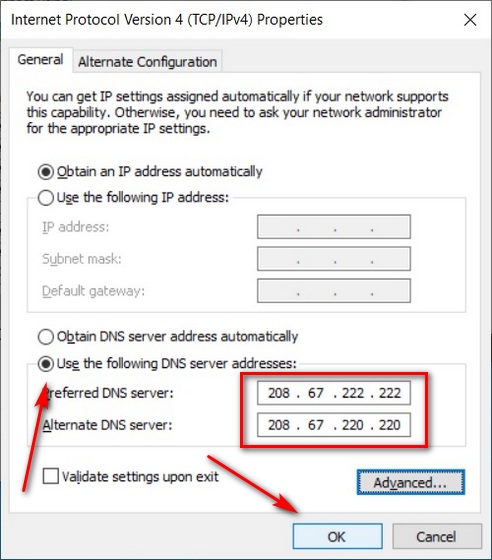
- Click on ‘Use the following DNS server addresses’ and enter the DNS IDs of your chosen DNS resolver. Click ‘OK’ once you’re done.
Reset Internet Connection by Flushing DNS
If you’re facing connection issues after changing the DNS resolver for your network, restart your network adapter by clicking on the ‘Disable’ option in step 3 above. Re-enable it only after a minute or two.
If that doesn’t solve it, open Command Prompt in Admin mode and execute the following commands in sequence:
- Type “ipconfig /flushdns”. Press Enter
- Type “ipconfig /registerdns”. Press Enter
- Type “ipconfig /release”. Press Enter
- Type “ipconfig /renew”. Press Enter
- Type “netsh winsock reset”. Press Enter
Now restart the computer.
Note: Learn how to flush DNS on Linux computers by clicking on the link.
What are the Best DNS Servers I Can Use?
To avoid ISPs spying on their activities, you can configure your router or PC to use either Open DNS (208.67.222.222 / 208.67.220.220 for IPV4) or Google DNS (8.8.8.8 / 8.8.4.4 for IPv4), both of which are typically faster than the default DNS resolver provided by ISPs. CloudFlare also added consumer a DNS service with the launch of the 1.1.1.1 resolver in 2018.
Alongside the aforementioned ones, there are dozens of other third-party DNS services for consumers, and you can take your pick by through our detailed guide (linked above) on this subject. Personally, I’ve been using the free Open DNS for over a decade on all my devices, and I highly recommend it for reasons of privacy, speed, and efficiency.
Change Default DNS Settings to Enhance Online Privacy
So now that you know how to change the default DNS service to something that’s fast, safe and efficient, go ahead, give it a go. Once you do, let us know which DNS service you chose on your computer and why. Also, now that your internet is fast, check out Windows tips and tricks that will speed up your windows devices.


