A lot of people use and prefer Google Docs over the likes of Microsoft Word, due to the simple fact that Google’s offering is simple to use and features a UI that focuses on what’s important. However, there is more to Google Docs than what meets the eye. Google Docs has some astonishingly powerful features that can immensely help you with document creation and collaboration. In this article, we are going help you get the most out of Google Docs and create perfect documents through it. Here’s our list of 13 Google Docs tips and tricks to make you a Google Docs pro:
1. Use Google Docs Templates
When you create a “Blank” document in Google Docs, you must have noticed various document types available on the right. Well, these are the document templates that make document creation a breeze. There are dozens of templates that you just need to fill with text, to create a professional document. Just click on the “More” button on the right side to open up all the available templates. The templates include, different Letter and Resume types, Essay, Report, Notes, Plans, Brochures and more.
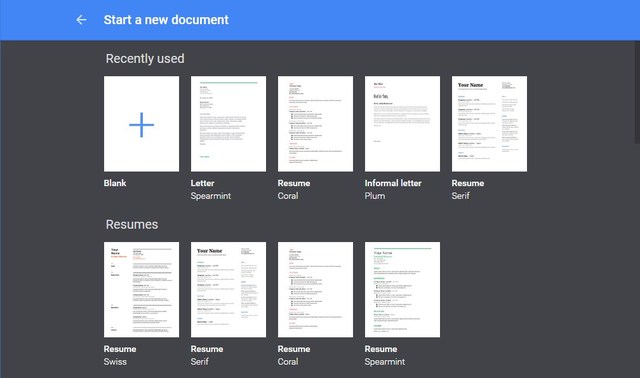
The templates are pretty good and make editing easy, thanks to clear guidelines on what you need to enter. All you need to worry about is your text, and Google Docs will handle all the formatting.
2. Use Suggestion Mode
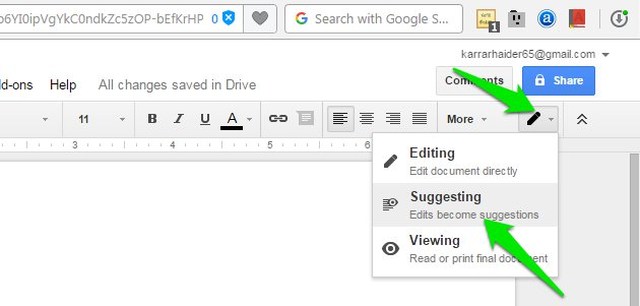
While collaborating on a document, Google Docs allows everyone to make changes in real-time. However, what if others don’t agree with your edits, won’t that make it difficult, to track the changes you made and then amend them? This is where suggestion mode comes into play. The mode helps you by converting all your (or anyone else’s) edits to suggestions in the sidebar, that other editors can confirm or deny.
To enable the suggestion mode, click on the pencil icon at the right side of the menu bar and select “Suggesting”. This will put you in suggestion mode and your edits will become suggestions.
3. Use the Web Clipboard
Your operating system’s built-in clipboard works fine for quickly moving text and images, but it is fairly limited. Google Docs has a built-in web clipboard that lets you save multiple selections and also save them in cloud, so that you can access them in another device. Select the text or image in Google Docs and then click on “Edit” menu above and hover your mouse cursor over “Web clipboard”. Here, select “Copy selection to web clipboard” to copy the items.
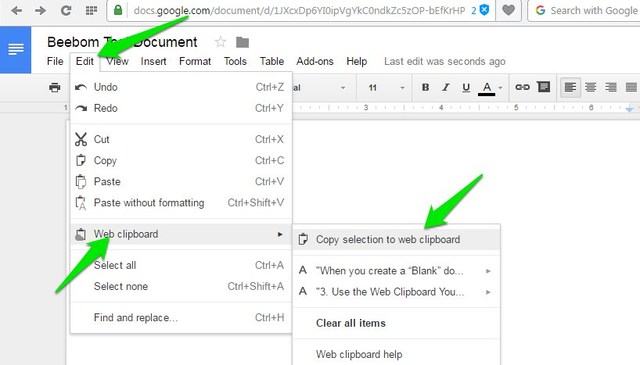
You can repeat the process to copy multiple items and they can be accessed from any device running Google Docs (Sheets and Slides as well). The selections will stay there for 30 days.
4. Take Advantage of Keyboard Shortcuts
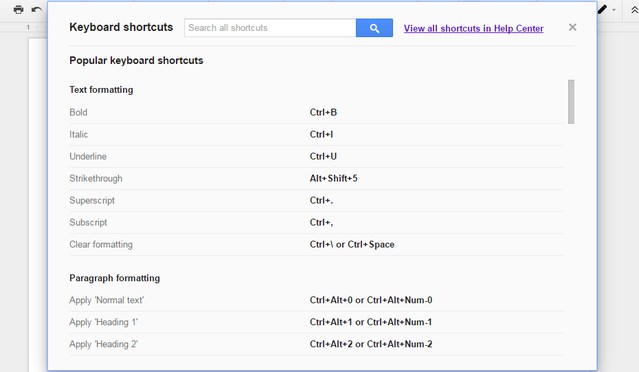
Similar to other Google services, Google Docs also comes with reliable keyboard shortcuts. These shortcuts can make editing documents a breeze and it’s certainly a much faster way when compared to using the mouse. You can change formatting, insert links, find content, navigate the document, comment, access menus and many other useful things using various keyboard shortcuts. To see the full list of keyboard shortcuts, press “Ctrl+?” in Windows or “Command+?” on Mac. The keyboard shortcuts are available for all the devices supporting Google Docs.
5. Use The Revision History Feature
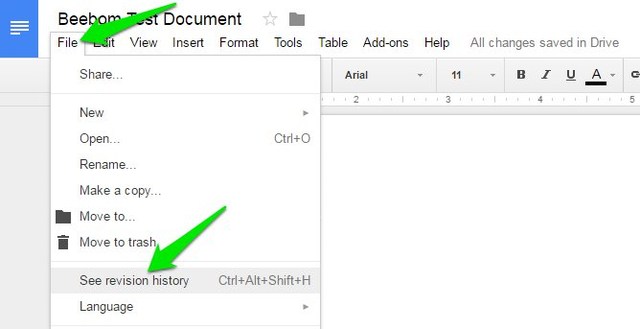
Google Docs keeps a complete record of edits made by anyone in the document. You can use it to see how the document’s original state and even restore to a previous state, if need be. To access revision history, click on the “File” menu and select “See revision history”.
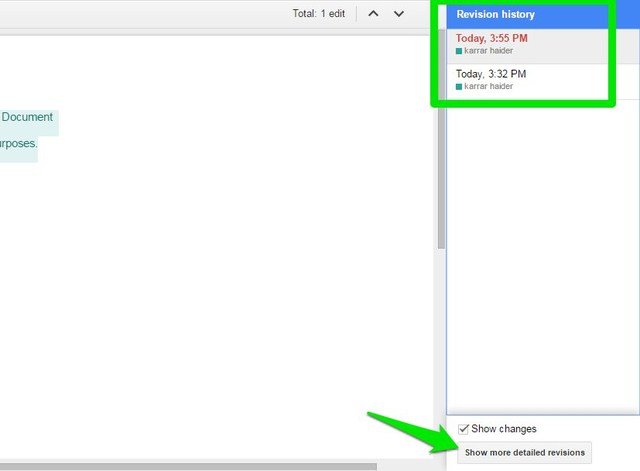
You will be able to see revisions with major edits in the sidebar, along with date and time stamps and the name of the person who made the edits. Click on the “Show more detailed revisions” button below to see all the revisions.
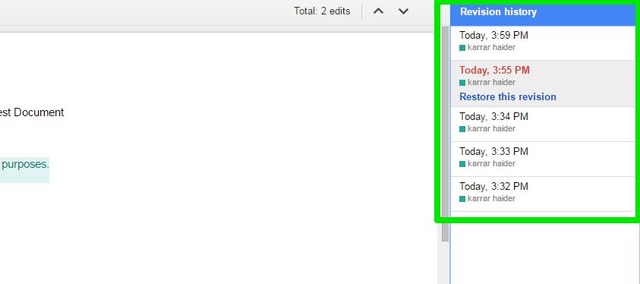
Then, you can click on the “Restore this revision” button to restore the particular revision.
6. Type With Your Voice
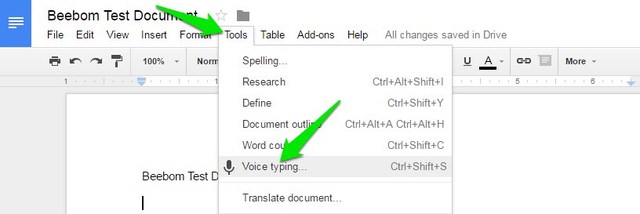
If you are using Google Docs in Chrome, you can take advantage of the voice typing feature to type and control document solely with your voice. You will need a microphone and Google Docs running in the Chrome browser. To do it, click on the “Tools” menu above and select “Voice typing” from the options.
A tiny microphone icon will appear on the left side of the page. Click on it and start speaking to dictate the words you want to type. When done, click on the microphone icon again to stop. Apart from typing with your voice, you can add punctuation and use commands to control almost every feature of Google Docs (here’s the full list). For instance, you can say “add question mark” to add a question mark or say “Open File menu and select see revision history” to access the revision history.
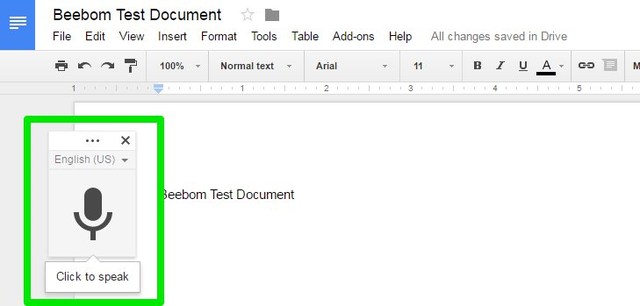
Voice typing also supports dozens of popular languages, including English, German, Spanish, Arabic and Chinese, etc.
7. Edit Images in Google Docs
Google Docs also lets you make basic edits to an image, so that you won’t have to resort to a third-party editor. Once you add an image, right click on it and you will find the option to crop it. From the same menu, you can click on “Image options”, which will open up options like adjust contrast, transparency and brightness.
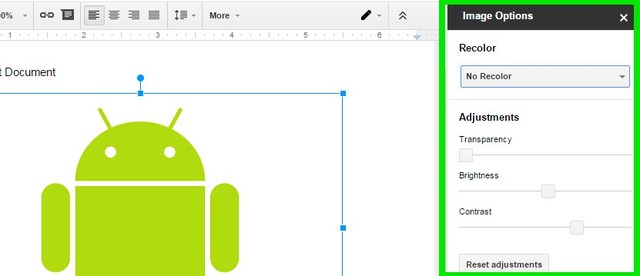
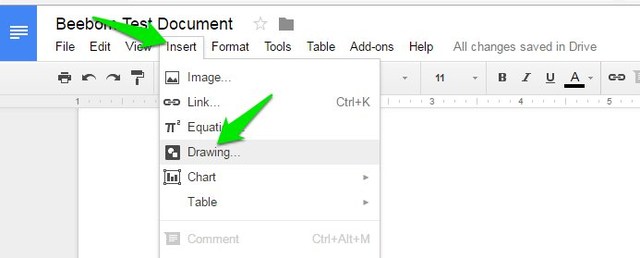
If you need more editing options, you can upload the image in Google Docs’ drawing tool and then import it in the document. Click on “Insert” menu and select “Drawing” from the list. Use the “Image” option at the end to upload you image in the Drawing tool.
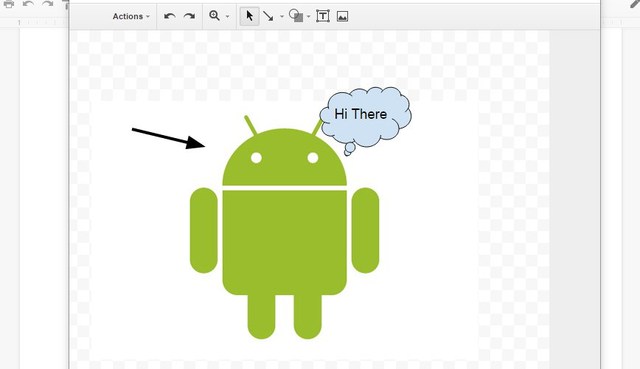
Once uploaded, you will be able to add shapes, text, or draw on it, change color and more. When you are done, click on the “Save & close” button above to insert the image.
8. Download Documents in a Different Format
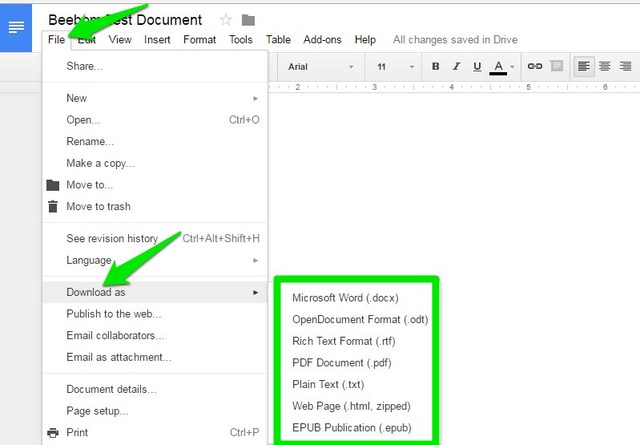
If you need to submit your document in a different format, Google Docs allows you to download documents in popular formats like DOCX, ODF, PDF, rich text, plain text, etc. Simply click on the “File” menu and hover your mouse cursor over the “Download as” option. You will see multiple formats to choose from. As soon as you select a format, it will be downloaded.
9. Use the Add-ons
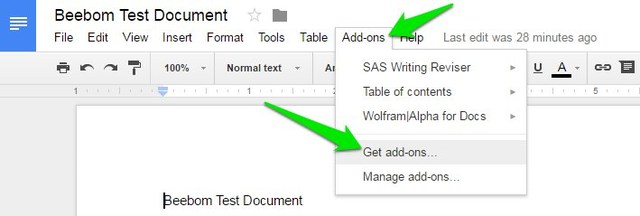
Google Docs has support for third-party add-ons that you can use to increase functionality of Google Docs. There are a number of cool add-ons that add functionalities like add a table of contents, fix grammatical errors, add graphs and diagrams, translate content and much more. To get add-ons, click on the “Add-ons” menu and select “Get add-ons”.
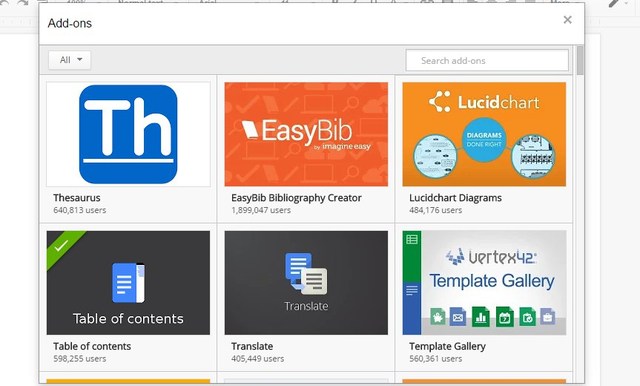
You will see all the add-ons available for Google Docs that you can install. Hover your mouse cursor over them to see more details and click on the “+” button below to install them.
10. Use the Research Feature
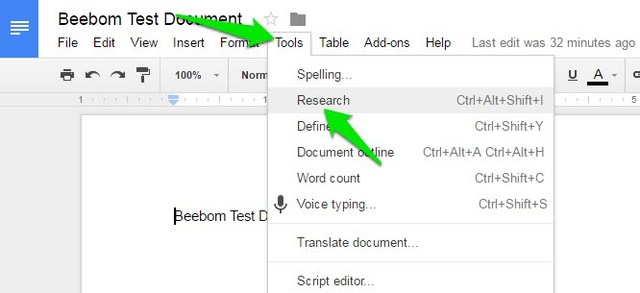
Google Docs has a built-in research feature that lets you search the web for information and quickly add it in your document. Click on the “Tools” menu and select “Research” from it.
The Research tool will open in the sidebar and you can use the “Search” option to look for images, search Google Scholar articles, add beautiful quotes and other useful information, that may help you with the document you’re creating. You can also find royalty free images and directly insert them in the document.
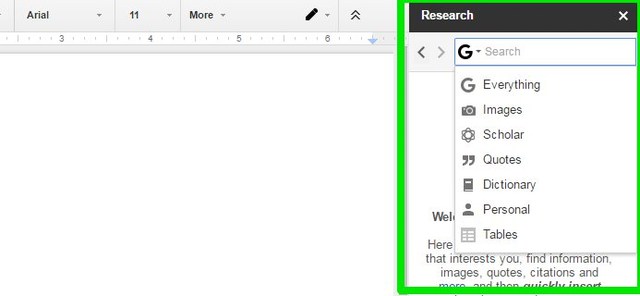
Furthermore, the Research feature is also capable of automatically picking up key topics from your content and suggesting you to find more information on these topics.
11. Tag People in Comments
If you want to gain attention of another editor in your document, you can tag them and an email will be sent to them as notification. While commenting, type “+” and a list of all your contacts will open up. Select the person you want to notify and click on “Comment” to enter the comment and also send the notification.
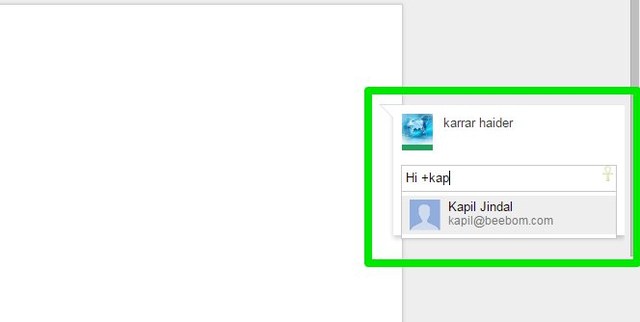
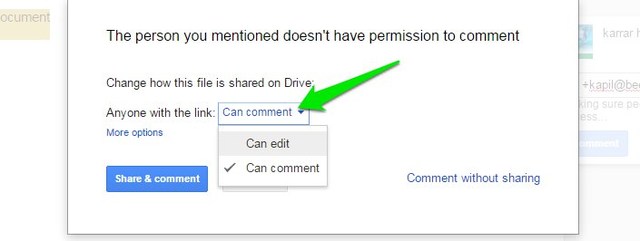
The notification will be sent if the document is already shared with them, otherwise you will see a window, where you can share and specify editing rights. Furthermore, you can also type the email manually, instead of selecting a Gmail contact.
12. Search Efficiently in Google Docs
If you have loads of documents, it can get a little hard to quickly find an old document, especially if you have different documents on a same topic. Thankfully, Google Docs’ search field makes it very easy to find exactly what you need. Entering a keyword in the search bar will quickly result all the documents with that keyword in the title.
There is more to it though, if the usual search doesn’t help you find the document you need, you can also take advantage of the advanced search commands. For instance, you can use “OR” to do a search with multiple keywords, such “Android OR iOS” to find documents with one or both of these terms. You can find a full list of Google Docs advanced search commands on Google’s support website.

13. Google Docs Outline Feature
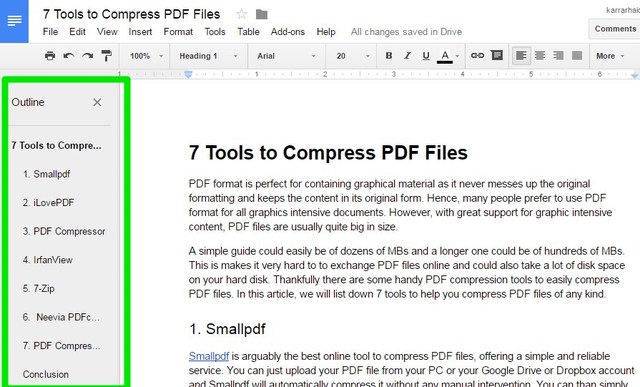
If you are working on a long document, it can be a little difficult to navigate it. This is where Google Docs’ Outline feature will come in handy for you. The feature creates a table of contents of your document, on the left side. You can click on the headings inside the outline to quickly move to it. Do keep in mind though that you will have to properly format your document using headings (like heading 1 or heading 2) for the outline feature to work.
SEE ALSO: 10 Google Drive Tips and Tricks to Increase Productivity
Improve your Google Docs experience with these tips & tricks
These Google Docs tips and tricks should definitely enhance your experience and help you get things done faster. I use most of these Google Docs features in my day to day writing and they definitely help me write better. I also recommend you to learn a few Google Docs keyboard shortcuts, as they surely speed things up.
Well, we hope you liked these cool Google Docs tips and tricks but if there are any cool Google Docs features that we missed out on, do let us know in the comments section below.


