
Everyone has important data on their computers, and no matter which hard disk or SSD you use, there are chances of disk failure that results in data loss; that is exactly why we create backups. The thing with backups, though, is that you need to restore data from them, back into your computer. Why not use a fault-tolerant setup, instead? RAID is a combination of multiple disks that can be set up to be fault tolerant, in a sense. So that if one or more of the disks in the RAID volume fail, your data is still available to you.
In this article we’ll get you up to speed on what RAID actually is, and how you can use it to either keep data safely backed up, or to increase the read/write speed on the internal as well as external disks.
What is RAID?
RAID stands for Redundant Array of Independent Disks. Previously, it stood for Redundant Array of Inexpensive Disks, because it was originally meant to show that multiple inexpensive disks when RAIDed could perform equal (if not better) to high-end, large, enterprise storage disks, but I digress.


What RAID basically does is it allows you to combine two or more (hence the “Array”) disks for purposes such as fail-safe backups, increasing read/write speed and the likes.


RAID Levels
RAID has various types (or “levels” as they are called). There are six of these, but Mac only allows for two (there’s a third option, but it’s not really a RAID setup). These are described below:
- RAID 1 : This level is called a “mirrored” RAID, and it does exactly what it sounds like. It mirrors the contents of one disk onto every single disk in the array. This means that if one or more of your disks fail, you can still recover all of the data as long as at least one disk in the array is functioning properly. This is possible because the data is copied on every disk in the array.
- RAID 0 : Also known as “striping” RAID, what this does is it combines multiple disks into one, larger volume. Data stored in such an array is almost equally distributed among all the disks in the array. This allows for faster reading and writing times. There is an issue however, if any one of the disks in your level 0 RAID fails, it becomes almost impossible to recover that data from the array because no disk has all of the data. This level is particularly useful for people who work with large files.
- CDS/JBOD: Concatenated Disk Set, also known as Just a Bunch Of Disks is not really a RAID setup. It simply allows you to concatenate a number of disks into one large logical volume. Say, for example, you had four 256 GB disks. CDS would allow you to concatenate them into one 1TB volume. This means that you will be able to save files onto these disks as if it was a single 1TB volume instead of four 256GB ones.
Now that we have given you a basic idea of what the various levels are, let’s dive headfirst into some RAID fun.
How To Setup RAID on Your Mac
Before Apple came out with OS X El Capitan, the process to set up RAID volumes was very simple. The graphical “Disk Utility” app on the Mac had a simple option to RAID a number of drives into either level 0,1 or to concatenate the drives (CDS/JBOD). When Apple redesigned the disk utility in OS X El Capitan, they quietly removed the RAID option. Why they did this is not what we are here to discuss. Instead, we are presenting the solution to your RAIDing problems in El Capitan.
Let’s dive into our trusted Terminal app. Turns out, the “diskutil” command has a “appleRAID” sub-command for creating RAIDs.
The syntax for the command:
diskutil appleRAID create stripe|mirror|concat setName fileSystemType memberDisks
Before we get cracking on the command, you’ll need to figure out which disks you want to RAID.
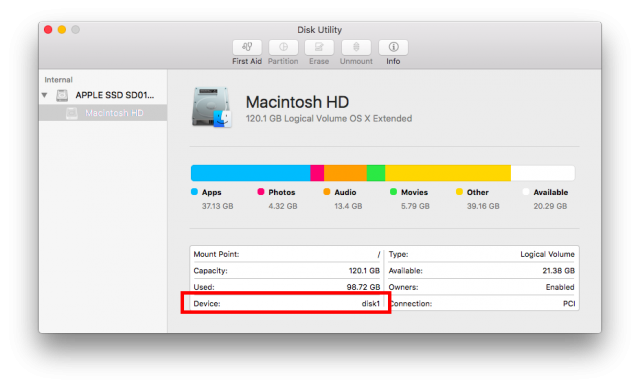
1. Connect the disks to your computer and launch Disk Utility.
2. From the left pane, select your disks and note down the value of the “device” property. You’ll have to enter this in the Terminal.

3. Go to the Terminal and type diskutil appleRAID create <stripe/mirror/concat> setName fileSystemType memberDisks.
![]()

4. Replace the keywords with stripe (for RAID0), mirror (for RAID 1) and concat (for CDS/JBOD).
- Replace “setName” with the name you want for your RAID volume.
- Set the “fileSystemType” to something like JHFS+, and in place of “memberDisks” type in the values you noted down in Step 2, leaving spaces between the names of each disk.
- For example, if you wanted to create a mirrored RAID with the name “Backups” and the device ids for your disks were “disk2”, “disk3”, “disk4”, the command you’ll have to type will be:
diskutil appleRAID create mirror Backups JHFS+ disk2 disk3 disk4.
5. Let the command run, and on completion, OS X will automatically mount your RAID volume and you can find it in Disk Utility.
SEE ALSO: 8 Useful FFmpeg Commands You Should Use on Your Mac
Ready To Create RAID Volumes on Your Mac?
We think RAID volumes can be useful for a lot of people, as they can be set up to not only create backups automatically but also to increase the read and write speeds of the drives. So, if you have a couple of disks lying unused, you should try turning them into a RAID volume, play around with them and see if it makes a difference. Don’t forget to let us know about your experience in the comments section below.


