If you look inside the applications folder on your laptop, you would probably find applications dedicated to converting video files, ripping audio from video files, and a lot more. What if I told you that you did not really need all of those things, neither on your computer, nor as websites saved into your bookmarks for quick access to video conversion tools? There exists an alternative to all of those applications, and it is called FFmpeg. Before we get to all the awesome stuff FFmpeg commands can let you do on your Mac, you first need to know what it is, and how you can install it on your macOS computer. So, here goes:
What is FFmpeg?
FFmpeg is a command line/com utility that has a lot of powerful libraries and its various commands allow users to convert video files from one format to another, edit the aspect ratio of the video files, extract audio, and a lot more. However, the Terminal (or Command Prompt on Windows) is not a friend to everyone. Some people might simply find it too intimidating, or too complicated. That’s why, I am writing this article detailing the steps you will need to take to use various FFmpeg commands on a Mac (Sorry Windows users!) with ease. So read on, and get ready to appreciate the true power of the command line and FFmpeg commands.
To get it on your Mac, you’ll simply have to download FFmpeg off their website (it’s free!), and install it on your Mac. It’s pretty straightforward stuff. After you have set it up on your Mac, here are 8 useful FFmpeg commands for Mac:
We’ll take this one step at a time, starting from the simplest things that you can do with FFmpeg commands, and going up to some of the niche things that can be accomplished using the utility.
Useful FFmpeg Commands for Audio and Video Manipulation
1. Convert Video Formats
FFmpeg can convert videos to different formats with just one simple command. The command that you will need to achieve this, is:
ffmpeg -i input_file.extension output_file.extension
Obviously, you will have to replace the filenames and the extensions according to the files that you have. For example, I converted an mp4 file, called “abc.mp4” to an avi movie, called “convertedabc.avi”, and the command looked like:
ffmpeg -i ~/Desktop/Scripts/abc.mp4 ~/Desktop/Scripts/convertedabc.avi
![]()
That’s all. FFmpeg will output a bunch of stuff on your Terminal that you don’t really need to bother yourself with, unless there is an error (which is rather rare), and you can find your converted video file in the Finder.

2. Rip Audio From Video Files
FFmpeg can also let you rip the audio from a video file. This basically uses the same command as above but you will need to specify an audio file format in the output. The command to do this is:
ffmpeg -i input_file.extension output_file.extension
I ripped the audio from “abc.mp4” to an audio file “rippedaudio.mp3”, using the command:
ffmpeg -i ~/Desktop/Scripts/abc.mp4 ~/Desktop/Scripts/rippedaudio.mp3
![]()
3. Convert x264 Encoded Video Files to x265
H.265 is a newer encoding technique that results in massively reduced file sizes for the same quality videos. I’m not even exaggerating, if you look at video files downloadable over the internet, the same file in x264 and x265 encoded schemes will have drastically different file sizes. The FFmpeg command to achieve this, is:
ffmpeg -i input_file -strict -2 -c:v libx265 output_file
For example, I converted the “abc.mp4” file from x264 to x265 using:
ffmpeg -i ~/Desktop/Scripts/abc.mp4 -strict -2 -c:v libx265 ~/Desktop/Scripts/abc265.mp4
![]()
Here are the screenshots of both the file sizes:
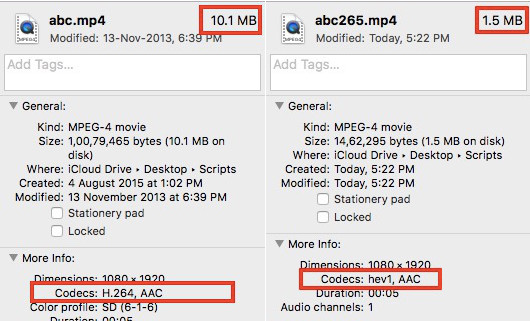
This is obviously a good way to encode video files, however, older computers might not be able to play the video files encoded in H.265.
4. Change the Frame Rate of Video Files
FFmpeg also has the ability to edit the frame rate of video files. While this might not be a useful feature in regular use, it is a feature that is needed in special situations, and is definitely worth a shot, even if you do it just for fun. You could change the frame rate of a video to 1FPS and see how it plays back. The best part is that you can increase frame rate as well, and FFmpeg simply replicates the existing frames to make the frame rate higher and the video time remains the same. The command to achieve this is:
ffmpeg -i input_file -strict -2 -r frame_rate output_file
I changed the frame rate of “abc.mp4” to 1FPS and saved it as “abcfps.mp4” using the following command:
ffmpeg -i ~/Desktop/Scripts/abc.mp4 -strict -2 -r 1 ~/Desktop/Scripts/abcfps.mp4
![]()
5. Edit Aspect Ratio of Video Files
Another cool thing that FFmpeg can do, is change the aspect ratio of videos. So, you can change the aspect ratio of a video in 4:3, to 16:9, or 1:1 or any other aspect ratio that you might want to change it to. The command to do this using FFmpeg is:
ffmpeg -i input_file -strict -2 -aspect aspect_ratio output_file
I changed the aspect ratio of “abc.mp4” to 1:1 and saved it as “abcaspect.mp4” using:
ffmpeg -i ~/Desktop/Scripts/abc.mp4 -strict -2 -aspect 1:1 ~/Desktop/Scripts/abcaspect.mp4
![]()
6. Extract Images from Videos
FFmpeg also allows users to take snapshots from videos, automatically, at a desired speed. You can use FFmpeg to take a snapshot from a video every second, and even specify the size of the image that is to be captured. FFmpeg can save these snapshots to any folder that you want it to, and automatically append sequential file names to the images, so you know the order in which the snapshots were taken. The command to achieve this is:
ffmpeg -i input_file -an -r number_of_images_per_second -y -s size_of_images filename_%d.jpg
Note: The “%d” is a placeholder that FFmpeg uses to append numbers to. In this case, the images will be appended with numbers like 1, 2, 3 etc.
I took snapshots from “abc.mp4”, once every second, by using the command as follows:
ffmpeg -i ~/Desktop/Scripts/abc.mp4 -an -r 1 -y -s 400×400 abc_%d.jpg
![]()
Further, if you need to take snapshots only of, say, the starting 3 seconds of the video, you can use the “-t” option which makes FFmpeg take snapshots only till that time in the video. To use the -t option, you will have to edit the command in the following way:
ffmpeg -i ~/Desktop/Scripts/abc.mp4 –t 3 -an -r 1 -y -s 400×400 abc_%d.jpg
![]()
Obviously, you can replace the “3” with whatever the time you want to use, in seconds.
What about if you needed to take snapshots for 3 seconds, starting from a particular time in the video? Well, FFmpeg can do that, as well. The “-ss” option allows users to specify a start time for the snapshot process. Say I wanted to take snapshots from “abc.mp4” for 2 seconds, starting from the time 00:03 (in mm:ss format), I will use the command as follows:
ffmpeg -i ~/Desktop/Scripts/abc.mp4 -ss 3 -t 2 -an -r 1 -y -s 400×400 abc_%d.jpg
![]()
7. Create Videos from Images
Another cool thing that you can achieve using FFmpeg commands is the ability to use multiple images to create a video, kinda like a slideshow, but not exactly like a slideshow. This feature proved useful to me when I needed to edit every frame in a video and then convert it back into a video with the new images. Doing this manually would have obviously proven really difficult, but FFmpeg did this very easily, and allowed me to wander aimlessly, sipping coffee. Talk about goals.
The command to do this in FFmpeg is:
ffmpeg -r frame_rate -f image2 -i image_name.extension output_video.extension
How about using the images we created in the last example to recreate abc.mp4? To do that, we can use the command as follows:
ffmpeg -r 1 -f image2 -i ~/Desktop/Scripts/abc_%d.jpg ~/Desktop/Scripts/recreatedabc.mp4
![]()
8. Add Metadata Entries to Video Files
This is a feature that I don’t expect casual users to use, at all, but for people who need to edit the metadata of video files, this FFmpeg command can prove very useful. The command is not very complicated:
ffmpeg -i input_file -strict -2 -metadata tag_name=“tag_value” output_file
For example, if I wanted to add the metadata entry “Title” with the value “Akshay” to “abc.mp4”, I would use the command as follows:
ffmpeg -i ~/Desktop/Scripts/abc.mp4 -strict -2 -metadata Title=“Akshay” ~/Desktop/Scripts/metaaddedabc.mp4
![]()
The screenshot below shows the added metadata field in the new video file.

SEE ALSO: 15 Cool Mac Keyboard Shortcuts You Must Know
FFmpeg: A Superpowered Video Manipulation Utility
The 8 FFmpeg commands that I mentioned in the article are barely scratching the surface of the true power in FFmpeg. The tool is incredibly powerful, and very flexible. Multiple options can be combined together to get extremely customized functionality out of FFmpeg. I would definitely recommend that you go and read the documentation for FFmpeg, which is very detailed and contains a lot of functionality that I have not covered in this topic for the sake of simplicity.
As always, we would love to hear about your experience with FFmpeg commands, and your thoughts and comments on the best commands. Make sure you drop your opinions and thoughts in the comments section below.