First introduced in iOS 12 last year, “Screen Time” has traveled to Mac with the new macOS Catalina update. As part of Apple’s digital health push, Screen Time helps you keep a track of how you spend time on your Mac and other connected devices like iPhone and iPad. With comprehensive reports, it offers better insight into your app usage, how often you pick up your device, and the number of alerts you receive – which can go a long way in getting rid of Mac addiction or cutting down unnecessary usage. What’s more, you can also set up Screen Time for a child on your Mac so that you can keep an eye on the movies your little champ watches, the websites that he/she visits or even the games they play. With that said, in this complete guide, we are going to show how you can enable Screen Time to set up parental controls on Mac in macOS Catalina to bolster your digital health or reign in your smart kid.
Use Screen Time to Set Up Parental Controls on Mac in macOS Catalina
With the introduction of macOS Catalina, Apple has replaced “Parental Controls” in System Preferences as those features have been included in Screen Time settings. Therefore, do not get confused if you don’t see the erstwhile Parental Controls icon in the System Preferences. So, first we will start by enabling Screen Time on macOS Catalina and then see how you can use it to set up parental control on your Mac.
Enable Screen Time in macOS Catalina and Set Up Parental Controls
1. Open System Preferences on your Mac by clicking on the Apple menu at the top left corner of the screen and choosing System Preferences.

2. Now, select the Screen Time icon.

3. Next, you will see information about what this feature does. Click on Continue to proceed.

Note: If you have enabled Family Sharing on your Mac, click on the pop-menu in the sidebar and select the profile. If you aren’t using Family Sharing on your device, the pop-up menu won’t appear in the sidebar.
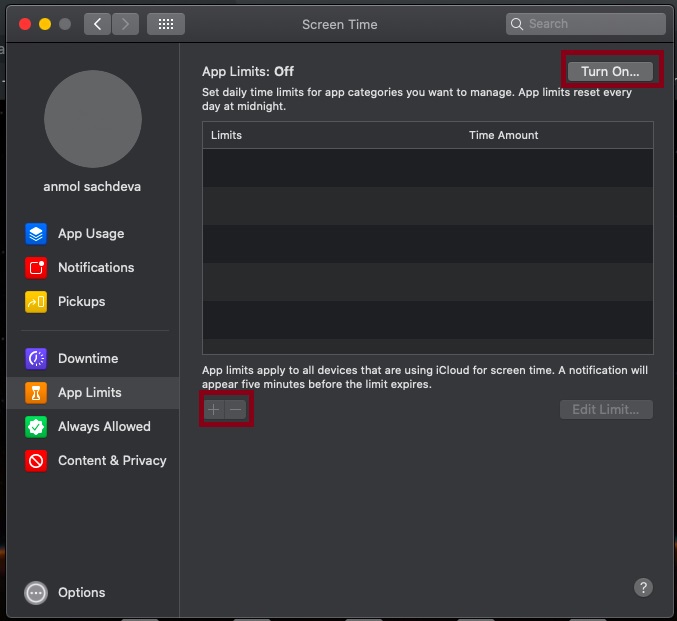
4. Next, choose Options in the bottom left corner of the screen and then click Turn On in the top right corner.

5. Now, based on your preference, you can customize the Screen Time settings on your macOS device.
- Share across devices: Enable this option if you want the Screen Time to present a comprehensive report of the time spent on all of your devices synced with the same Apple ID.
- Use Screen Time Passcode: Choose this option to prevent anyone from making changes to Screen Times settings without your permission. Besides, it will also ensure that your kids will need your approval for the additional time when limits expire.
- Include Website Data: Enable this option to get the details about the specific websites that your kid visits. (this option appears only when you are using Family Sharing.)
6. Up next, configure all the following options in line with your requirements:
- Downtime: It lets you set a daily schedule for when you don’t want to use your Mac. During this period, only the apps you allow and phone calls will be available. You will get a reminder five minutes before the downtime starts. Moreover, it will apply to all the synced devices. To set up downtime, choose it in the sidebar and then click on Turn ON. After that, set the schedule as desired.

- App Limits: Use it to set time limits for specific app categories like social media, games, music, and more. Do note that app limits will apply to all the connected devices and will automatically reset every day at midnight. Again, you will get an alert five minutes before the limit expires.

To set app limits, simply click on the plus button and then choose a particular app category like games, social networking, entertainment, etc. Then, click on Done to finish.
- Always Allowed: As the name itself suggests, allowed apps are available to use only during Downtime. To allow any app, simply click on the Always Allowed option in the sidebar and then check the box to the left of respective apps.

- Content & Privacy: It enables you to restrict explicit content, downloads, purchases, and privacy settings. To adjust content and privacy settings, select Content & Privacy in the sidebar and then click on Turn On at the top right. After that, choose the specific category like content, stores, apps, etc. and then configure everything as desired.

Track Screen Time Usage on Mac
Once you have set up everything, tracking Screen Time usage on macOS Catalina becomes quite straightforward. You can use the App Usage, Notifications, and Pickups features located in the sidebar to check the respective information.

- To find out the usage for only one of your devices, simply select a device from the menu at the bottom of the window.
- To switch between days, just click within the weekly chart. You can also use arrow buttons above the chart to switch between days.
- To check total usage by week, select This Week from the date menu located at the top of the window.
- To view the usage for a child account, select a child’s name from the menu at the top left corner.
Restricting Content in Apple Music and Apple TV
That’s it for the parental controls part. As you can see, you can use Screen Time to control your child’s device usage quite minutely. However, what if you want to restrict not just the time but also the type of content your child can access. Well, in this section, we will show you how you can restrict explicit content based on rating in Apple Music and Apple TV.
Set Up Content Restrictions in Music App on Mac
1. Launch Music app on your Mac. Then, click on the Music menu at the top left of the screen and choose Preferences.

2. Next, click on the Restrictions tab. After that, you may need to click on the Lock button on the bottom left corner of the screen and then enter your username and password.

3. Next up, select the items you wish to prevent anyone from accessing without your permission.
Disable: In this section, you have the option to restrict access to many things like Music Profiles, Apple Music, iTunes Store, and Shared Libraries. To do so, simply check the box for each option.
Ratings for: macOS automatically selects the rating as per your country or region. But you have the option to make changes depending on your needs. Simply click on the drop-down menu next to the “Ratings for” section and choose your preferred country or region.
Restrict: In this section, you can prevent access to explicit content. You can also block films as well as TV programs with specific ratings. Simply check the box for explicit content. Then, use the drop-down menu to choose a particular rating for films and TV programs. Do note that the restrictions will apply to playback, sharing, iTunes purchases, and the iTunes Store.

Once you have customized everything in line with your needs, make sure to click the Lock button to prevent anyone from making changes without your consent. After that, click on OK to finish.
Enable Content Restrictions in Apple TV App on macOS Catalina
1. Open the Apple TV app on your Mac. Then click on the TV menu > Preferences > Restrictions tab. After that, click on the Lock button on the bottom left corner of the screen and then enter your username and password.

2. Next up, go ahead and customize the content restrictions.

Disabled: Check the respective boxes to disable purchasing/ subscribing and shared libraries.
Ratings for: The rating is already selected as per your country or region. But you can make changes to it.
Restrict: It allows you to restrict movies and TV shows of a specific rating. Click the drop-down menu and choose the particular rating.
When you have made the desired changes, do not forget to click on the Lock button again to keep the unauthorized access at bay. After that, hit OK to confirm the changes.
SEE ALSO: How to Sync iPhone and iPad with Mac in macOS Catalina without iTunes
Set Up Parental Control on Mac with Ease
There you go! That’s how you can take advantage of Screen Time to set up parental control on Mac and prevent your kid from overusing the macOS device. With many customization options, macOS ensures you can fine-tune the settings to suit your needs better. We have also mentioned how you can set up content restrictions so you have complete control over the content you child can access. Have any questions regarding this new macOS feature? Shoot it in the comments below.