Even though macOS 12 doesn’t seem to be as big an upgrade as iOS 15, the latest iteration of macOS has got an impressive array of all-new features under the hood, like the new Universal Control. Hence, digging into macOS 12 has been an equally intriguing affair for me. Now that the rigorous exploration is over, it would be cool to talk about customization tips and also reveal the macOS Monterey hidden features that haven’t got much attention. So, if you are all set to customize the brand new macOS in line with your preference, these are the 25 macOS Monterey settings you should change right now for a more personalized experience.
25 macOS 12 Monterey Settings You Should Change Right Now
As you may have already expected, a good number of macOS 12 features are also available on iOS 15/iPadOS 15. So, if you have tried Apple’s latest mobile operating system, you might already be quite familiar with how they work. Apart from covering those most-talked-about universal features, I have also taken into account the macOS-exclusive features that need to be tweaked for a much-improved experience on Mac. Now that you have got the insight, let’s get started!
Set Up a Hot Corner to Access Quick Notes Faster on Your Mac
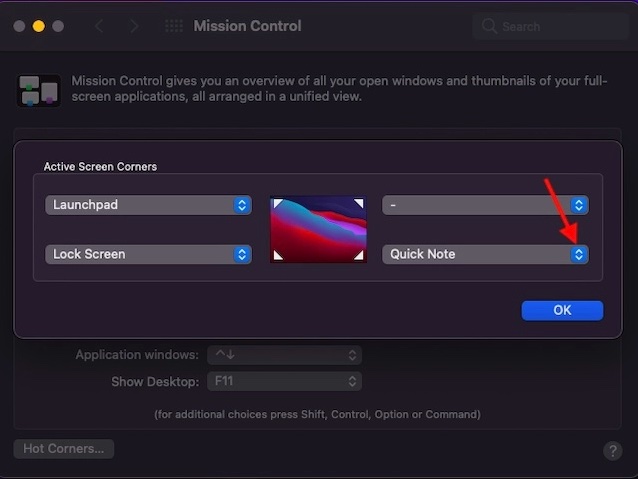
“Quick Notes” is designed to let you jot down thoughts faster without having to take the traditional route. Even better, you can also set up a hot corner on your Mac to access Quick Notes just by moving your cursor to the desired corner of the screen. For the uninitiated, “Hot Corners” lets you convert each of the four corners of a Mac into a quick shortcut. Hence, you can access certain features by dragging the cursor to the preferred corner.
First off, open System Preferences and choose Mission Control. Now, click on Hot Corners at the bottom left. After that, click on the drop-down menu of the desired corner and choose Quick Note. There you go! From now onwards, all you need to do to bring up a Quick Note window is simply drag the cursor to the selected corner of your Mac.
Add a Shortcut to Menu Bar
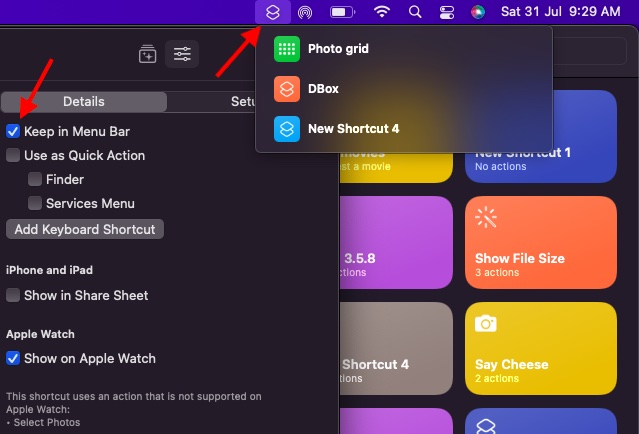
As someone who loves using shortcuts on iPhone and iPad, I have found the arrival of the Shortcuts app on macOS a welcome move. It has given automation a huge boost on Mac. Interestingly, you can also add shortcuts to the menu bar for quick access. Head over to the Apple Shortcuts app and then open the shortcut that you want to add to the menu bar. Now, click on the menu button (three horizontal lines) at the top right and choose Details. Next, check the box to the left of the Keep in Menu Bar.
Receive Shortcuts Directly from People in Your Contacts
With macOS 12, you can receive shortcuts directly from people in your contacts thanks to the private sharing feature. If you are a loyal user of shortcuts, you should take advantage of this all-new macOS feature. Bear in mind that Apple can’t verify the authenticity of the shortcuts shared privately. So, you should go with private sharing at your own risk.
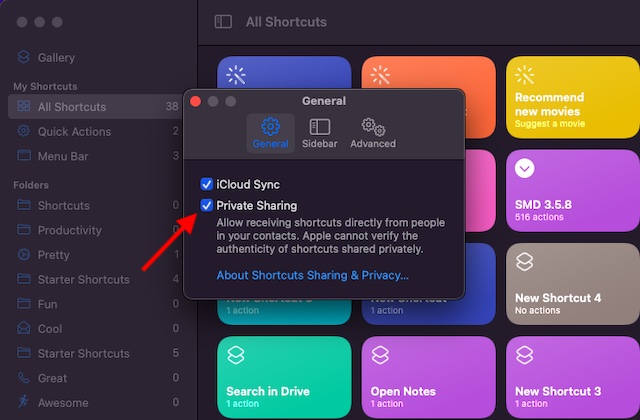
Open the Apple Shortcuts app on your macOS device. After that, click on the Shortcuts menu at the top left corner of the screen and choose Preferences. Now, ensure that the General tab is selected. Now, check the box to the left of Private Sharing.
Create Safari Tab Groups
Apple has revamped Safari tab management in macOS Monterey. For a change, you can now create tab groups to keep all the tabs perfectly organized. By creating different tab groups based on topics like shopping, movies, and tech, you can keep everything in the right sync and access a bunch of tabs faster. Yeah, it’s the way to go, especially if you want to keep the chaotic tabs at bay.
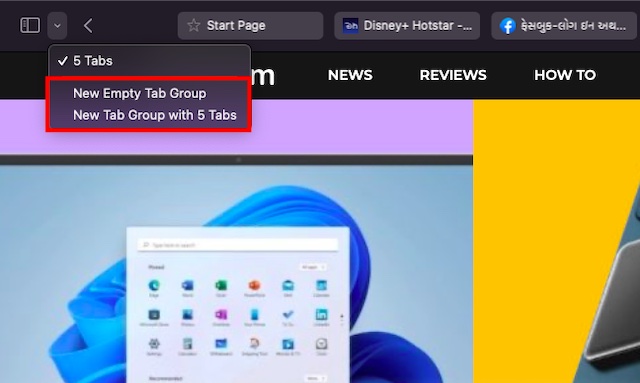
Launch Safari on your Mac and then click on the tiny downward arrow right next to the sidebar at the top left corner. After that, click New Empty Tab Group or New Tab Group with X Tabs. Next, give a suitable name to the tab group and you are pretty much done.
Perfectly Arrange Your Safari Tabs By Title or Website
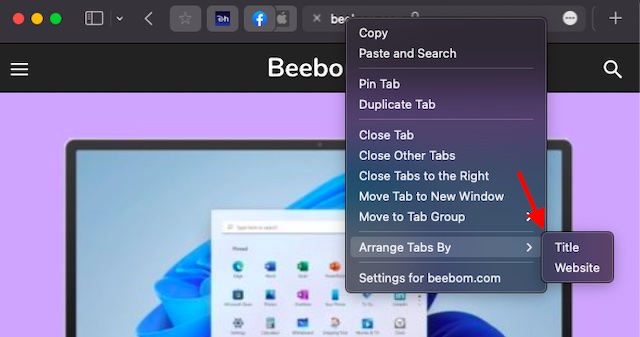
Another notable tab management feature that you should take under your radar is the ability to arrange tabs by tile or website. If you no longer want to let scattered tabs mess your browsing experience, better keep your tabs organized. Simply, right/control-click on a Safari tab and then choose Arrange Tab By in the menu. After that, select Title or Website. This also means you no longer have to drag and drop tabs around to organize them properly.
Stop Links Shared in iMessage from Cluttering Safari
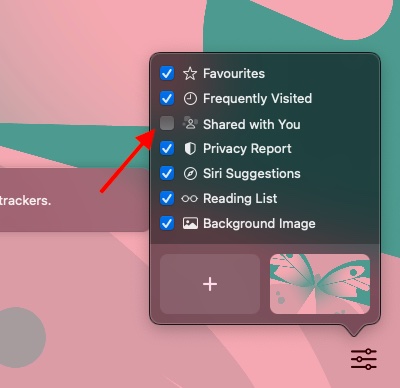
In macOS Monterey, links shared in the Apple Messages app automatically appear in Safari. While “Shared with You” is a pretty helpful feature, not everyone may find it worthy enough, especially the ones who want to keep the browser uncluttered. If that’s you, stop the web links from showing up in Safari. Launch Safari on your Mac -> menu button at the bottom right corner (three tiny lines) -> Uncheck the box to the left of Shared with You.
Enable Mail Privacy Protection
Spammers use various means and ways to track how you interact with their emails. They smartly employ invisible tracking pixels and remote images that automatically load when viewing an email to retrieve certain information like whether you have checked the email as well as the time and the place where the email was opened.
To prevent emails from tracking you, Apple has introduced a security feature called “Mail Privacy Protection (also available in iOS 15) that hides your IP address and loads entire remote images in the background. For enhanced safeguard, Apple routes your IP address through several proxy services and assigns an IP address randomly.
As a result, they are able to view an IP address that corresponds to the region in which you are located. Mail Privacy Protection ensures that advertisers and trackers have access to nothing but approximate information that is non-specific and can’t be used to build a profile of your behavior.
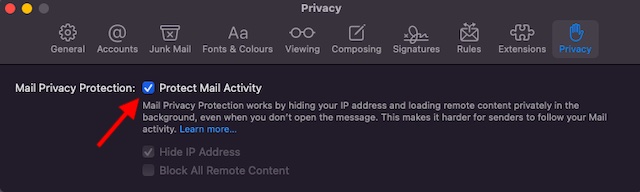
To enable this security feature, open Mail app -> Mail menu at the top left -> Preferences -> Privacy tab. Now, check the box right next to Mail Privacy Protection to safeguard your mail activity. Do note that you also have the flexibility to hide IP address and block all remote content separately even without enabling Mail Privacy Protection.
Hide IP Address from Trackers in Safari
Trackers use IP address to determine personal information like your location, zip code, how you interact with websites, and more. To safeguard your personal information, Safari can hide your IP address. The best part? You do not have to upgrade to iCloud+ for being able to conceal your IP address in the stock web browser on your Mac.
To activate this important security feature, open Safari on your Mac -> click on the Safari menu at the top left -> Preferences. Now, ensure that the Privacy tab is selected and then check the box to the left of the Hide IP Address from trackers option.
Use Your Favorite Shortcut as Quick Action
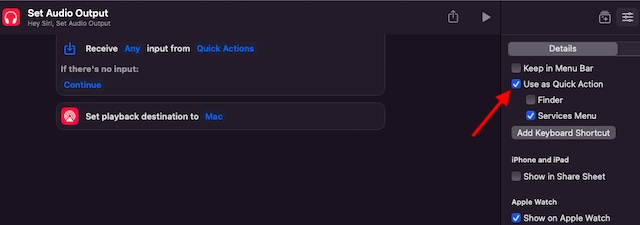
Interestingly, you can also use your favorite shortcut as a Quick Action. For those unfamiliar, quick actions allow you to create workflows that work in the Finder preview pane, Services menu, and MacBook Pro Touch Bar. Head into the Apple Shortcuts app -> a specific shortcut -> menu button (three horizontal lines) at the top right -> Details. Now, check the box to the left of Use as Quick Action. Next, you can choose to use it in Finder or Services Menu.
Customize AirPlay to Mac Settings
Though Apple AirPlay has existed for nearly two decades, allowing users to stream audio and video from one compatible device to another, Macs have lacked the support to receive content using the wireless communication protocol. But that has changed for the better thanks to the introduction of the “AirPlay to Mac” feature in macOS Monterey.
With macOS 12 Monterey, you can now AirPlay from iPhone to your Mac, provided they are connected with the same iCloud account and Wi-Fi network. What’s more, compatible Macs can also function as an AirPlay speaker or act as a secondary speaker for multi-room audio. For a more personalized experience, you can even customize AirPlay to Mac settings.
Navigate to the System Preferences app -> Sharing. Now, check the box to the left of AirPlay Receiver in the sidebar. In the Allow AirPlay for section, you should see three options:
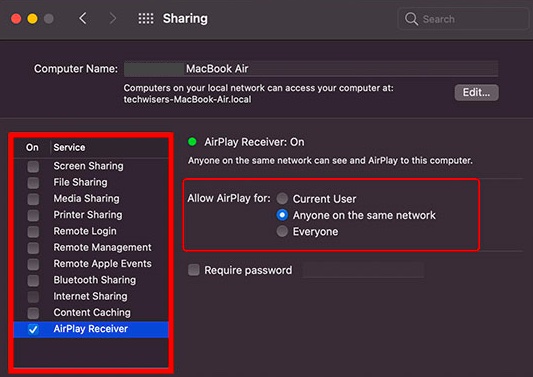
- Current User: Allow only the device connected with the same Apple ID as the Mac to AirPlay content.
- Anyone on the same network: Let anyone on the same Wi-Fi network AirPlay content to your Mac.
- Everyone: Let everyone AirPlay content to your macOS device without any restriction.
It’s worth mentioning that there is also an option to make the requirement for a password a must. Simply, check the box to the left of Require Password and then set it up.
Set Up Verification Code for Secure Password Authentication
If you’re looking for macOS Monterey settings to make your online life easier, well, macOS 12 has come up with a fully-featured password manager. Apart from letting you manage your passwords with ease, the built-in password manager can also let you set up verification codes for additional sign-in security. Yeah, you no longer have to depend on third-party password authenticators for generating verification codes.
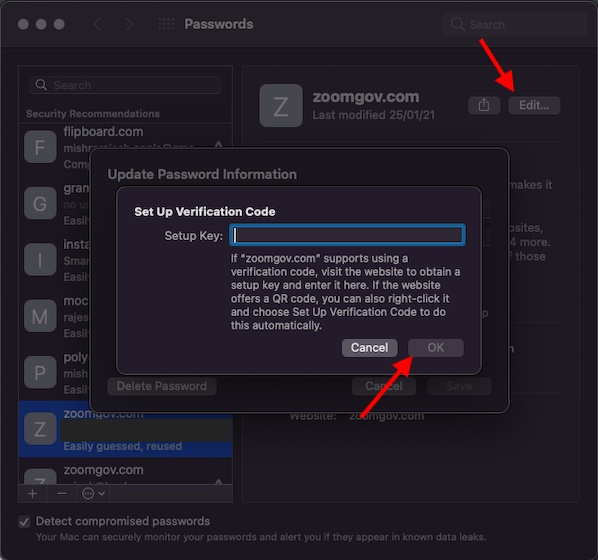
To get started, head over to the supported website and then obtain the setup key. After that, navigate to System Preferences -> Passwords. Now, you should see the list of all the websites that you have saved. Open a saved website and then click on the Edit button at the top right. After that, click on Enter Setup Key and then enter it. Make sure to click OK to finish.
Do note that if the website provides a QR code, you can also right-click it and select Set Up Verification Code.
Add Password for a Website
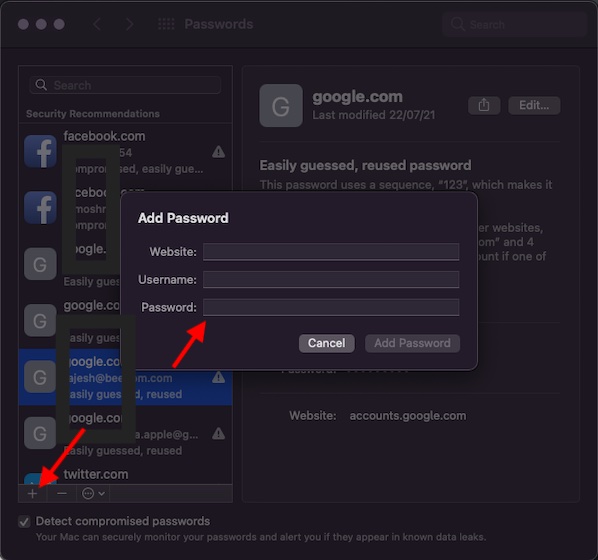
Though macOS lets you save passwords while signing in to a website, you can also manually add passwords and even change/delete them as and when you want. Another feature worth mentioning is the ability to securely share your saved passwords through AirDrop, which will come in super handy in a professional environment. To get going, open System Preferences -> Passwords. Now, you will need to authenticate by entering your passwords. After that, click on the “+” button at the bottom left corner of the screen. Next, enter the website name, user name, and password. In the end, make sure to click Add Password to confirm.
Sort Your Quick Notes
Apple Notes app features a separate Quick Notes folder to let you keep a track of your notes with ease. Moreover, the stock note-taking app also offers a nifty way to let you sort your notes based on your preference. For instance, you can choose to sort your Quick Notes based on date created, date edited, title, oldest to newest, and newest to oldest.
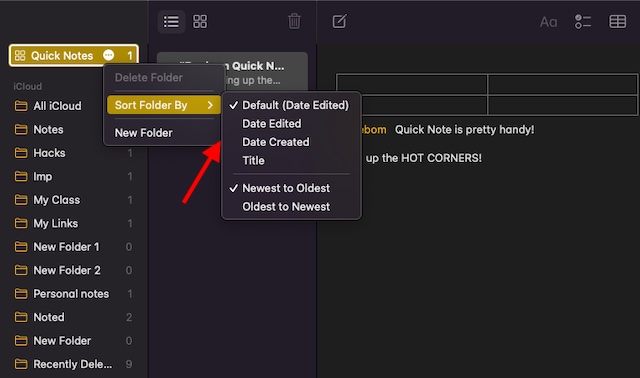
Launch the Apple Notes app on your Mac and then right/control-click on the Quick Notes folder located at the left corner of the screen. Now, click on Sort Folder By and then choose the preferred option.
Show Your Shortcuts on iPhone/iPad Share Sheet and Apple Watch
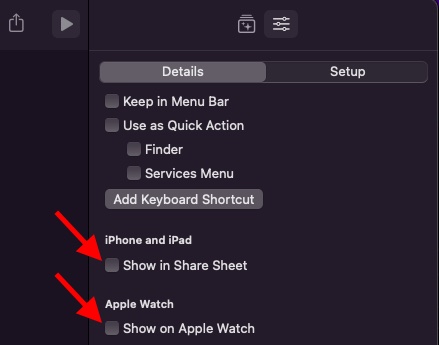
For a seamless experience across the Apple ecosystem, you can also show your favorite shortcuts on iPhone, iPad, and Apple Watch. To me, it’s the best way to get the most out of some of the nifty hacks that are designed to work across iOS, watchOS, and macOS. So, make sure to keep this feature at your disposal. Head into Apple Shortcuts app -> select a shortcut -> menu button (three horizontal lines at the top right) -> Details. Now, check the boxes to the left of Show in Share Sheet (under iPhone and iPad section) and Show on Apple Watch.
Add Legacy Contacts to Your iCloud Account
For people who prefer to stay prepared, changing this macOS Monterey setting is a must. If you want to preserve your memorable photos, videos, curated playlists, and all the thoughtful notes beyond life, Apple Digital Legacy is for you. With Digital Legacy, you can pass down your digital information to your family/friends after your death. It first requires you to add someone you trust as legacy contacts that can inherit your data after you are gone. Notably, you can add multiple legacy contacts, choose what to let them access and what to keep private. Furthermore, you can even revoke their access to your account at your own wish.
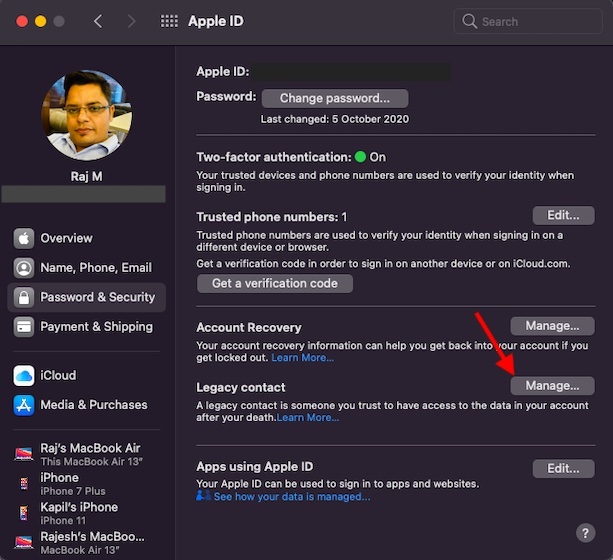
Navigate to the System Preferences app -> Apple ID -> Password & Security -> Now, click on Manage right next to Legacy Contacts. Next, click on Add Legacy Contact. Next up, go ahead with the instructions to add a legacy contact and then share the access key.
Add iCloud Account Recovery Contacts/Set-Up Recovery Key
If you have ever forgotten your Apple ID password and found yourself locked out of your device, you would know how painful it is to regain access to the account. To make account recovery a painless experience, Apple has come up with a highly efficient iCloud account recovery service. It offers two straightforward ways to recover an iCloud account.
- Account Recovery Contacts: iCloud account recovery service lets you add account recovery contacts. If you ever happen to forget your Apple ID password, you can call one of your Account Recovery Contacts to get a shortcode which you will need to enter on your device to unlock the account.
- Set Up Recovery Key: You can also set up a recovery key to restore all of your data. Keep in mind that when you create a recovery key, the only way to reset your Apple ID password is by either entering a recovery key or using another device already signed in with your Apple ID.
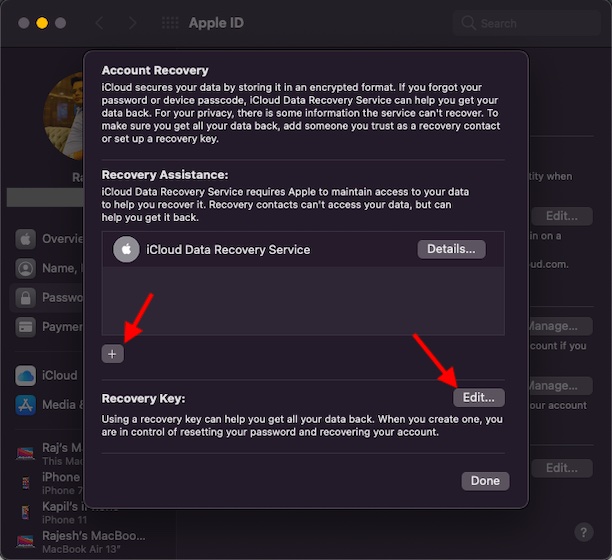
Now that you know how this essential security feature works, head over to System Preferences -> Apple ID -> Password & Security. Next, Click on Manage located right next to Account Recovery. After that, if you want to add a recovery contact, click on the “+” button and then select a contact from your address book. And if you want to set up a recovery key, click on the Edit button and then follow the prompts to create one.
Create a Custom Focus Mode
When you are dealing with a task that warrants more concentration, it becomes indispensable to keep the never-ending alerts and random calls at bay to avoid distraction. And this is where the all-new Focus Mode setting comes into play in macOS 12 Monterey. It’s designed to let you focus on your task or anything that matters to you by keeping distractions at a fair distance.
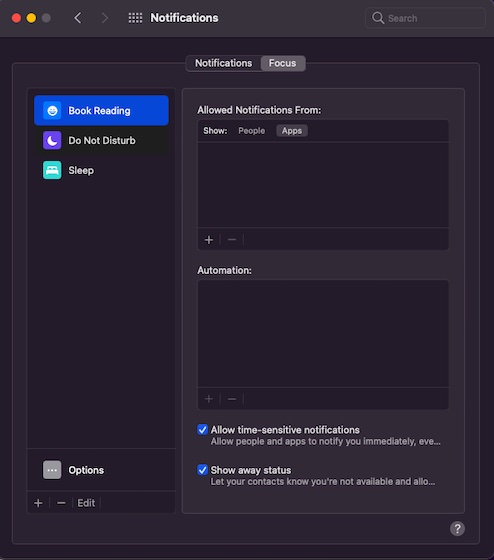
So, if you want to give your best to a task hand, navigate to the System Preferences app -> Notifications -> Focus. Now, click on the “+” button at the bottom left. Next, give a suitable name to your focus and then click Add. Now, go ahead and customize your focus. For instance, you have the option to choose the apps/people you want to receive notifications from and even hide your status from people.
Enable Smart Automation for Focus Mode
If you love Focus Mode, chances are pretty high that you would appreciate the smart automation as well. What makes it such a useful feature is the ability to automatically activate the desired focus at relevant times. Yeah, you don’t need to manually dig into the System Preferences to kickstart a focus every time you wish to bring your entire attention to work, which is probably the greatest USP of this brand-new feature.
Better still, macOS lets you set up three types of automation.
- Time-Based automation: It enables you to activate Focus mode at a specific time.
- Location-Based Automation: It allows you to enable Focus mode at a specific location.
- App-Based Automation: It lets you activate Focus Mode when you open a certain app on your Mac.

Navigate to System Preferences on your Mac -> Notifications -> Focus -> select a focus. Now, click on the “+” button located in the Automation section and then choose the type of automation you want, and then set it up.
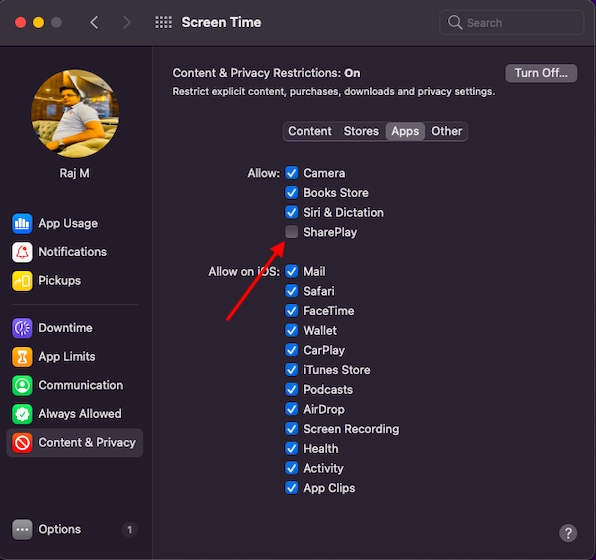
Restrict SharePlay in FaceTime on Your Mac
Do not get me wrong! SharePlay is one of the highlights of macOS 12 and iOS 15. What makes it an exciting feature is the ability to let you watch movies together with your friends and family. In the wake of the widespread pandemic, it’s something that can bring your dear ones together for a fun-loving watch party.
That said, do note that what could be a must for you may be unnecessary for others. So, just in case you no longer want your kid to be part of a watch party facilitated by FaceTime or you simply wish to lock SharePlay to prevent anyone from taking part in FaceTime watch party, Screen Time has got you covered. To get it done, head into System Preferences -> Screen Time -> Content & Privacy -> Apps tab. Finally, uncheck the box to the left of SharePlay.
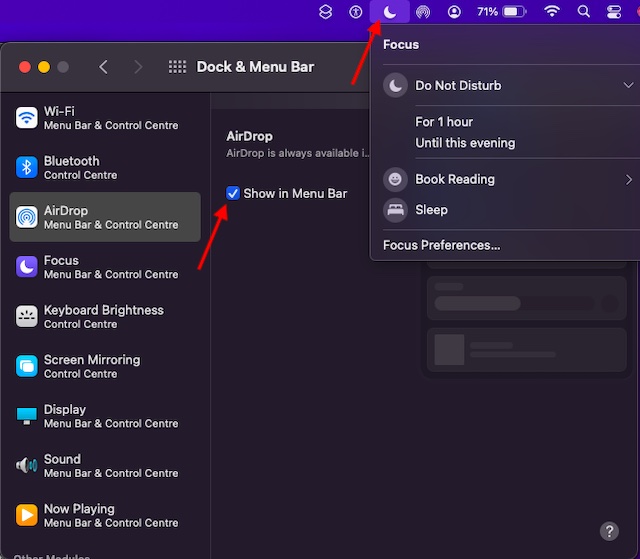
Always Show Focus in Menu Bar
If you are a loyal user of Focus mode, you might want to always show it in the menu bar. Personally, I like to keep Focus mode in the menu bar for quick access. Though Control Center also makes it easy to keep a track of focus, the menu bar icon feels a bit more obvious.
Open System Preferences -> Dock & Menu Bar -> Focus. Now, check the box to the left of Show in Menu Bar. After that, click on the drop-down menu and choose Always. From now onwards, a Focus mode icon will always show up in the menu bar that will let you keep a tab on your focus.
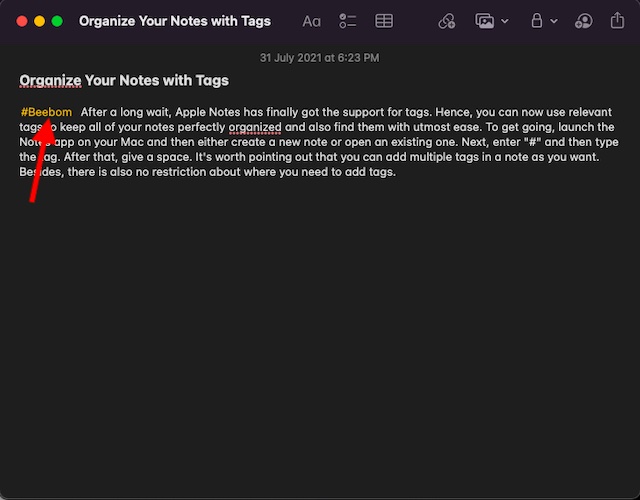
Organize Your Notes with Tags
After a long wait, Apple Notes has finally got the support for tags. Hence, you can now use relevant tags to keep all of your notes perfectly organized and also find them with utmost ease. To get going, launch the Notes app on your Mac and then either create a new note or open an existing one. Next, enter “#” and then type the tag. After that, give a space (For example, #Beebom). It’s worth pointing out that you can add multiple tags in a note. Furthermore, there is also no restriction about where you need to add tags.
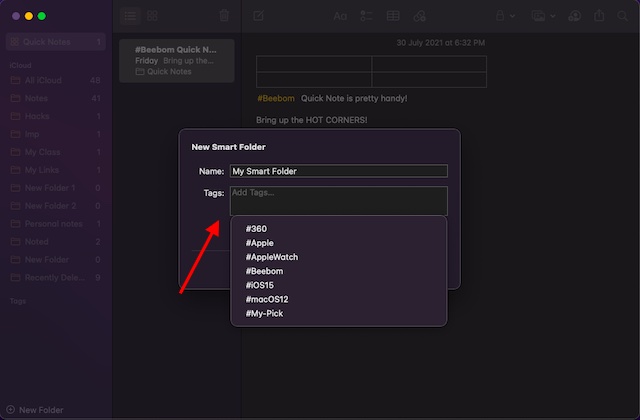
Create a Smart Folder to Automatically Organize Your Notes Based on Tags
Another macOS Monterey Setting you should change is to set up a Smart Folder. This is what you should use to organize your notes without breaking any sweat. Yeah, you read that right! It can let you automatically organize your notes based on your selected tags. So, if you don’t want to spend your precious time categorizing your notes, you should go for this smart automation. To bring this feature into action, open the Apple Notes app and then click on the New Folder button at the bottom left corner of the screen. After that, give a name to your smart folder, select tags, and you are good to go.
Show Battery Percentage in Menu Bar
Though the battery icon does provide a reliable indication about how much juice is left in the tank, I prefer to show battery percentage as it makes the task of tracking battery status a bit more convenient. Just like macOS Big Sur, macOS Monterey also doesn’t show battery percentage by default. Thus, you have to manually add it to the battery icon in the menu bar.
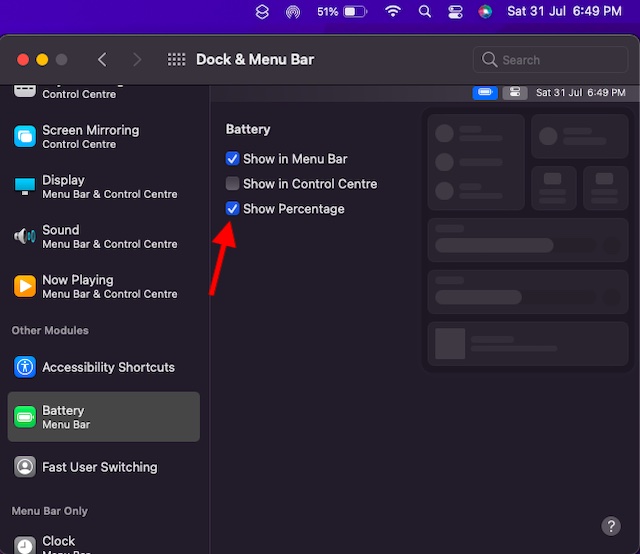
Navigate to System Preferences -> Dock & Menu Bar -> Battery. Now, check the box to the left of Show Percentage. From now onwards, the percentage will appear to the left of the battery icon in the menu bar.
Enable Fast User Account Switching
For a hassle-free account switching on your Mac, I would recommend you to enable the fast user account switching feature. macOS lets you add the user account switching icon in the menu bar so that you can switch user account with ease and that too without having to take the pain of logging out.Launch System Preferences -> Dock & Menu Bar -> Fast User Switching. Now, you can choose to show the user account switching button in the Control Center or Menu Bar.

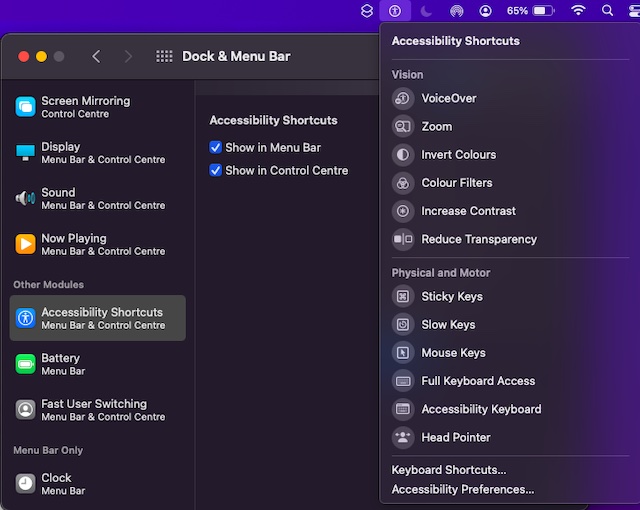
Show Accessibility Shortcuts in Menu Bar/Control Center
Rounding up our list of macOS Monterey settings, last but not least, you should add the Accessibility Shortcuts icon in the Menu Bar or Control Center. If you use Accessibility features like VoiceOver, Color Filters, Invert Colors, and more, the shortcuts will make it way more convenient to activate these features. Launch System Preferences on your Mac -> Dock & Menu Bar -> Accessibility Shortcuts. Now, you can show the Accessibility Shortcuts icon in the Menu Bar or Control Center.
Change These macOS Monterey Settings to Get the Best Experience
That’s it! So, these are the best macOS Monterey settings and tips that you can use for a much-improved user experience. While not all the tips may be a must for you, I bet there could be a handful of your-kind-of macOS hacks. Now that you have unraveled my top picks, it’s time to share your collection. Besides, if you have found any notable macOS Monterey features missing from the above roundup, make sure to let me know them in the comments section below.