- Smartphone cameras have come a long way and are far better than laptop cameras.
- You can thus use your phone's camera as a substitute for the lack of a good camera on a laptop.
- Android offers a "Device as Webcam" feature to use your phone as a webcam but you can also use third-party apps on iOS and Android to do the same.
Smartphones are constantly evolving, packing incredible features like powerful cameras. While laptop and desktop webcams often fall short, your phone’s camera can be a fantastic alternative for video calls and recordings. Ready to unlock this hidden potential? Here are a few simple methods to use your phone as a webcam.
Method 1: Using Device as Webcam Option (Android)
Google pushed an update in Android 14 which added the ability to connect your phone to a laptop or PC and use it as a webcam. This only works when you connect via USB.
The “Device as webcam” feature is currently only supported on a handful of Pixel devices on Beta or Developer Preview software. It was released in Android 14 Quarterly Platform Releases and could debut in Android 15.
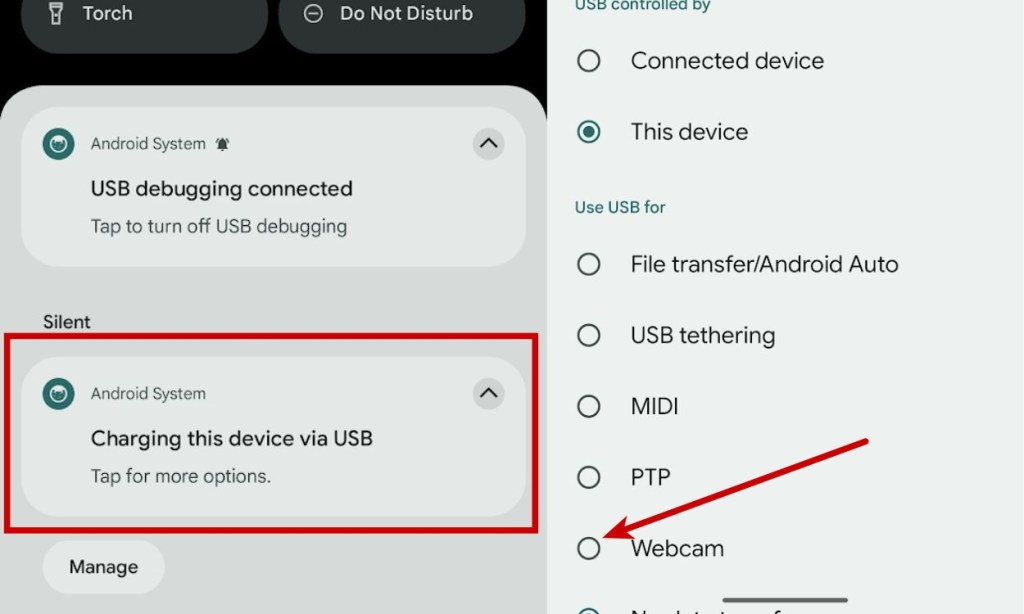
- Grab a USB cable and connect your Android phone.
- Once connected, swipe down to reveal the notifications and tap USB options.
- In the USB Preferences, under the “Use USB for” section, select Webcam.
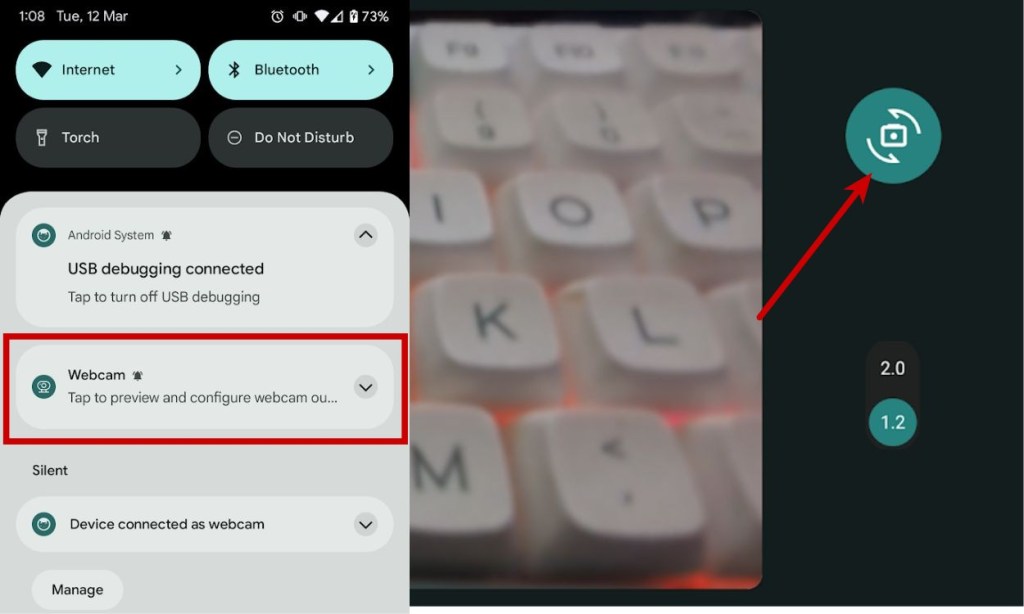
- To configure the camera, swipe down from the top to reveal notifications again and tap the Webcam notification to preview and configure.
- You will then see a preview with the live camera footage and options to zoom in, zoom out, and switch between front and back cameras.
- Once done, you can now go to any video streaming or virtual meeting application to use your device’s camera.
We’ve tested this source on all the popular video conferencing platforms and it worked on every platform. Compatibility should not be an issue.
Method 2: Using a Third-Party App (Android)
There are many Android apps out there that offer webcam functionality on the computer. However, I found DroidCam to be the best as it’s free for the most part and works reliably well. It doesn’t put any watermark and allows you to use both the front and back camera on your smartphone under the free version. However, if you want HD quality and better FPS support then opt for its premium version, DroidCam X ($4.99). Apart from that, the app is available on both Windows and Linux platforms, but not on macOS.
Note:
We’ll be using the wireless method as it’s pretty seamless and easy to configure, unlike the wired method that requires ADB setup. However, for the wireless method to work, both your Android smartphone and PC should be connected to the same WiFi network.
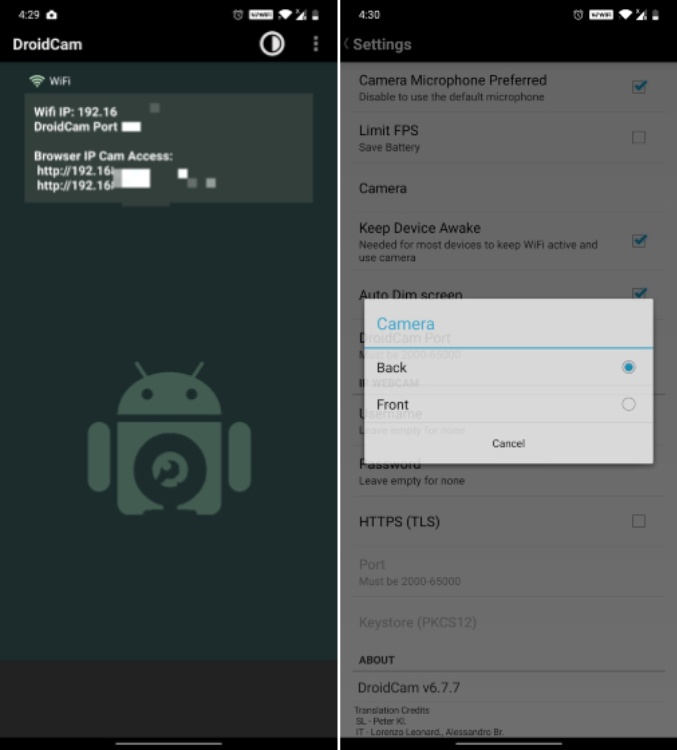
1. Install the DroidCam app on your Android smartphone.
2. Now install the desktop client on Windows or Linux from here.
3. Open the DroidCam app on your Android smartphone and you should see your device’s IP address. Note it down.
4. Launch the desktop client and enter the IP address into the Device IP text field. Following that, enable both “Video” and “Audio”.
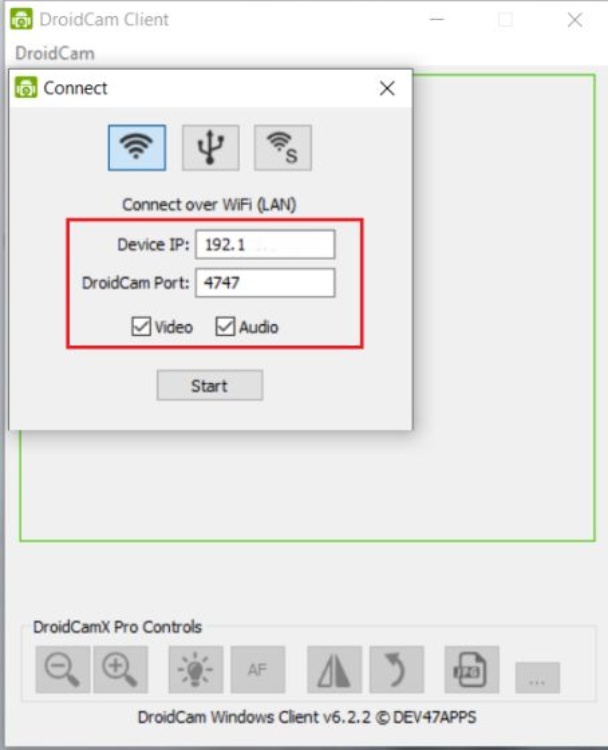
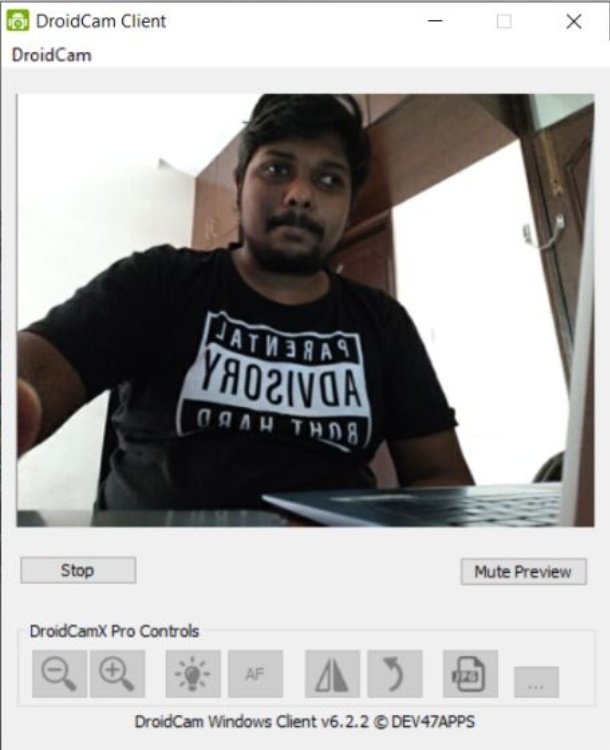
5. Finally, click Start. You should see the live video footage from your smartphone cameras. You can minimize the app or lock the smartphone and the video feed will still pass through.
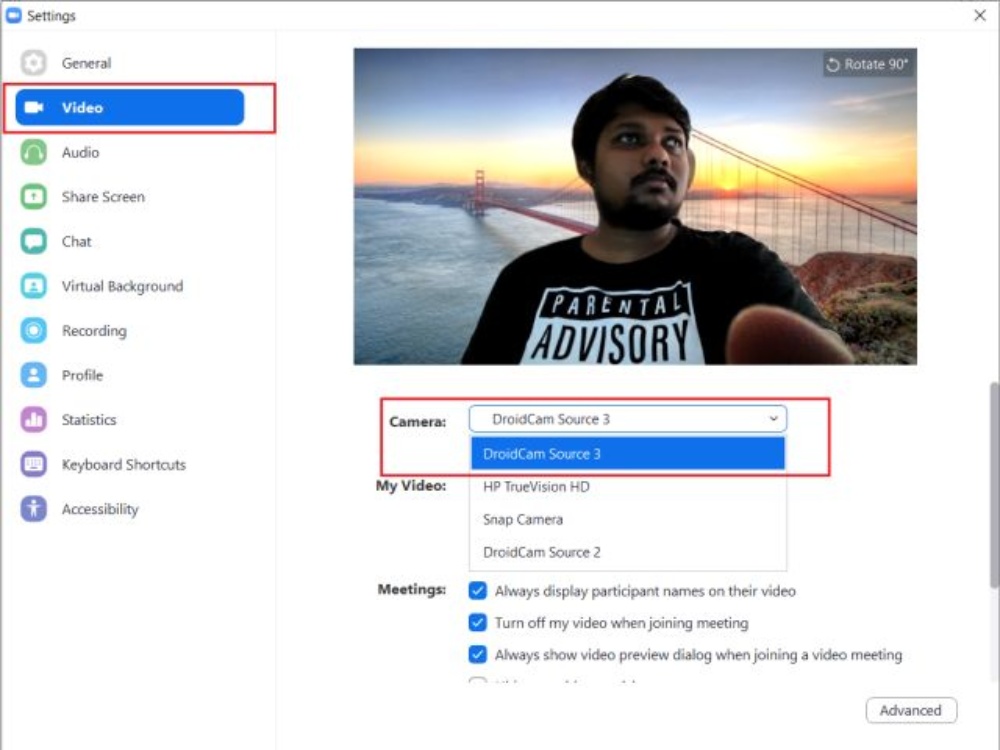
Now that we have configured our Android device as a webcam, we can use it on Zoom, Skype, Microsoft Teams, Meet, and other video conferencing apps. All you need to do is go to their respective settings pages, go to video settings, and change the video source to “DroidCam Source”. Similarly, you can go to the audio tab and change the Microphone to “DroidCam Virtual Audio”.
You can also use the video feed from your smartphone while streaming games using OBS to your favorite live-streaming platforms. Just choose the video source as “DroidCam Source” and you are good to go.
Method 3: Using a Third-Party App (iPhone)
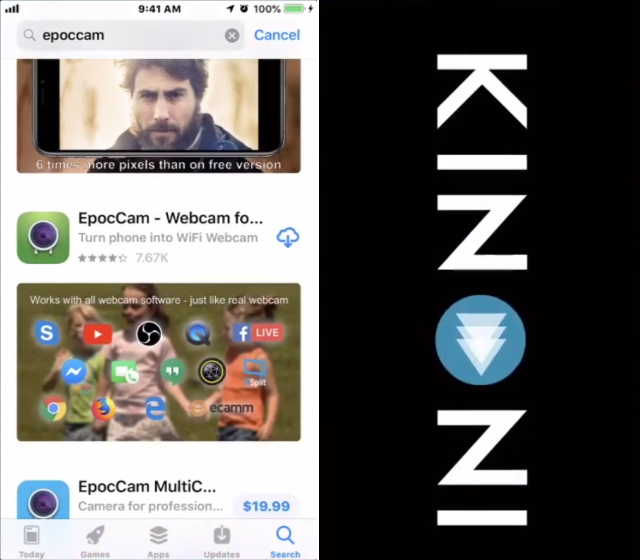
If you want to use your iPhone as a webcam for streaming or video conferencing then you have come to the right place. In this instance, we’ll be using the EpocCam app from the App Store which works pretty well and it’s available on both macOS and Windows.
For starters, the app is free, but I would highly recommend you to get the paid version to access some really important features. Under the free version, you can’t use your iPhone’s microphone and don’t have the option to switch the camera between front and back. With that said, let’s go through the steps and learn how to use the iPhone as a webcam for web meetings.
Note:
For this method to work, both your iPhone and computer should be connected to the same WiFi network.
1. Download and install EpocCam (Free, Pro version at $7.99) from the App Store. After that, install the driver on macOS or Windows from here. Keep in mind, EpocCam does not have a desktop client on macOS but runs and stays active in the background.
2. Now open the EpocCam app on your iPhone. Make sure to not minimize or dismiss the app otherwise the video feed will stop.
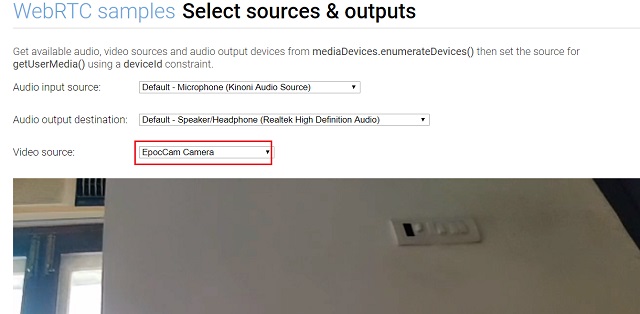
3. To test the video feed on Windows, open EpocCam Viewer from the Start Menu and you can check the stream. While macOS does not have an app, you can test the feed through a web browser. Open this website and you will be able to test the video feed from your iPhone. Make sure to change the “Camera” and “Microphone” to “EpocCam” from the address bar.
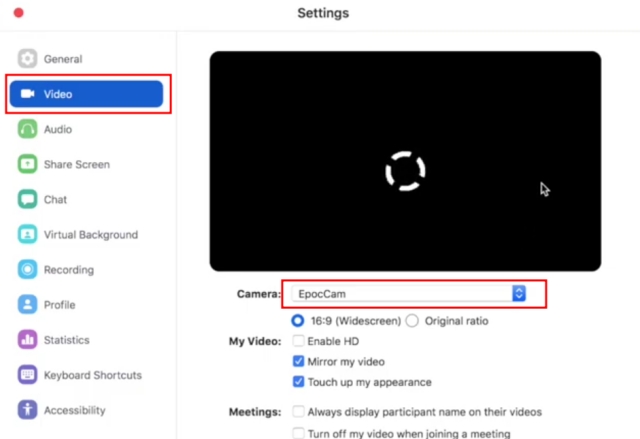
4. Once testing is done, open any video conferencing app on your computer and navigate to the Settings page. Here, I am using Zoom for example. Now, move to the “Video” section and change the camera output to “EpocCam”.
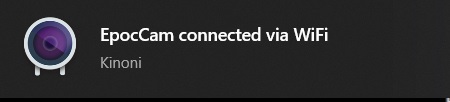
5. Instantly, a notification will appear saying that “EpocCam connected via Wi-Fi.” That’s it. Now, you can comfortably use your iPhone as a webcam on Mac or Windows computer.
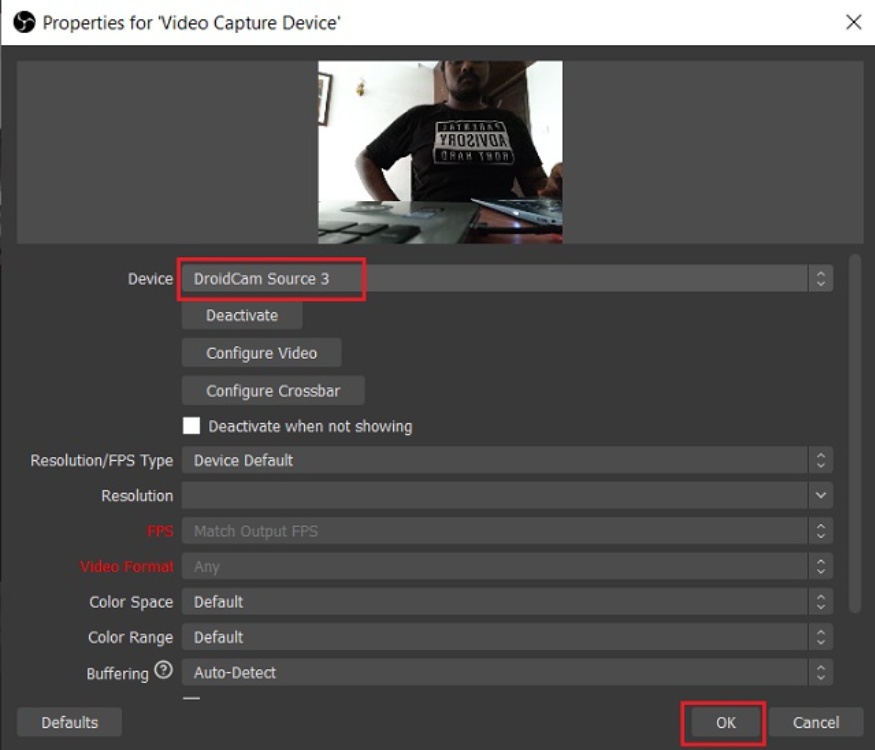
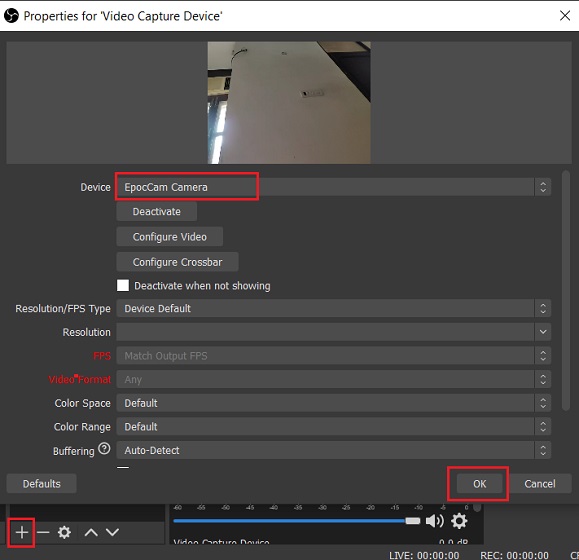
6. If you want to use video feed from your iPhone for streaming purpose then you can do that too. Keep the EpocCam app open on your iPhone and start OBS or any other streaming software. After that, click on the “+” button and select “Video Capture Device”. Finally, choose “EpocCam Camera” from the “Device” drop-down menu and you are all set.
These are the two ways you can use your phone’s camera on a PC. We think it’s worth mentioning another platform called Scrcpy which you can set up to use your Android phone as a webcam. The bad news is, that it only works on Linux because the platform works as a platform when you create a dummy device to stream the mirrored camera output from your screen. Scrcpy is also one of the best tools to mirror your Android screen on Windows or Linux.
Were you successfully able to use your Android device as a webcam by following the above instructions? Do you know of any better apps we should mention in our next revision of this guide? Let us know in the comments section below.
So that is how you can use your phone as a webcam for video conferencing and streaming purposes. I have offered a step-by-step guide for both Android and iOS devices with support for Windows, macOS, and Linux platforms. On top of that, you can also learn how to use your phone as a webcam while streaming games on Twitch or YouTube. Anyway, that is all from us. If you are facing any problem while setting up your phone as a webcam then do comment down below and let us know. We will definitely try to help you out.