AI upscaling technologies like Nvidia DLSS and AMD FSR are all the rage lately, letting you play your favorite games at higher frame rates with no downgrade in image quality. It is a massive win for us gamers, for we no longer need to shell out more money and buy a new GPU for a performance boost. Now, imagine the same thing, but for streamed video content on popular streaming services like Netflix, Hulu, Disney+, and more. Thanks to Nvidia’s RTX VSR technology, the same Tensor Cores that power Nvidia DLSS in games can now work their magic on videos you stream online.
If you are a fellow binge-watcher and own an Nvidia RTX graphics card, you can have lower-resolution web videos upscaled to 4K through Nvidia’s RTX Video Super Resolution technology. Sweet, right? In this post, we will explain how to enable and use the Nvidia RTX VSR on your Windows PC.
How Does Nvidia RTX Video Super Resolution (VSR) Work
The movies and TV shows hosted on streaming platforms are susceptible to compression artifacts (graphical glitches caused by heavy video compression). Have you ever played an old movie on your high-resolution display and noticed jagged edges and a loss of sharpness around the corners? They make the viewing experience somewhat less sweet. This is where Nvidia RTX Video Super Resolution steps in and helps upscale low-res video playback in browsers without much quality loss. Let’s learn how it works:

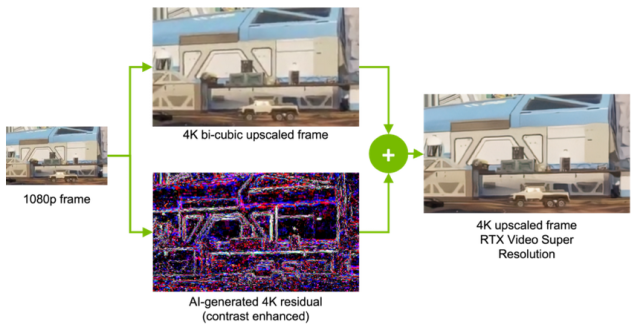
In an official blog post, Nvidia reveals that Video Super Resolution “improves the quality of streamed video content beyond edge detection and feature sharpening.” This feature uses a Deep Learning Network, which analyzes the lower-resolution video and predicts what it should look like at the target resolution. It then superimposes the predicted image on top of a traditionally upscaled image to eliminate any artifacts. Plus, it also sharpens the image along the way, giving you a better output.
Which Graphics Cards Support RTX Video Super Resolution
Before we explain the steps to enable RTX Video Super Resolution, there are a few prerequisites that you need to fulfill. They are:
- Nvidia RTX Video Super Resolution works on RTX 20 Series, RTX 30 Series, and the new RTX 40 Series graphics cards. The support for the 20 Series was added recently.
- Google Chrome (version 110.0.5481.105 or higher) or Microsoft Edge (version 110.0.1587.56)
How to Use RTX Video Super Resolution (VSR) On Your PC
Step 1: Download the Latest RTX Drivers
First, you need to download the latest drivers for your RTX graphics card (version 530 or higher). You can download them from Nvidia’s official website right here. You have to enter the details for your GPU, including the product type, series, and model.
Also, select the operating system and language before you hit the “Search” button. Nvidia’s website will then show you the latest drivers for your card, which you can download and install with ease. We hope you already have the latest Chrome or Edge browser update installed on your computer. For further help on this step, check out our dedicated GPU driver update guide.
Step 2: Open the Nvidia Control Panel
- Next, open the Nvidia Control Panel on your Windows PC. To do this, first right-click on the desktop and select “Show more options” in the context menu.
- Now, a new context menu will open, and you will find the “NVIDIA Control Panel” option. Click on it.
Step 3: Enable RTX Video Enhancement
- Once the Nvidia Control Panel is open, you need to navigate to “Adjust video image settings” at the bottom of the left pane.
- In the right pane, look for the “RTX video enhancement” option. Here, enable the “Super resolution” checkbox, and select a quality level from the drop-down menu. Remember, the higher the quality setting, the better the image quality. However, it will also consume more GPU horsepower.
Step 4: Try Out Nvidia VSR Right Now!
Once enabled, power up the Chrome or Edge browser on your Windows PC. Open your favorite streaming platform and play any video at resolutions between 360p and 1440p (preferably full-screen). Nvidia Video Super Resolution will kick into action and upscale the content on your screen instantly.
Note: If you have a laptop with an Nvidia RTX graphics card, it’s a good idea to plug in the charger to ensure the discrete GPU is enabled. Nvidia Video Super Resolution (VSR) relies on the Tensor Cores built into RTX GPUs, so you will need the dGPU running the show.
Taking your viewing experience to the next level has never been easier. Plus, you don’t have to pay extra for better quality. If you have a compatible Nvidia GPU, I highly recommend turning on Nvidia VSR. In our brief time testing the feature, we noticed that the video had better sharpness and clarity. We hope the steps in this guide proved helpful for you! Which movie would you watch first after turning on the Nvidia RTX VSR feature? Let us know in the comments below.