
The iPad has risen up to become a powerful combination of work and entertainment. More recently, the new features in iPadOS 15 have given even more power to the iPad. However, one of the biggest users of the iPad are also children who use it to consume entertainment in the form of games and TV shows. As we all know though, that the online world is a volatile one, and without proper parental supervision children can be exposed to content they are not fit for quickly. Fortunately, Apple has a whole set of parental controls for the iPad that make parent’s jobs easier when it comes to controlling the amount of exposure children get. So if you’re a parent looking to ensure your child remains safe while using their iPad, here’s how to set up parental controls on iPad.
Set up Parental Controls on iPad (2021)
This guide goes into depth about how you can get started with parental controls on the iPad and goes into detail about the various settings you can use to leverage its power. To learn about a specific setting, use the table below and jump ahead.
Why Do You Need Parental Controls
While you might be hesitant to put parental restrictions on your children’s online activity, there are several reasons why you should do so.
Mobile entertainment has become a solid platform for millions of users around the globe. The iPad specifically has an ironclad grip on this market with its competitive price and a massive set of features. This is exactly what drives parents to get one for their kids and assuming everything will be fine. However, providing unrestricted access to the iPad to your children leads them to spend an unhealthy amount of time on it. Given the environment that revolves around social media today, it is scarily easy for children to get addicted to their iPads and stay logged on for hours at a time.
Therefore, there is a strong need for parental oversight that puts you in control over what kind of content your child consumes on the iPad and for how long. Apple thankfully already acknowledges this dire need and hence has provided a plethora of various features in the form of parental controls on the iPad that can help parents. While earlier you could only change a thing or two, the introduction of Screen Time on the iPad has centralized a lot of settings and made things even easier for users seeking parental controls on the iPad.
So if you’re among the group of parents who are confused about what to do, don’t be. The iPad’s parental controls are very easy to turn on and manage as we will teach you below.
Enable Screen Time on iPad
As we discussed above, Screen Time is Apple’s centralized way of putting all the information you need regarding your device usage in one place. This also contains all the parental controls you can tinker with once you enable it. Enabling Screen Time on the iPad is very easy. Just follow the steps below and get started:
1. Open the Settings app on the iPad


2. Find and tap Screen Time on the sidebar.


3. Tap Turn on Screen Time and a pop-up box will appear. Read the text shown and then press Continue.

4. Depending on who you are enabling this for, select if this is your iPad or your Child’s. We will select the latter as we are setting up Parental Controls on the iPad.


5. You will be met by a couple of informational pop-ups including the option to set up downtime and app limits. You can choose to enable them right now. However, we are going to skip them as they will be covered below.

6. Press Continue on the Content and Privacy box after reading the text.

7. Now it is time to set up a passcode. This passcode will ensure you get access to the Screen Time and Parental Control settings of your child’s iPad. Choose and insert a four-digit passcode.

8. Re-enter the passcode for verification and make sure to remember it or note it down somewhere.

9. The next menu will ask for your Apple ID. This is in case if you forget your iPad parental control passcode and need to recover it. You can enter it or skip it according to your need.

And you’re done! Screen Time has now been enabled on your iPad. Here you find the entire list of parental controls for the iPad along with detailed statistics like iPad and app usage along with a daily average. We shall now use Screen Time to enable the various parental controls on the iPad below.

Turn on Downtime on iPad
Downtime is one of the easiest parental controls on the iPad you can enable. Like the name, the feature allows you to block all but the apps you’ve chosen on the iPad. While the downtime is active, only the selected apps and phone calls will work. To turn it on and configure it, follow the steps below:
1. Go to Settings > Screen Time on the iPad.
2. You will see Downtime as the first option on the list, tap it.

3. On the downtime console you will see two options. You can either choose to manually turn on Downtime until midnight or set a schedule to turn it on automatically. Toggle on Scheduled option.

4. From the list of these options, choose every day or customize days depending on how much control you want your child to have on their iPad. You can choose the start and end times for the iPad’s downtime.

Depending on the option you have selected, you will see the Downtime iPad parental control kick in. The easiest way is to go to the home screen and notice. As you can see below, the icons for various apps have been grayed out.


Since Downtime is on, children cannot access these apps until the downtime has ended. This parental control for iPad is especially helpful when your kids are winding down for bed or for setting general limits.
Set Content and Privacy Restrictions
Children are very prone to consume content not meant for them on the iPad. Screen Time, however, has a full set of restriction settings on the iPad that range from blocking access to app downloads to filtering web traffic. However, to gain access to all those parental controls on the iPad, we need to turn on Content and Privacy Restrictions. Follow the steps below to do so:
1. Go to Settings > Screen Time on the iPad.
2. Find and tap Content and Privacy Restrictions from the Screen Time list.

3. Find and toggle on Content and Privacy Restrictions from the list available.

And you’re all done. Turning this master parental control on has now opened up access to all the other settings we will discuss below. Keep reading to enable them further.
Block App Installs and Purchases
One of the easiest ways children can get access to unfiltered content is through the App Store. Besides not downloading apps meant for them, kids can also accidentally spend a massive amount of money by clicking the attractive boxes meant for purchase. Moreover, kids might start app trials that you might not even know about. To avoid these problems, you can set parental controls on the iPad that specifically block the install and deletion of all the apps in the store along with purchases. Follow the steps below to set it up:
1. Go to Settings > Screen Time on the iPad.
2. Find and tap Content and Privacy Restrictions from the Screen Time list.
3. Tap iTunes and & App Store Purchases.

4. Here you will see a list of options that control the installing and deleting of apps along with purchases. You can also choose to set the iPad to ask for the passcode we made above.

5. Tap Installing apps and tap Don’t Allow on the next screen. Repeat the same with every setting you wish to turn on or off.

You’re all set up. The amazing part here is, instead of blocking every purchase specifically, the iPad just hides the entire App Store. As you can see, searching for it renders zero results and we can’t find it anywhere unless we turn the setting off.

So the next time you want to hand the iPad over to your kids without the risk of any extra purchases or exposure, turn this parental control setting for the iPad on.
Turn off Explicit Content
The explicit content your child can consume can range from music playback to even books they might read. You can choose to turn off explicit content on the iPad so your child only sees ‘Clean‘ content. To turn this parental setting on the iPad on, follow the steps below.
1. Go to Settings > Screen Time on the iPad.
2. Find and tap Content and Privacy Restrictions from the Screen Time list.
3. Find and Tap Content Restrictions from the list.

4. Here you can see various options that you can enable to restrict your child’s access. We will focus on Music and Books. Tap Music, Podcasts, News, and Workouts.


5. Simply choose Clean instead of Explicit and you’re done.

6. Repeat the same with books and you’re done! Your child’s access to explicit content is now restricted and the same will be reflected on supported apps.
Restrict Movies and Shows by Rating
Depending on the age of your children, there are movies and shows that might be suitable for them to watch and vice versa. Thankfully, the iPad takes the guessing game for parents out of it. If you have some knowledge about movie ratings and what they mean, then you can simply restrict access to just a section of movies and TV shows. Follow the steps below to learn how:
1. Go to Settings > Screen Time on the iPad.
2. Find and tap Content and Privacy Restrictions from the Screen Time list.
3. Find and Tap Content Restrictions from the list.
4. Depending on what you want to restrict, tap either Movies or TV Shows. We will choose the Movies section.

5. Here you will see various movie ratings that you can choose from. These ratings will depend on the country you reside in. Tapping a specific rating will ensure your child only sees movies from that age bracket. We will choose UA which stands for Unrestricted with Caution. Simply tap your option and you’re set.

6. You can set ratings for TV shows in the same way and you’ll be all set up.
And that’s it. You don’t need to do anything else to apply this parental control setting on the iPad. The next time your children try to start content that has been restricted, they will automatically be stopped by the iPad.
Filter Website Content
The Internet is full of dubious and unsavory content. Letting your children access every website is a risky practice and one you should avoid. Using a simple setting, you can quickly choose filters available in the parental controls of the iPad and even add your custom websites. Follow the steps below to do so:
1. Go to Settings > Screen Time on the iPad.
2. Find and tap Content and Privacy Restrictions from the Screen Time list.
3. Find and Tap Content Restrictions from the list.
4. Find and tap Web Content from the list.

5. Here you will see three filters that can either give kids full unrestricted access or only limit adult websites. Choosing only allowed websites also shows a pre-made list of kid-friendly websites you can let your children enjoy. If you want to grant or prohibit access to a specific website, tap the Add Website option or choose any of the other ones.

You’re all set. The iPad will now monitor website activity depending on the setting you have chosen and will act accordingly. You can always go back and make changes by following the same steps.
Bolster Privacy
Besides just blocking content that is not fit for children, the Parental Controls in iPad also allow you control over which apps have access to various permissions and features stored on your device. You can choose to restrict things like Location, contacts, microphone, and camera from apps among other options. To know how to do so, follow the steps below:
1. Go to Settings > Screen Time on the iPad.
2. Find and tap Content and Privacy Restrictions from the Screen Time list.
3. You will see a whole list of various permissions under the Privacy tab. These range from location services all the way to Media and even Apple Advertising. Choose and tap any one of them. We will go with Location Services.

4. The next screen will show you the various apps that can use this specific permission along with other options. You can even see a toggle to turn it off altogether. You can either flip this toggle to restrict GPS from every app or click an app to partially restrict it. Find and tap your desired app.

5. The next screen will display the specific location access options along with the option to turn off the precise location. Choose your needed setting and toggle off Precise Location.

You can choose to repeat the steps with all the other permissions and increase the privacy of your children while they access the applications you’ve allowed. Furthermore, if your kids are especially tech-savvy then take this moment to teach them about app permissions and how they affect our privacy.
Customize Siri Search
A sneaky way kids can gain snippets of access to restricted content is through Siri. However, it’s very easy to turn Siri’s web search off or simply disable explicit responses she gives. Follow the steps below:
1. Go to Settings > Screen Time on the iPad.
2. Find and tap Content and Privacy Restrictions from the Screen Time list.
3. Find and Tap Content Restrictions from the list.
4. You will easily have a small menu marked as Siri. Under it, you will see Web Search Content and Explicit Language set to their default settings.

5. Tap Web Search Content and then change the setting to Don’t Allow.

6. Repeat the same with Explicit Language to fully prohibit Siri and you’re all set.
Now when your kids try to search for something online, they’ll be met by Siri denying them access. You can easily lift these parental restrictions by following the same steps and changing them to Allow.
Game Center Settings
Apple’s Game Center is a gaming hub that allows players to socialize through multiplayer matches, achievements, leaderboards, and more. The Game Center serves as a handy tool when trying to game on the iPad. However, if you’re currently trying to limit your child’s online gaming activity, the iPad parental controls feature a separate game center section where you can restrict specific settings. Follow these steps to get to it:
1. Go to Settings > Screen Time on the iPad.
2. Find and tap Content and Privacy Restrictions from the Screen Time list.
3. Find and Tap Content Restrictions from the list.
4. Scroll all the way down on the list of items available and you will all the settings marked under Game Center. You can choose to turn Multiplayer games on/off, restrict your kid from adding friends. Furthermore, you can turn off screen recording if you’re concerned about privacy. We will choose Multiplayer Games.

5. The next page will show settings to either limit or completely turn off multiplayer games. Choose whichever you want and you’re done.

Depending on what settings you adjust, your child’s Game Center will adjust accordingly. Perhaps it’s better to make moderate changes instead of going all out. Moreover, if you’re a gamer parent yourself, then these 50 best iPad games should serve you well.
Find out Which Websites Your Child Visits
For parents who want to keep a watchful eye on what websites their kids visit, Screen Time provides a very easy for you to check. Follow the steps below to get to it:
1. Go to Settings > Screen Time on the iPad.
2. Under the Daily Average window, find and tap See All Activity.

3. Here you will see a list of the apps and websites your child has used or visited. You can change the above filter to Week or Day. You might have to click show more to reveal more info.

4. You can even click on a specific website to find out if the user visits that website often or add a time limit for it.
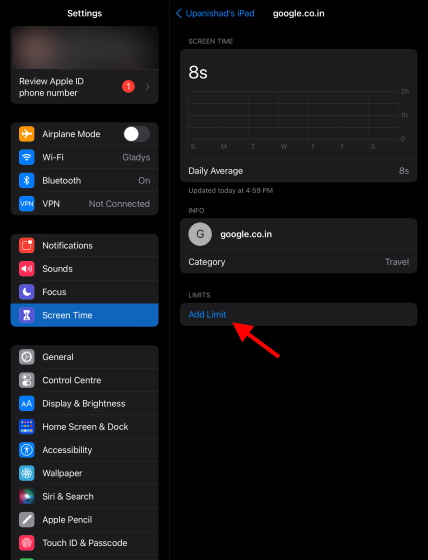
You can use the above steps to keep a watch on what websites your children visit and restrict any of them if needed.
Use These Parental Controls on iPad Wisely
We hope this guide was useful in teaching you about parental controls on iPad and how to go about using them. Besides just entertainment, however, the iPad is an invaluable tool for teaching young children. Whether it’s using the best language learning apps or building powerful iOS apps, the iPad can be used for a lot. Need help on a step? Let us know in the comments below!

