
As of July 2021, you can’t install Windows 11 without a Microsoft account because the upgrade is only available as part of the Windows Insider Program. However, once you have installed Windows 11, you can remove, delete, or de-link your Microsoft account from your PC and use a local account instead. Sure, you will not be able to update to the latest Windows 11 builds and will be unable to access all the cool new features such as Widgets, Android apps support, and more. But you will still be able to use the latest desktop OS, nonetheless. So let’s learn how you can remove a Microsoft account from Windows 11.
Remove Microsoft Account from Windows 11 (2021)
We will show you how to delete your Microsoft Account from any Windows 11 PC in this article. You can do so in several ways, including through Settings, via the Control Panel, and from the User Accounts menu. We will also show you how to create a local account because, without that, Windows won’t let you remove a Microsoft Account from your computer. So without further ado, let’s get started.
Things to Remember Before Removing Your Microsoft Account
Removing a Microsoft Account from Windows 11 is a relatively easy undertaking, as you will see later in this article. However, there are a few things you need to know before embarking on that road. Here they are:
- Firstly, if you want to disassociate a Microsoft account from your PC, change your account type instead of removing your Microsoft account from your computer. This process will retain all your files, folders, apps, and settings. Basically, you will be using the same account with the same data but with a changed name. Plus, you will not be able to access some of the associated Microsoft services and features.
- Secondly, if you have made up your mind, you will need a local account with Admin privileges to be able to remove your Microsoft account from Windows 11.
- Thirdly, removing your Microsoft account will delete all data in that account. We recommend you create a backup if you have important files and don’t want to lose them.
- Fourthly, reports suggest that Windows 11 Home might require a Microsoft account for the installation and setup process, even the stable version. If we go by these reports, only the “Pro” version will let you install the OS with a local account.
- Finally, removing your Microsoft account from a computer will not delete the actual online account. It can still be accessed via a web browser using your credentials.
While a Microsoft account is currently mandatory to install Windows 11, that will likely change once the OS gets a stable release for all compatible devices. That means you technically won’t need to add a Microsoft account to use Windows 11 (at least the Pro version).
Switch From Microsoft Account to Local Account
To use a local account on your Windows 11 PC, you don’t necessarily have to remove your Microsoft account. Instead, you can simply switch over to a local account whereby none of the Windows services can automatically sign you in. In this case, you will have to manually sign in to each service to use them on your computer. So let’s see how you can switch over from a Microsoft account to a local account in Windows 11.
- Firstly, open the Settings app using the Windows 11 keyboard shortcut Windows key + I. From the Settings, click on “Accounts” on the left pane and select “Your Info” on the right pane.


- On the next page, under Account Settings, click on “Sign in with a local account instead“.

- You will now have to confirm your identity before you can make the switch. So on the next page, confirm your Microsoft account ID and select “Next“.


- Now enter your password for that account and hit OK.


- On the next page, enter your user name (mandatory) and a password (optional). Finally, click the “Next” button at the bottom.

Note: You can leave the password section blank because it is not mandatory. If you don’t want a login password for your local account, simply select your user name and move on.
Create Local Account On Your Windows 11 PC
If a switch from Microsoft account to a local account won’t do, you will need to start the process to remove a Microsoft account from your computer. The first step towards that involves creating a local account with Administrator privileges. To create a local account on your Windows 11 computer, follow the steps below:
- Go to the “Settings -> Accounts” section. Now click on “Family & other users” on the right pane.


- Next, switch off your internet connection. Now, find the “Add other user” option and click on the “Add Account” button next to it.


Note: It’s best to do the above step without being connected to the internet. That way, you will get the option to directly create a local account. If, however, you are connected to the internet, select “I don’t have this person’s sign-in information -> Add a user without a Microsoft account” on the next two screens. Then, move to the next step.
- Enter your chosen user name under “Who’s going to use this PC?”. Select a password (optional), re-enter it correctly, and hit “Next“. A new local account will immediately be created with your chosen credentials.


Note: As explained earlier, passwords for local accounts are optional, not mandatory. You can leave the password section blank if you don’t want one for your local account.
Change Account Type From Standard User to Administrator
By default, all new accounts are “Standard User” accounts in Windows 11. That means you will have to now change the account type of your new account to “Administrator” manually. Here’s how you do that:
- Go to the “Settings -> Accounts -> Family and other users” page and click on the user name of the newly-created account. Then, click the “Change Account Type” button next to Account options.

- From the pop-up window, click on the drop-down menu and select “Administrator“. Finally, hit the “OK” button to implement the change.


How to Remove a Microsoft Account from Windows 11
Method 1: Remove Microsoft Account Via Settings
If switching over to a local account isn’t enough, and you want to get rid of a Microsoft account from your Windows 11 PC for good, follow the step-by-step guide below:
- First off, log in from an Admin account, separate from the Microsoft account you are trying to remove. You can either create a different admin account (local or Microsoft) or uncover the hidden Admin account on your Windows PC.
- Next, go to “Settings -> Accounts -> Family and other users“.


- Under Other users, select the Microsoft account you want to get rid of. Now, click on “Remove” next to the “Account and Data” option.

- Finally, confirm your selection by clicking on “Delete account and data” in the confirmation pop-up. This will remove your Microsoft account from that Windows 11 computer.


Method 2: Remove Microsoft Account via Control Panel
Another way to remove or delete your Microsoft account (or any user account for that matter) is through the Control Panel. Here’s how:
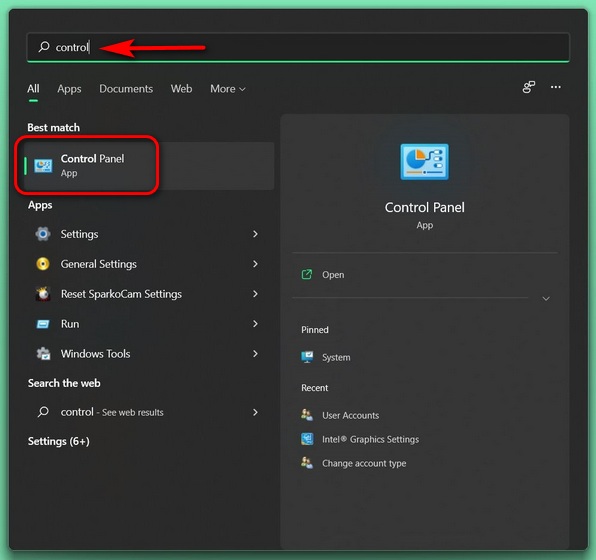
- Open Control Panel on your Windows 11 PC. To do that, search for “control” (without quotes) in the Windows search bar and select “Control Panel” from the results.

- On the Control Panel, make sure you are using the small or large icons view. Then, click on “User Accounts“.


- Next, if you are using the “Category” view, click on “Remove user accounts”. Or, if you are using the “Icons” view (small or large), select “Manage another account“. In both cases, you will end up on the same page.

- On the next page, click on the target Microsoft account.

- Then, select the “Delete the account” option.

- You will now be provided with two options on what Windows should do with your files: “Delete Files” or “Keep Files”. While the first option will delete all the files, the second one will only save some files and not all. Select your preferred option. Irrespective of what you choose, the Microsoft account will be deleted on your Windows 11 PC.

Method 3: Remove Microsoft Account via User Accounts Panel
The third and final way to delete a Microsoft account from your Windows 11 computer is through the User Accounts Panel. Here’s how you go about it:
- Open the “Run” dialog box by using the keyboard shortcut Windows key + R. Now, enter “netplwiz” (without quotes) and hit Enter.


- In the User Accounts window, select the Microsoft account you want to remove and then click on the “Remove” button.


- Finally, click on “Yes” in the pop-up window to confirm your choice. It will remove the selected Microsoft account from your Windows 11 PC.


Use a Local Account on Your Windows 11 Computer
The tutorial above shows you three easy ways to remove a Microsoft account from your Windows 11 computer. So go ahead, follow our guide to delete or de-link your Microsoft account from your PC and use a local account instead. Meanwhile, check out some of our other useful Windows 11 tutorials, including how to turn off notifications in Windows 11, how to stop automatic updates in Windows 11, and how to take screenshots in Windows 11. Finally, if you are finding it hard to adjust to the new OS, learn how you can roll back from Windows 11 to Windows 10 in a few simple steps.

