The power supply unit (PSU) is an essential component in a computer system, as it supplies power to all your PC hardware, including the motherboard, processor, and graphics card. Installing a PSU can be intimidating due to the numerous cables it comes with, but this guide will walk you through the process step by step. The power supply is one of the last things you should install in your PC case, alongside the graphics card. That said, whether you are here to learn how to install a PSU for the first time or perform an upgrade in your existing build, let’s look at how to install the power supply in your PC.
In this guide, we will also help you install the various component cables provided with your power supply, which is something many first-time PC builders find tedious. By the end of this article, you will understand where each power cable plugs into the motherboard. This is a step-by-step guide on how to install the power supply (PSU) inside your PC case.
Things to Consider Before Buying a PSU
Check PSU Wattage Rating
Before installing your power supply, it is important to ensure that it is compatible with the rest of your computer system. You can do this by calculating the total wattage consumption of all your components and comparing it to the PSU total’s wattage. It is generally recommended to buy a PSU where the total wattage is at least 150-200W higher than the calculated consumption to allow for some headroom in case of power spikes.
To accurately determine the wattage needed for your system, you can use OuterVision’s Power Supply Calculator tool (visit). Moreover, it is important to note that several PSU makers may not list the correct maximum supported wattage and offer bad-quality products. We would suggest you buy PSUs from a reputable brand and check the reviews before purchasing.
Checking for an 80 Plus Rating
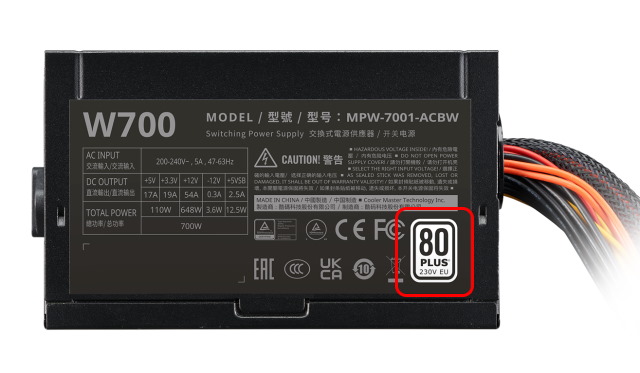
It is important to be cautious when purchasing a power supply unit (PSU) with a high wattage rating but a low price. It may not deliver the advertised wattage and could end up damaging your PC components. so the best way to ensure that you are getting a good-quality PSU is to check for an 80 Plus rating.
For those unaware, the 80 Plus system rates PSUs based on their quality and efficiency, certifying them into tiers, including Bronze, Silver, Gold, and Platinum, among others. Since the power supply is an important component, you must never cheap out and get the best one for your build.
Check Available Power Supply Connectors
Your power supply needs to have sufficient connectors for your CPU and GPU. Some motherboards take dual CPU connectors and newer graphics cards like the GeForce RTX 4090 GPU require at least three PCIe 8-pin connectors. Now, some high-wattage PSUs (including a 1,000W unit) may not have enough connectors for all of your components at times. So ensure your components are compatible with each other, and that you have the required connectors on your selected PSU.
Things You Need for Installing PSU in PC
Gather the Necessary Tools
Before building your PC, gather all your installation materials and tools. In this case, you will need a Philips Head screwdriver. Plus, ensure the workplace is clean and static-free (avoid building on top of a carpeted floor). Also, wear an anti-static bracelet during installation to prevent electrostatic damage.
Install Core Components in PC Case
Before installing the power supply (PSU), make sure to install the motherboard in your PC case, along with all the core components such as the CPU (possibly the Intel Core i9-13900K), memory (RAM), and storage drives. You must also have your hard disk drives (HDD) and 2.5-inch SATA SSDs pre-installed in your case before the PSU installation.
Make sure your motherboard, storage drives, processor, and CPU cooler are installed inside your PC case. The only component to leave out is the graphics card since it’s harder to perform optimal cable routing and management with the GPU installed in the case. Ideally, we first plug in a few power connectors from the power supply and then install the graphics card with its various PCIe power connectors (explained below).
Plug in the PSU Power Connectors

In case you have a semi-modular or fully modular PSU, plug in all the necessary cables before installing it in your computer case. If you have a standard, non-modular power supply, you can skip this step. Otherwise, make sure the following cables are plugged in before placing the PSU inside the case:
- 24-pin power connector: Supplies power to your motherboard, which then distributes power to all the internal components.
- CPU power connector: Provides power to the processor. You might need 2x 8-pin connectors, so check your motherboard.
- PCIe power connectors: Provides power to the graphics card. Depending on the model and make of your GPU, you will need to use a certain number of 6- or 8-pin power connectors.
- Peripheral power connectors (MOLEX and SATA): These connectors are used for your storage drives such as a SATA HDD or SSD. Also, it powers other peripherals such as your case fans, RGB lighting, and more. It is generally recommended to plug in at least one SATA power connector, but if you plan on using multiple HDDs/ SSDs and other peripherals, you may need two connectors. We suggest you consult the documentation for your power supply and other components to determine the number of connectors needed.
Note:
If you have a non-modular PSU, you may continue with the installation guide and not use the extra cables that aren’t required to power any components.
How to Install Power Supply (PSU) in PC Case
1. Once you are ready with your power supply and the installation tools, the first step requires you to figure out where to install the PSU. In most PC cases these days, the power supply shroud a few PC cases, the power supply shroud is usually positioned at the bottom, while in some cases, it is positioned at the top. You also need to ensure the power supply fan has proper ventilation in its final orientation.
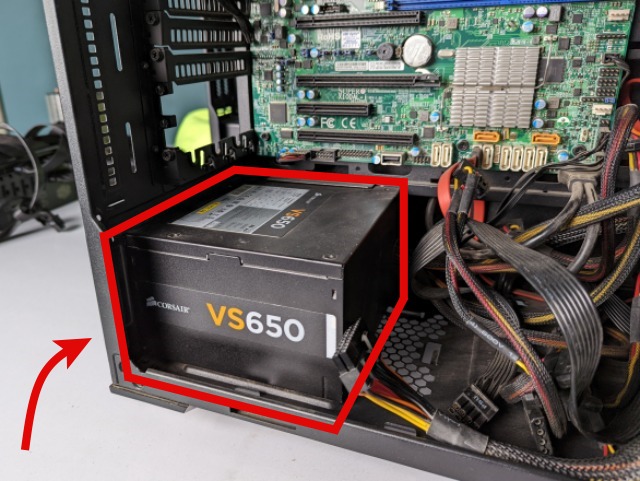

2. Now, place the power supply in its designated location, making sure the power supply fan aligns with the ventilation cutout in the case. In most instances, you have to simply place the PSU with its fan facing downwards.
Note:
The PSU fan must align with the ventilation holes present in your case. If the fan is blocked when facing downwards, you need to change the power supply orientation to ensure the fan can cool the unit properly.

3. When positioned correctly, proceed to screw in the power supply in the PC case. Make sure to tighten the screws diagonally so as to reduce stress on one side of the component.

Connect Power Supply to Motherboard Components
Once you have successfully installed the power supply in the case, it’s time for the most important task – connecting the PSU cables to the required connectors on the motherboard. Let’s learn how to do that efficiently:
1. First, take all the power cables coming out of the power supply and pull them out from behind the PC case (opposite side of the tempered glass one). This is for basic cable management. Then, grab each power connector and route it to the nearest cable management hole on the back side, depending on where it needs to be plugged in on the motherboard. Simply refer to your motherboard manual for the right locations.
For example, here’s what the cable routing looks like in our PC build. Note that if your PC case does not have the proper cable management routing options, you can manage the various cables on a best-effort basis.

2. Next, start by plugging in the 24-pin motherboard power cable and 8-pin CPU power connectors into the corresponding female connectors. When you push the cable in, do it firmly with your whole hand to ensure the connectors are installed perfectly. The highlighted notch on the cable and the motherboard’s side should both snap into place. The same goes for the CPU power connector.


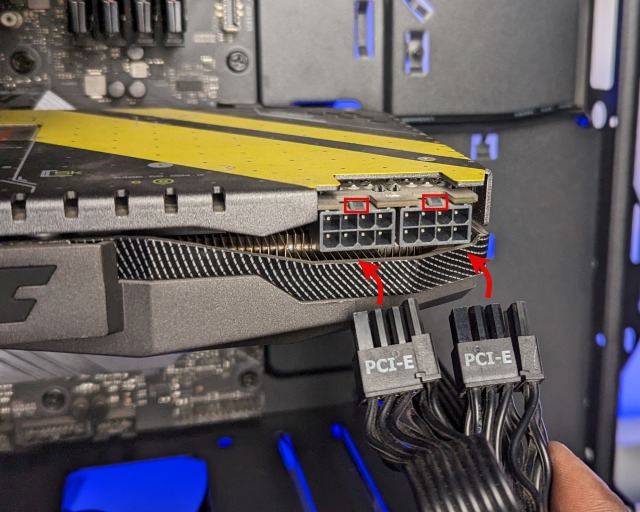
6. Now, install the graphics card on your motherboard and screw it on the computer case. After that, locate the power connectors present on your GPU. Proceed to plug in the 8-pin or 6-pin PCIe power connectors required to run your graphics card. The orientation for plugging in the PCIe 8-pin power cable can change depending on the GPU. You must look out for the notches where the power connector clips in. They are also on the opposite side sometimes.
Note:
Nvidia Founders Edition graphics cards often come with 12-pin or 16-pin power connectors, which are available in newer ATX 3.0 power supplies. For older PSUs, you will need the adapter that comes in the GPU box. In the adapter, you attach the required number of 8-pin PCI-e power connectors on one side and then attach the 12-pin or 16-pin power connector to your Nvidia GPU.
7. Next, plug the SATA power connectors into your hard drive or SSD after aligning them. Also, plug in the required SATA or MOLEX power connectors for the remaining peripherals, such as your PC case’s RGB lighting or fans.

8. Well, you have successfully installed the power supply in your PC case and its various power cables on your motherboard. But there are a few additional tasks you need to do next. So get some zip ties and use them to ensure proper cable management and optimal performance. Securing the cables neatly in place can help improve airflow and give your PC a clean, organized look.

9. Now, you can proceed to finish the rest of the PC build if there’s still something left to install. After that, install the side panels in your PC case and screw them back in place. Lastly, connect the main power cable to the back of the power supply and connect its plug to an outlet. If you get a 1,300W+ PSU, you may need to plug it into a 16A socket. So, check with an electrician as your PSU might work better on a higher-amperage electrical socket.
For those wondering, what do the markings on the power supply switch mean? Here, a line (-) represents the ON state, and the circle (O) represents the OFF state.

10. And that’s it! We hope you have carefully installed the power supply and turned on your new computer. As long as you have installed the rest of your components correctly, and connected the power switch to the motherboard, the PC should turn on by pressing the power button on your PC case.
That’s everything you need to know about the steps you need to follow before and while installing a power supply unit (PSU) and its various power connectors. Following the steps above, you should be able to install the PSU in your PC case successfully. While the process can look somewhat intimidating due to the various power cables and expensive components, it’s easier if you follow the manual and our step-by-step guide carefully. Being one of the last steps in the PC assembly process, we hope your PC build is now complete. Now, if you have any doubts or encounter any issues during the installation process, don’t hesitate to ask for help in the comments section below.
To turn your PC on, flip the PSU switch to the “ON” state, represented by the line symbol. Then, press the power button on your case to turn on the computer. The circle mark on the PSU button means it is in an ‘OFF’ state. Remember to never flip the switch while the PC is running, but you can do so to force shut down when needed by holding down the power button.
Yes, you can easily swap out an older PSU for a new one. You must remove the existing PSU first and make a mental note of where the previous connectors were installed. Then, follow our guide to install a new power supply in its place.
The 16A socket is only necessary for high-end power supplies. Behind the power plug of the PSU, it mentions what amperage it needs to function properly. Then, you can accordingly decide whether to use a 16A socket or not.
It’s not absolutely necessary to connect your PSU to a UPS, as the power supply comes with many protection mechanisms in case of power loss. However, if you are doing important work on your computer, having a UPS will ensure you don’t lose out on the data. PC shutdowns due to power cuts may also suffer from storage corruption. So, most people should invest in a UPS to avoid losing data.
The orientation of the power supply depends on where the ventilation holes are present in your case’s PSU chamber/shroud. Simply ensure that the fan is facing the side where it can pull fresh air in to cool the power supply unit.