The processor (CPU) in your PC always needs to be accompanied by an adequate CPU cooler. So, you need to ensure that your AIO liquid cooler or air cooler is firmly installed on the processor before you mount the motherboard in your PC case. This is a tough task, given the number of cables, mounts, and screws included in the box. But don’t worry, as we will help you successfully install an air cooler or AIO on your CPU in your PC build.
Things to Remember Before Installing CPU Cooler
- Remove Motherboard from the PC case
This guide requires you to remove the motherboard from your PC build. Doing this makes it considerably easier to install the CPU cooler’s mounting hardware.
- Gather All the Necessary Tools
While this is an obvious prerequisite, remember to gather the necessary tools and materials, including a Phillips head screwdriver, cooler mounting hardware, a microfiber cloth, isopropyl alcohol, thermal paste, and an anti-static wrist bracelet to avoid electrostatic damage. If you are unsure about which CPU thermal paste to buy, check out the linked guide.
- Check CPU Cooler Compatibility with PC Build
To check the compatibility of a CPU cooler with your PC build, you need to consider the following:
- The size of the CPU cooler and whether it will fit in your PC case.
- The mounting hardware included with the CPU cooler and whether it is compatible with your motherboard’s CPU socket.
- The TDP limit of the CPU cooler and whether it is sufficient to cool your processor.
If you are overclocking your CPU, you need to buy a CPU cooler with a higher TDP limit. Here are some additional tips for checking CPU cooler compatibility:
- Refer to the product specifications sheet or manual of your PC case and CPU cooler to find the maximum dimensions and TDP limits.
- Check the reviews of CPU coolers online to see what other users have said about their compatibility.
- If you are not sure whether a CPU cooler is compatible with your PC, contact the manufacturer for assistance.
- Check the CPU Socket and Mounting Hardware
After unboxing your CPU cooler, check the instructions manual to find the mounting bracket that matches your motherboard’s CPU socket. For example, we used a Lian Li Galahad 360 AIO in our 13th-Gen Intel Core i9-13900K review, and we needed a mount (screws, backplate, etc.) for the Intel LGA 2066 socket for it.
Use the bracket and its mounting hardware to install the cooler on your CPU. Store the other accessories in case you need to upgrade your PC with a new motherboard.
How to Install CPU Air Cooler in Your Desktop PC
We expect you to be ready with the correct mounting bracket and all the relevant accessories compatible with your motherboard. Also, the installation might vary for different products, so refer to the instruction manual when needed.
1. First, install the correct mounting bracket on the motherboard. There might also be a backplate, which you need to install under the CPU’s socket, behind the motherboard. For our air cooler, no backplate was required. Still, we have given an example below.

2. Next, the other part of the mounting bracket will be installed on the CPU socket’s side. Line up this bracket with the backplate and proceed to screw it down with a Philips Head Screwdriver and the provided mounting bracket screws. You have now installed your CPU air cooler’s mounting bracket in your motherboard.

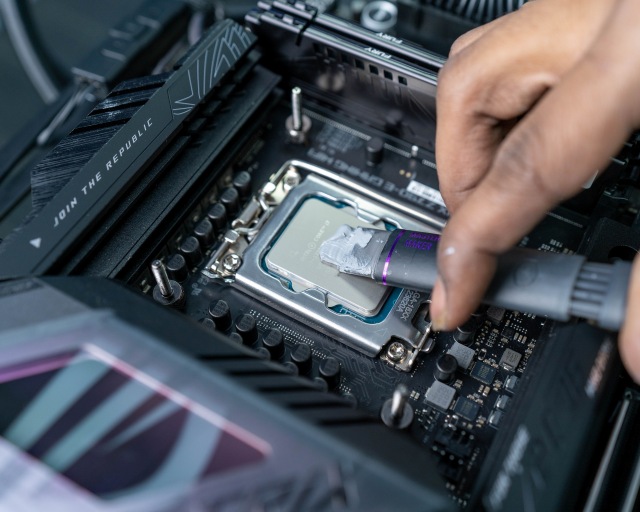
3. Next, apply thermal paste on your CPU with the help of this guide, where we explain how much thermal paste to apply based on the surface area of your processor.
Note: For users upgrading their cooling system, make sure to clean the CPU’s surface beforehand, and also remember that no thermal paste should be spilled on your motherboard. If so, simply clean it with a microfiber cloth and 99% isopropyl alcohol solution.
4. Next, grab the air cooler and position it directly above your CPU, making sure that it is lining up with the mounting bracket that we had installed in the first two steps.

5. Then, you need to lower the air cooler down to your CPU socket as evenly as possible, until it firmly rests on the processor. Try to do this in such a manner that your thermal paste spreads evenly across the CPU’s surface area.
6. Now, install your air cooler on the CPU by screwing it down with your Philips Head screwdriver. Make sure to tighten these screws in a diagonal manner, which ensures that your air cooler mounts on top of the CPU in an even manner.
Note: Some CPU coolers get mounted by lowering the retention clip, as was the case for our air cooler. Also, we did not need screws, but instead got a few plastic nubbins that go on top of the bracket to hold the CPU cooler in place.

7. Well, you have successfully mounted the air cooler on your CPU, but there are a couple of things left for us to do. Get your motherboard manual and navigate to the Cooling system installation section. A different, but similar term might be used in your situation. Here, it will tell you where the CPU fan header is located on your motherboard, and this usually looks like three or four pins.
8. Now, grab the cable coming out of your air cooler’s CPU fan and plug the cable into the CPU fan header (often marked) on your motherboard. If your air cooler has RGB, you might need to plug it into the 5V or 12V RGB header of your motherboard, the location for which is also listed in your motherboard manual.

9. That’s it! You have successfully installed the air cooler on your PC’s CPU. You can move to put together the rest of your PC build or turn your PC on now after closing the side panels if all you were doing is an upgrade to your existing build.
How to Install AIO Liquid Cooler in Your Desktop PC
Since different brands of All-in-One Liquid Coolers tend to have a lot of variation in their installation method, you should keep the manual of your AIO on hand. We recommend using the manual as reference material alongside our step-by-step installation guide below.
How to Install AIO Radiator in the PC Case
1. First, mount the fans on your radiator. Start by positioning them on the radiator unit, where the fans are aligned against the screw holes. If any ‘spacer’ has to be used in your situation, position it on top of the screw holes for your fans first.

2. Now, use a Philips Head Screwdriver and the fan screws (provided in AIO’s box) to install all the fans needed on the radiator unit of your AIO.

3. Next, you need to mount the radiator in an optimal location inside your PC case. To do this, you have to first refer to your case manual to know the optimal locations for mounting the radiator.
Note: For a 120mm-sized AIO, you can install the radiator unit where the PC case’s exhaust fan is located at the back. For your 240mm, 360mm, or other AIOs, you have to mount it at the top, which is usually preferred by most. But you can also install it in the front. Do note that if your AIO is installed at the front, optimally the tubes must come out from the top of the radiator.

4. To install the radiator in your PC case, first position it at the optimal location as you confirmed through its manual just now.
You have to be careful as the AIO’s CPU cooler block will be dangling in the air while you try to install the radiator on your PC case. You should rest your PC case in a horizontal manner to make things easier. Make sure that your AIO’s CPU block doesn’t get damaged while mounting the radiator.

5. Now, screw in and mount the radiator in your PC case with the help of a Philips Head screwdriver and the provided radiator mounting screws. As we said before, keep in mind that your AIO might require washers between the screws for proper clearance, or something else that is specific to your liquid cooler’s design and installation method.

How to Install AIO’s CPU Block
6. Now that you have installed the radiator in your PC case, you need to mount AIO cooler’s CPU block on your processor. To do this, you first need to install the mounting bracket that is compatible with your CPU socket, onto the back of your motherboard.
7. You might have some other mounting bracket parts as well that come with your AIO. Install those things as well. As we mentioned at the start, refer to your manuals for detailed instructions for your case.

8. Next, proceed to mount the motherboard in your PC case with the help of this guide. The correct AIO mounting bracket should be pre-installed on the motherboard before you screw the motherboard into the PC case.
Note: As you can see, we placed the AIOs box next to the PC case, so that we can rest the AIO’s CPU block on it safely. You can do this to ensure no damage is done to your expensive hardware.

9. Next, install the thermal paste; the correct amount as per your processor’s surface area.
10. Before proceeding to the next step, make sure that you also remove the plastic covering on your AIO’s underside, where the contact plate is, which rests on top of your CPU’s surface area.

11. Now, mount your AIO’s CPU block unit on top of your processor by aligning it against the mounting hardware we pre-installed in the previous section.

12. Then, press down on the AIO block such that the thermal paste spreads evenly. After that, use the various mounting hardware relevant to that bracket, and a Philips Head Screwdriver, to securely screw the AIO CPU block unit to your motherboard.

13. And that’s all. You have successfully mounted the AIO Liquid cooler on your CPU, but there are a couple of things left for us to do.
Your AIO needs two main cables to be plugged in to function properly – the CPU fan header, in which all your radiator fans have to be installed. Also, you need to plug in the AIO pump into its header. You can refer to your motherboard manual for knowing the specific location of these headers, and we have highlighted it below.
Note: If your motherboard does not have an AIO pump header, don’t worry. Plug it into a different fan header on your motherboard and then set that fan’s speed to 100%. This will ensure the pump is working well.

If you have any RGB on your AIO, do refer to its manual as we cannot elaborate on the steps to install the lighting system in this guide; it differs from brand to brand.
We hope that after following our steps carefully, your All-in-One Liquid Cooler is mounted perfectly on your processor. You may continue building your PC by installing the rest of the components. If you were upgrading an existing system with a brand new AIO, then you have to install the motherboard’s connections again. Then, you can turn on your build to witness the glory of your new AIO liquid cooler.
How to Check If CPU Cooler Is Working Properly
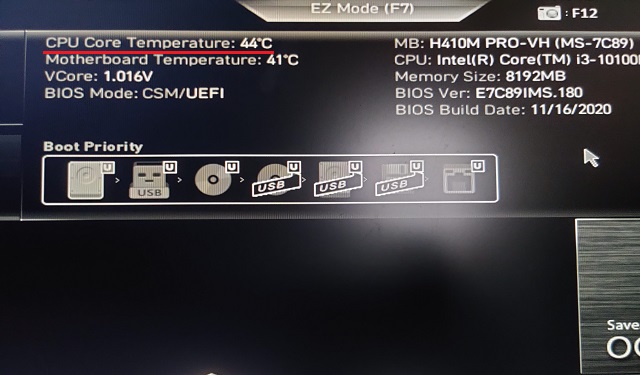
The final step of the guide involves checking if the CPU air cooler that you have installed is working optimally or not. It shouldn’t cause any throttling issues to your processor. To do this, enter the BIOS with the F2 or Delete key. Then, navigate to the temperatures section where you can see your CPU Temperature. In the BIOS, your CPU is not getting stressed in any way. So, it is essentially idle and in that state, your CPU temperatures should ideally be between 30 to 50 degrees Celcius.
In the BIOS, you can also set a fan curve easily without requiring any additional software to do so. We recommend an aggressive fan curve if your CPU runs at very hot temperatures. For example, the Core i9-13900K reaches up to 100 degrees Celcius during intensive loads. But, as we described in our review, these kinds of chips are designed to run at their maximum potential. It’s quite normal for them to regularly hit their thermal limits. If your CPU is an efficient one, which remains at relatively chill temperatures, then you can set a fan curve that is more noise-focused.
To check your CPU temperature, refer to this guide which includes various apps that can help you keep track of your processor’s thermals. Put your system on load by doing a stress test such as Prime 95 or Cinebench R23. You can also run an intense game like Cyberpunk 2077, which stresses everything on your system quite heavily. Then, observe the CPU temperatures and judge if they are in line with what you expected out of your AIO or Air Cooler, in comparison to the TDP limit on the spec sheet that it is supposed to effectively cool down.
First, find the CPU_FAN header on your motherboard. Then, plug in the CPU cooler’s 3-pin or 4-pin fan cable into it, and you will have successfully plugged in your CPU cooler to your motherboard.
Yes, in most cases. While it is possible to install the mounting hardware and the CPU cooler onto a pre-installed motherboard, we don’t recommend doing so, as the installation process becomes more complicated.
No. An All-In-One Liquid Cooler (AIO) should never be disassembled, since the coolant inside of it is designed to withstand long-term use without failing or needing a replacement. If something does go wrong, make sure to claim the manufacturer’s warranty and send your AIO for RMA.
After plugging in the CPU cooler’s fan to the headers on your motherboard, you will be able to control its speed in accordance with the temperature in your BIOS. There are also various profiles available like ‘Performance’, ‘Silent’, and ‘Full Speed’.
CPU Cooler works by transferring the heat of your processor all the way up to its fins, through the heat pipes. Your processor remains cool because this entire unit is cooled down by the fans.
An improper installation can surely damage a motherboard, so take the time to refer to your manual if needed. You can follow our above-mentioned steps to install the CPU cooler successfully on your PC, without running into any issues.


