The autofill form option in modern browsers is useful and takes the annoyance out of signing into different websites with different credentials. However, it could also prove to be a privacy nightmare, especially if you use a shared computer or smartphone. So to help safeguard your login credentials, we will show you how to disable the autofill option for forms and websites in Google Chrome on desktop and mobile in this article.
Disable Autofill in Google Chrome: A Detailed Step-by-Step Guide (2021)
Autofill is usually enabled by default, but all major web browsers let you disable it for obvious privacy reasons. Turning off the feature is often the right move, even though it makes signing into websites a little less convenient. So without further ado, here’s how you can disable or turn off the autofill feature in Google Chrome:
Turn Off Google Chrome Autofill on Desktop (Windows, Mac, and Linux)
Note: We are using Chrome on Windows for the purpose of this demo, but the process of disabling form autofill is identical on Mac and Linux computers.
1. Open Google Chrome on your computer and click on the three-dot menu button at the top-right corner. Then, select “Settings” from the drop-down menu.

Note: You can also get to the Settings directly by copy-pasting chrome://settings into the Chrome address bar and hitting Enter.
2. In the Settings window, find the “Auto-fill” section, and disable autofill individually under three categories — Passwords, Payment methods, & Addresses and more.

3. First off, click on “Passwords” and switch off the toggle next to “Offer to save passwords”. This will prevent passwords from being saved and auto-filled on your device. Also, toggle off the “Auto sign-in” option if it isn’t turned off already. This will ensure that the browser doesn’t automatically sign you into websites using stored credentials.

4. Now go to the “Payment methods” section under Auto-fill in Chrome. Turn off the toggles for the “Save and fill payment methods” and “Allow sites to check if you have payment methods saved” options on the next page.

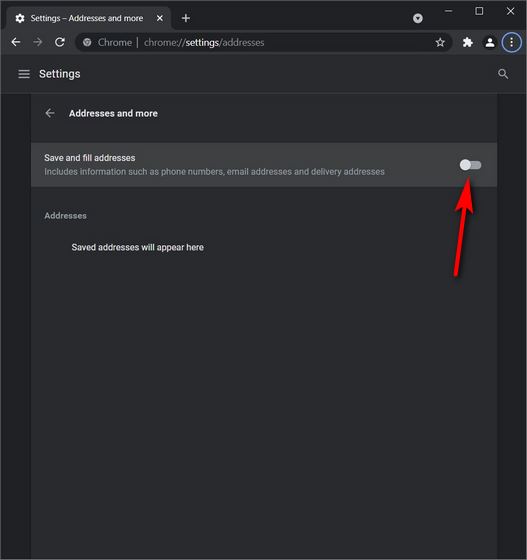
5. Finally, repeat the above process for “Addresses and more”. Basically, switch off the toggle next to “Save and fill addresses” to stop Google from suggesting phone numbers and addresses while filling out forms.
After you disable autofill in Google Chrome, it will no longer fill any information in any forms on your computer in the future. To re-enable autofill in Google Chrome, retrace your steps and switch on all the toggles you turned off in the steps above. You can also turn on only one or two of the toggles depending on what information you want Chrome to autofill.
Delete Autofill Information in Google Chrome on Desktop
For complete privacy, we also suggest you delete all your saved passwords and other autofill information from Google Chrome. That includes credit card information, phone numbers, addresses, etc.
To do that, check out our tutorial on how to delete history in any major web browser. Make sure to check the “Autofill Form Data” option while clearing your browsing history.

Turn off Autofill in Google Chrome for Mobile (Android and iOS)
Note: The screenshots here are from Chrome for Android, but the process of disabling autofill on Google Chrome for iOS remains identical.
1. On your Android device, open the Chrome app. Then, tap on the three-dot menu button at the top-right corner and select “Settings” from the drop-down menu.

2. Now, just like on the desktop version, you have to disable autofill individually for all three categories – Passwords, Payment methods, & Addresses and more. So first, tap on “Passwords” and switch off the toggle next to “Save passwords“. Of course, the “Auto Sign-in” option should also remain unchecked to prevent the browser from automatically signing you into websites.

3. Next, go back to the Settings page and select “Payment methods“. Then, turn off the toggle for the “Save and fill payment methods” option.

4. Finally, go to the “Addresses and more” section and disable the toggle next to “Save and fill addresses” in Chrome. This ensures that the browser will no longer offer to save your form information and implement autofill on your Android or iOS phone.

Delete Autofill Information in Google Chrome on Android and iOS
To ensure complete peace of mind, delete all of your saved autofill form information by clearing the browsing history from Google Chrome on your Android or iOS phone.
1. You can do that by first going over to the Settings page as described earlier and then selecting “Privacy and security -> Clear browsing data“.

2. On the next page, go over to the “Advanced” tab and select “All Time” from the drop-down menu next to Time range. Finally, ensure that the “Autofill form data” option is checked before hitting the “Clear Data” button.

To re-enable autofill in the Google Chrome app on your smartphone, retrace your steps and switch on the three toggles you turned off in the steps above.
Bolster Your Privacy by Turning Off Autofill in Chrome
Autofill is a cool and powerful feature to have as long as you are not using a shared PC. However, in case you are not the only one using the device, it could become a major privacy issue. In some cases, it may even result in real-world damage if the device falls into the wrong hands. Hopefully, this detailed tutorial will help you protect yourself from such scenarios. Meanwhile, as a privacy-conscious user, we also suggest you check out some other privacy-related tutorials, including how to change DNS settings in Windows and how to improve security and privacy in iPhone. Finally, learn about the best browsers for privacy on Android and iOS.