No one can deny the fact that macOS is a great operating system. Since I bought my first Mac, I have fallen in love with it and have never looked back. Although I have been using a Mac since last two to three years, I am always fascinated by its hidden features which I keep on finding, time and again. Especially with the macOS updates, like macOS Sierra and macOS High Sierra bringing some great hidden features. In fact, over time I have built a list of Mac tricks which are not only cool but also practical when it comes to regular day-to-day use. Today, I am going to share this list with you. Some of you might already know some of the tricks on the list but I am pretty sure none of you will know all of them. So, if you are ready to learn something new about your Mac, here are 17 cool Mac tricks you may not know:
Cool Mac Tricks You Should Know
1. Show Full File Path In Finder
When I first moved from the Windows to the macOS system, the thing which frustrated me the most was its file organisation structure. I always knew where my files were on my Windows machine as I could categorise the files in different drives and folders. Since the Finder saves all the files in one drive and the only way you could organise files is by creating folders, it becomes confusing especially for the new users. Moreover, unlike Windows, there’s no file path shown in the Finder window which makes it harder to navigate.

Fortunately, there’s a way using which you can the file path in the Finder window. To do that, open the Terminal app, copy and then paste the following command, and hit return/enter.
defaults write com.apple.finder _FXShowPosixPathInTitle -bool YES; killall Finder
Now you will be able to see the file path in the Finder window (look at the pictures for clarity). To go back to the original setting just replace the word “YES” with “NO” in the code block.

2. Batch Rename Files
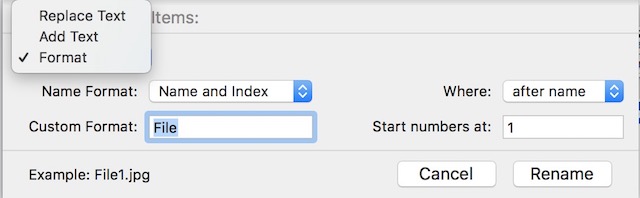
In my work, I have to take a lot of screenshots and renaming them one by one can be a pain. I am sure, at some point in time, you might also have felt the need of renaming multiple files. Well if you did, there’s an easy way to do that on your Mac. Just select all the files and right click (control+click). Now, Select the “Rename X items” from the right click menu.

You will now see a drop down menu where you can select the format and choose your naming scheme. If you can’t see the format option (you might see “Replace or Add Text”option), just click on the menu item and select “Format”. Look at the picture below for more clarity.
3. Lock Your Mac with Keyboard Shortcut (Needs High Sierra)
Another cool Windows feature which was missing in macOS was the lack of a keyboard shortcut to lock your device. The only way to lock your Mac was to make it sleep. The major problem for me because of this was that I had to keep my Mac unlocked while I was downloading something which is not an ideal situation. But, now with macOS High Sierra, you get the option to lock your Mac with a keyboard shortcut. To lock your Mac, just hit “Command+Control+Q” and it will lock your device. Alternatively, you can also access the picture by clicking on the Apple menu.

4. Create Smart Folder To Automatically Categorise Files
Smart Folders are a feature that most of the Mac users know about but rarely use. However, I would argue that they can be very useful if you know how to utilise them. For example, I have a Smart Folder which pulls all the written documents created in the last week and keep it there. Thus, my writing folder is not cluttered while still giving me access to previous weeks files. In the same way, I have a folder which saves all the pictures (screenshots) taken in the last 24 hours. You can design the Smart Folder as per your work type.

To create a Smart Folder, open Finder, click on the file menu and select “New Smart Folder”. You will see a folder open where you can set rules as per requirement. To add rules click on the (+) icon. For example, I have my rules set to show all files which have been created in last one week (1st rule) which are documents (2nd rules). It might take a little time to utilise the Smart Folders but once you do you will never go back.

5. Quickly Type Emojis on Mac
Emojis are loved by almost everyone. This is a craze which is refusing to die. Although, you might have known that you can use emojis on your Mac, did you know that you could fetch them with a simple keyboard shortcut, I didn’t think so. To get to emoji keyboard, just hit the following key combo, “Control+Command+Space” and the emojis will appear out of nowhere.

6. Enhance Your Spotlight Search
For me, Spotlight is the key to my productivity on my Mac. It allows me to quickly find files and launch programs which otherwise would take a lot of time. We all search for things in the Spotlight by typing the full name, but there’s even a quicker way to do that. Instead of typing the name, you can just type the initials of the app or the file you are searching for. For example, you can type “AS” for App Store, GB for Garage Band, and so on.

One cool thing which might not that be practical but is fun to use is searching in the Spotlight using emojis. Yes. you read that right. You can type emojis in your spotlight to search. For example, you can use the pizza emoji to find pizza places near you. Not really useful, but still a fun trick to check out.

7. Enable Double Tap To Insert Period (Needs Sierra)
Something which I like about smartphone keyboards is that they use unconventional ways to make your typing experience smoother and quicker. One of the features that help in doing that is the double tapping on the space button to insert a period. Well, if you wanted that feature on your Mac, there’s a way you can do that. Just go to, System Preferences->Keyboard->Text and enable the “Add period with double-space” option.
 8. Change Dock’s Hiding and Showing Animation
The Terminal is a very handy tool which can be used to change a ton of features on the Mac. The next few tricks will be utilising the Terminal on the Mac, so let’s get started with the first one. Most of the users who want to utilise the full desktop space tend to keep their dock hidden. However, the animation to show the dock is pretty slow. Thankfully, using a simple command line you can speed up the animation or totally remove it if you want to. To disable the animation, open the Terminal and paste the following command and hit enter/return.
defaults write com.apple.dock autohide-time-modifier -int 0;killall Dock
To speed up the animation, use the following command.
defaults write com.apple.dock autohide-time-modifier -float 0.12;killall Dock
To go back to the original settings, paste the following command.
defaults delete com.apple.dock autohide-time-modifier;killall Dock
Unfortunately, I cannot show the results in a picture, so try it out for yourself and decide on the one you want to keep.
9. Keep The Mac Awake
We all know that Mac’s go to sleep after a little while of inactivity and most of the time it is good as it saves power. But, when you are downloading a large file the same feature becomes irritating, to say the least. Of course, you could go to System Preferences and change the settings but it takes a lot of time and you have to change the settings again after you are done. However, you can do the same thing easily by using a simple Terrminal command.
Caffeinate -i -t 'time in seconds'

Now, the Mac will not sleep for the amount of time you have specified in your code. Remember the time is entered in seconds so calculate accordingly.
10. Change Screenshot File Type
The Screenshots you take on your Mac are saved in the PNG format. Although there are a lot of advantages of using PNG files (for example, they are lossless), they also come with a major drawback. PNG files are generally much larger in size as compared to other file formats such as JPG. JPG files take less space while retaining almost the same image quality. This also makes them the go-to format for sharing around the internet. Using a simple Terminal command, you can tell your Mac to save the screenshots in the format you want. For taking a screenshot in JPG format, use the following command.
defaults write com.apple.screencapture type jpg
You can also save the screenshot directly in the PDF format. Just replace the word jpg in the command line with PDF or PNG to go back to the default format.
11. Know Which Apps Are Hidden
I always prefer the hiding function in the macOS over the minimising function as the hiding function allows me to bring back the app by just using the “Command+Tab” keyboard shortcut, something I cannot do if I have minimised the app. However, if you have kept a lot of apps on your dock, there’s no way to exactly know which of them are hidden just by looking at it. An easy way you can use to identify the hidden apps is by using the following Terminal command:
defaults write com.apple.Dock showhidden -bool TRUE; killall Dock
![]()
Now, whenever you hide an app’s window the app’s icon will be a little greyed out as shown in the picture. If you look closely you can see that the Terminal and the Safari icon are a little bit greyed out. To revert back, just replace the word TRUE with FALSE inside the code.
12. Use Siri To Get More Things Done (Needs Sierra)
At first glance, Siri might not seem that useful on the macOS. However, it can make your life easier if you let it. You can change system preferences, send out a tweet, search on the web, pin the results of your search on the “Today Panel”, and do so much more. To add the search results to your “Today Panel”, just click on the + sign present at the top of the result.

Also, macOS High Sierra allows you to type to Siri which according to me is a more convenient method if you are on a Mac. To enable type to Siri, go to System Preferences->Accessibility->Siri and enable “Type to Siri”.

13. Advance Multi-text Selection
If you want to select multiple blocks of text and paste it somewhere else, you don’t have to do it separately for each block. Just hold the Command button and select the blocks you want to and then copy it.
 Now when you paste the text anywhere all the text blocks will be pasted together just as shown in the picture.

14. Create Custom Keyboard Shortcuts
Keyboard shortcuts are one of the most important tools in a Mac user’s arsenal. They allow you to get more work done without even lifting your fingers away from the keyboard. Although, apps come with their own inbuilt keyboard shortcuts, did you know you can create your own shortcuts for any app? I love this feature as it has helped me to improve my productivity by getting the things done quicker.
For example, there’s no keyboard shortcut for resizing photos in the preview app and since I use that function a lot, I created one for myself. To create a shortcut go to System Preferences->Keyboard->Shortcuts->App Shortcut. Now click on the + button and follow the instruction on the screen to create your own shortcut.

15. Sign Documents Using TrackPad
Did you know that you can easily sign documents on your Mac digitally? There’s no reason to print the whole document, sign it, scan it, and then uploading it. Just open the PDF in Preview and click on the markup button. Now select the signature option and then Trackpad. Here, you can record your signature and then drag and drop it in the signature field.

16. Drag Picture-in-Picture Mode Player Anywhere (Needs Sierra)
Apple introduced the Picture-in-Picture mode in Safari with macOS Sierra. If you do not know how to use this feature, it is pretty simple. Whenever you are playing a video in Safari, just double right click on the video and select the picture-in-picture mode option.

However, the only problem with this function was that the window only snapped to any of the four corners. If you want to snap the window to anywhere on the desktop just hold the ‘Command’ button while moving it. That way the window will remain in the position where you left it and won’t snap to any corner.

17. Minutely Control Brightens And Volume
The function rows at the top of your keyboard come in very handy when changing the brightness or the volume on your Mac. However, there’s one problem which I encounter when using those keys. The first few steps tend to make no difference while the last few seem to pack the 50-70% of the output. If you want to control the volume or the brightness more minutely just hold Shift+Option while changing them. Now the change will occur at a quarter of the step one time, giving you more control over them.

SEE ALSO: How to Add Spaces and Organize Apps in Dock on Mac
Use These Cool macOS Tricks to Enhance Your Mac Experience
Well, those were some cool Mac tricks that I use in my daily experience with macOS. I hope you found some new tricks which will help you to get the most out of your Mac. I would also urge you to share your favourite tricks which are not on the list to help the community. It’s always nice to see the community interacting in the comment section. Do tell us your thoughts in the comment section below.