There may be various situations where you might need to record your iPhone’s screen. It might be to show off a gameplay video on YouTube, or maybe just to create a short tutorial for your friend who is new to iOS and needs help figuring out something on their iPhone. Either way, since Apple doesn’t allow screen recording apps on the App Store, and not everyone wants to jailbreak their iPhone, the only solution we are left with, is to use your Mac or Windows PC to record your iPhone screen.
In this article, I will tell you how you can record your iPhone’s screen on your desktop/laptop computer, whether it is a Mac or a PC. There are multiple solutions that can work, but I’ll be covering the ones that worked out best in my testing.
Record iPhone Screen on a Mac: The Apple Way
Apple has made it a lot easier to record an iPhone’s screen on a Mac ever since they launched OS X Yosemite. To record your iPhone screen using a Mac, you just have to follow the steps given below:
- Connect your iPhone to your Mac with the lightning cable, and launch QuickTime on your Mac. Once done, go to File -> New Movie Recording.
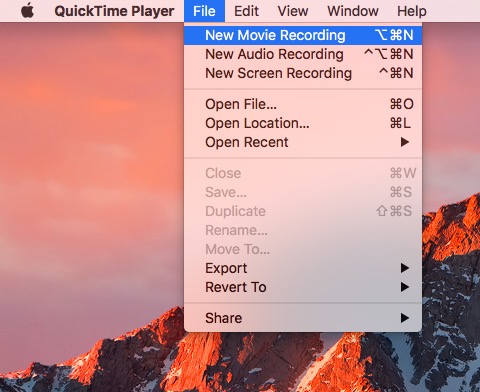
- Click on the arrow next to the record button and select your iPhone from the list of sources mentioned under “Camera”.
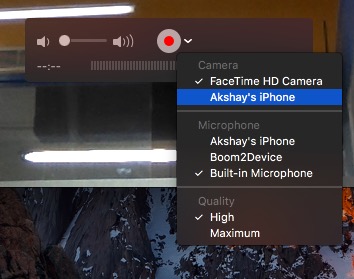
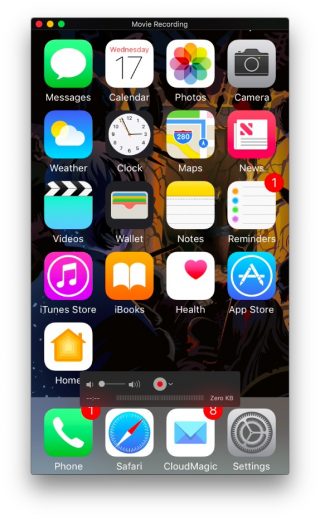
- You will now see your iPhone screen mirrored on your Mac. Click on the record button and your Mac will start recording your iPhone’s screen.
Record iPhone Screen on Windows and Mac Wirelessly
While recording an iPhone’s screen using QuickTime is incredibly easy (albeit, wired), the app does not offer recording features on Windows. Also, you might not have a lightning cable with you, all the time. In such cases, third party apps can come to your rescue.
Lonely Screen is a free app that is available on both Windows and Mac, and can be used to both mirror your iPhone’s screen wirelessly on your Mac or Windows PC, as well as record it. So, here’s how to use Lonely Screen to record iPhone screen on Windows or Mac wirelessly:
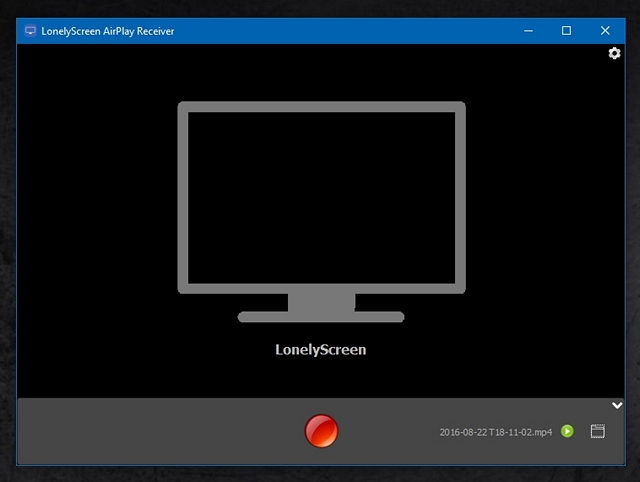
- Download and install Lonely Screen on your computer. Once done, launch Lonely Screen.
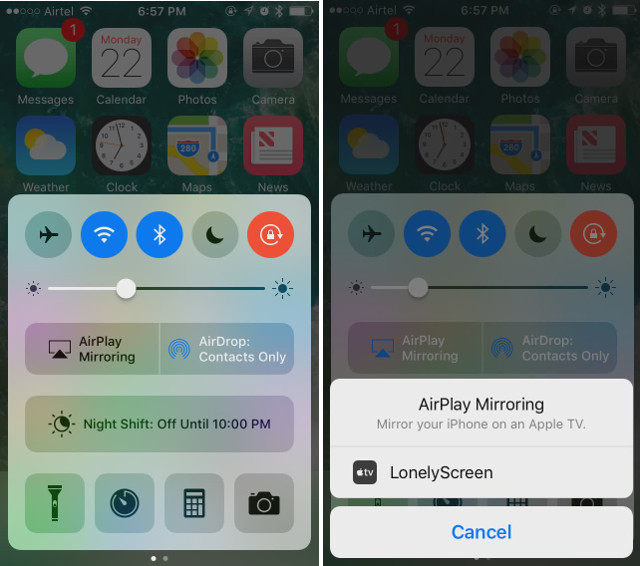
- On your iPhone, pull up the Control Center, and tap on “AirPlay Mirroring“. Select “Lonely Screen” from the list of options.
- Your iPhone’s screen will now be mirrored on your computer. When you are ready to start recording, simply click on the small arrow on the bottom right of the screen, to expand the bottom menu. Then, click on the record button to start recording your iPhone’s screen. Stop the video when you’re done, and Lonely Screen automatically saves it to the Movies folder (on Mac) and Videos folder (on Windows).
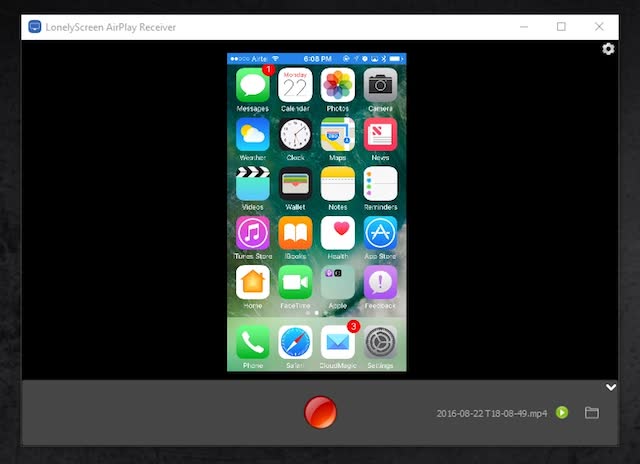
Note: In my testing of the application, Lonely Screen did not work on Windows 7 but worked quite well in Windows 10.
If you’re looking for a more feature rich application (which works on Windows 7 as well), you can check out AirServer, which offers AirPlay capabilities along with a lot more options that are not available in Lonely Screen.
AirServer: Get more control over your iPhone screen recording
AirServer allows your Windows PC or your Mac to act as an AirPlay receiver, therefore allowing you to mirror your iPhone screen on your computer. It works wirelessly, and as compared to Lonely Screen, which provides a bare minimum functionality, AirServer is feature rich and has a lot of advanced options. AirServer allows users to adjust the mirroring quality, on the basis of resolutions (1080p, 720p etc), and also on the basis of the connected device, starting from iPhone 4s, to iPhone 6s plus. It also has the ability to configure a password, so that unauthenticated devices can’t connect to AirServer.
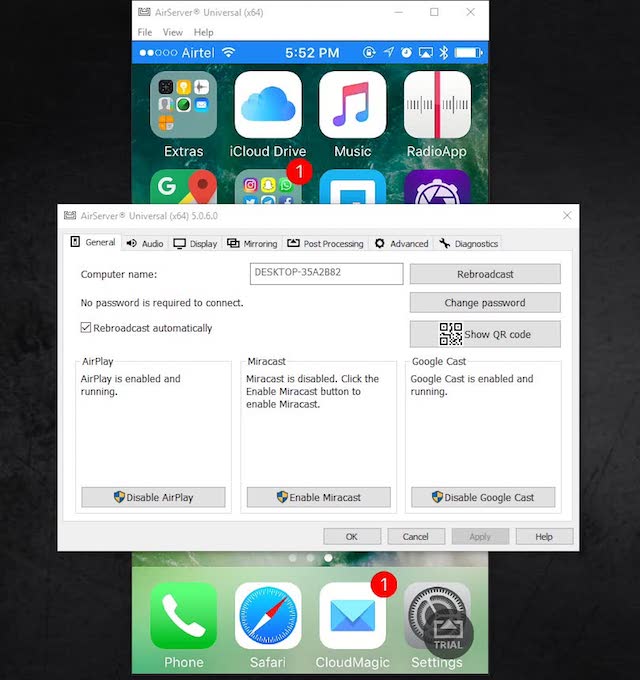
While the app is paid, it does offer a 7 day free trial, and in my use of the app, it worked flawlessly. The price, at $14.99, is definitely steep, but the app is amazing, and if you really need to mirror your iPhone to your Windows (or Mac) computer wirelessly, then it is definitely an investment you should make. The app also includes support for Google Cast and Miracast.
AirServer has recording capabilities built-in, but they are disabled on the trial version of the software, and you will have to buy an AirServer license in order to enable the recording feature. However, you can always use QuickTime on Mac, or a third party screen recording app on Windows to record the AirServer screen.
There are many more apps that allow users to mirror their iPhone screens on their PCs, but not all of them have recording features built-in. AirServer is very reliable and works well, although you will have to pay a rather steep $14.99 for it.
Download AirServer
SEE ALSO: How To Use Windows 10’s Built-in Screen Recorder
Record Your iPhone Screen on Your Mac or PC
Now you can easily record your iPhone’s screen on your Mac or Windows PC, and with the flexibility of using wires, or going wireless. So, go ahead and record that epic attack you did in Clash of Clans, or help out that friend who is new to iOS and can’t find his way around.
As always, give us a shout out in the comments section about your experience with recording your iPhone’s screen, or any issues that you faced, and also if you’re aware of any other methods to record an iPhone screen on a Mac or a PC, that we didn’t cover.
