
Windows 10 has been out for nearly a week and it has already seen more than 14 million downloads within the first day of its launch which is definitely an impressive achievement. Already installed on so many PCs around the World, Windows 10 has become the hottest computer OS gaining an edge over its predecessor. Although, the new OS brings in a lot of new features that you have never experienced in a Windows OS before but fret not because we’re here to teach you everything that you should know about the latest iteration of Windows.
Below are the 9 Windows 10 settings that you should tweak before starting your journey on the new operating system.
1. Customize The Start Menu


Windows 10 brings back the Start menu that was sacked with the release of Windows 8. The familiar old menu is now back and Windows users are loving it. The new Start menu looks amazing but old-school Windows users may find it a bit more overcrowded for their taste.
Microsoft has added live tiles similar to their Windows Phone and tablet mode into the Start menu.
If you are not a big fan of the tiles then you don’t have to keep them in your menu at all. You can easily get rid of them. Just open the Start menu, right click on any tile and select “Unpin from Start”. The tile will be removed from the menu. This way you can get rid of all the tiles and bring back the old look to your Start menu similar to Windows 7. Unpinning the tiles will not remove the corresponding app from your computer, if you want to completely remove the software then click Uninstall instead, this will instantly remove the application from your device.
2. Set-up The Way Updates are Delivered
Windows 10 automatically enables a feature that lets you download Windows updates from more than one source. This means that you can download updates from many PCs around the world in addition to Microsoft’s servers. This ultimately speeds up the download process and makes things easier for you, however, you also have to upload parts of updates for others to download. The uploading process works automatically though and you don’t have to do anything for it. If you’re really not interested in using your bandwidth to help other people get their update then you can easily turn this feature off.


Head over to Settings > Update & security


Now in the Windows Update section, click Advanced options


Now click Choose how updates are delivered


You can turn the feature completely off or just use it to deliver updates to the PCs on your local network instead of the whole internet.
If you have multiple computers in the house then choosing the “PCs on your local network” option will save you bandwidth by downloading the updates once and pushing them to all the computers on the local network.
3. Enable GodMode


This is the perfect feature for power users of Windows OS. Anyone can try the GodMode just make sure that you are careful and don’t mess with the settings too much because this may lead to a corrupted operating system on your device. Activating the GodMode brings all different settings of your computer in one single place where you can tinker with each setting and perform different functions. The GodMode gives you complete control over your Windows PC and you can do anything you want.
To enable GodMode, just create a new folder anywhere you want and name it the following “GodMode.{ED7BA470-8E54-465E-825C-99712043E01C}” get rid of the quotation marks. When you create the folder, it will turn into a new file with a different icon. Open it and you will be inside the GodMode where everything is in your hands, so be careful because “Great power comes with great responsibility” – Spiderman’s Dead Uncle Ben.
4. Free up Disk Space
If you are already in love with Windows 10 and don’t want to roll-back to your previous installation of Windows (7 or 8/8.1) then you can actually claim quite a bit of storage space by deleting the previous Windows installation. The previous installation files are only kept for a month, so if you choose to go back within a month you can do it easily, however, after a month or after getting rid of the files manually you can not roll back to the previous version. So make sure that you want to use Windows 10 and get rid of your previous installation.
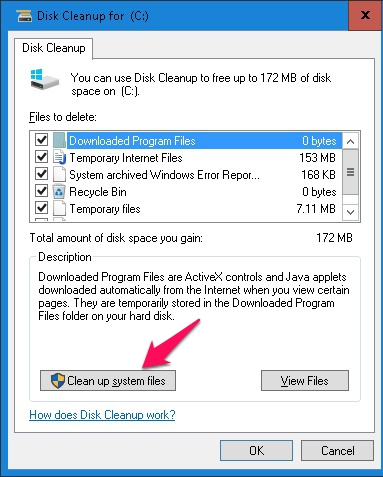

Open Start > All Apps > Windows Administrative Tools > Disk Cleanup
Now click the “Cleanup system files” button below. In the new pop-up select “Previous Windows Installation(s)” and “Temporary Windows Installation files” then hit OK. All these files will be completely removed from your computer saving you a lot of storage space.
5. Customize Notifications


The new Action Centre in Windows 10 brings you all the notifications to your desktop similar to a mobile device. However, you may not be interested in getting notification for everything and every app in the Action Centre and luckily, you can actually customize it easily. Head over to Settings > System > Notifications & actions, here you can customize which apps display notifications in the Action Centre and turn off notifications for certain apps that you don’t want.
You can also choose your quick action icons that are displayed in the action centre for the ease of access.
6. Disable Quick Access View in File Explorer


Every Time you open the file explorer in Windows 10, you’re presented with “Quick Access” instead of “This PC”. In Quick Access, you can see the recently opened files and frequently used folders, however, veteran users prefer their file explorer to show them their storage drives instead of anything else. Here’s how you can make “This PC” the default location for your file explorer.
Open File Explorer > View > Options
In the new pop-up, click the scroll-down bar next to “Open File Explorer to” and choose “This PC” instead of Quick Access. You’re done and file explorer will now open to This PC every time.
7. Schedule Updates For Later
Windows 10 automatically downloads updates to your PC but you have the option to install these updates whenever you want. You can delay them for up to 6 days if you don’t feel like installing them. Head over to Settings > Update & Security > Windows Update


Click Advanced Options, in the drop down menu select “Notify to Schedule restart” option. You will now be asked every time Windows downloads any new updates, you can then schedule these updates for any time you want.
8. Teach Cortana A Few Tricks
Cortana is one of the best personal assistants that was only available on Microsoft’s Windows Phone until Windows 10 came along. Now Cortana is accessible and integrated into the Windows 10 OS and you can easily use it to perform different tasks with just a simple voice command. Before you try using Cortana with you voice, you should set it up to recognize your voice easily.


Open Cortana and click the Notebook icon then go to Settings. Now Enable “Hey Cortana” and click “Learn my voice”. Cortana will ask you to say a few phrases, after you’re done it will easily recognize your commands and carry out tasks for you without any hassle.
9. Utilize Multiple Desktops


Windows 10 brings in a new multiple desktop features that we have seen in Ubuntu and Mac OS X. This feature lets you use multiple desktops on one single PC. You can create different desktops for different tasks, one desktop for work, other for personal stuff, and so on. To create multiple desktops, press Windows key + Tab and then click New Desktop in the bottom-right corner. This will create a new desktop where you can start other tasks. You can switch between desktops by using the same button combination and then choosing the desktop that you want to use.
SEE ALSO: 11 Facts You should Know About Windows 10
If you have just downloaded Windows 10 then you should definitely tweak these settings first and utilize the new features. This will definitely enhance your Windows 10 experience. Let us know if you have any other tricks for the all new Windows 10 OS.

