Founded in 2009 by Garrett Camp and Travis Kalanick, Uber has grown by leaps and bounds over the past eight years to become the pre-eminent transportation aggregator in the world. With a few notable exceptions, the company is pretty much the market leader in the industry in most regions that it operates in, and only recently, claimed to have crossed 5 billion trips worldwide since its inception. That shouldn’t come as a surprise to anyone, given that the service is available in almost 600 cities worldwide, including 29 in India. However, even though millions around the world are using the platform every month, many are unable to take full advantage of the service, mostly because of their lack of familiarity with all the features that the app brings to the table. So, over the course of this article, we’ll guide you through some of the key Uber tips and tricks that you can try to make your experience on the platform a whole lot better. Well, without any further ado, here are 12 cool Uber tricks you should know:
1. Know Your Rating in Uber
If you’ve ever used Uber in your life, you already know that all riders get to rate their drivers based on their experience. However, not everyone knows that the drivers also get to rate the rider. While drivers are booted off the platform if their ratings fall below a particular threshold that varies from city to city and country to country, riders can also be blocked temporarily or even permanently based on their ratings if the company feels that their business is just not worth the trouble for its ‘driver-partners’. That being the case, it pays to know how you are being perceived by your drivers, and the best yardstick for that is the rating you’re getting from them.
So how to know your Uber rating? Earlier, you had to go deep into the Settings menu in the Uber app and then send a request to the Uber servers to know your rating, but the whole process has now been considerably simplified. All you now have to do is just tap on the little ‘Hamburger Menu’ (three little lines) on the top left-hand side of your Uber app, and you’ll get to see your rating front and center in the slide-out panel, as highlighted in the image below.

Just remember one thing though; you’ll need to take multiple trips for your ratings to start showing up in your app, because Uber doesn’t want you know that the very first driver you rode with gave you a one star rating.
2. Book Ride For Someone Else
This is a relatively new feature that Uber officially rolled out a few weeks ago. Although technically you could always book cabs for someone else, it required you to play around a bit with the app and circumvent a few restrictions that are put up by the company to prevent abuse, but now, the process has just gotten a whole lot simpler. Once you ensure that you’re indeed running the latest version of Uber, there are two ways you can go about booking a ride for someone else, depending on whether you have that person’s contact number in your phone or not.
If you do have their number on your device, you may choose to just give Uber the permission to access your contact-list if you haven’t already. To do that, just go over to Settings -> Apps -> Permissions to grant Uber access to your contacts, and once you’re done, fire up the app and fill in the destination in the ‘Where To’ box as usual. Now comes the interesting part. By default, the pickup point will be your current location if your GPS/Location is turned on, but you’ll need to change that to the location of the person you’re booking this cab for. The process itself is identical to choosing your own pickup point with the location services on your device turned off, so that shouldn’t really be a problem.
Once Uber detects that your current location is not the pickup point you’ve filled in, it will ask you if the ride’s for you or someone else. Just pick “Someone Else”, and from the resultant page, navigate to the name/contact number of the person who will be taking this ride.
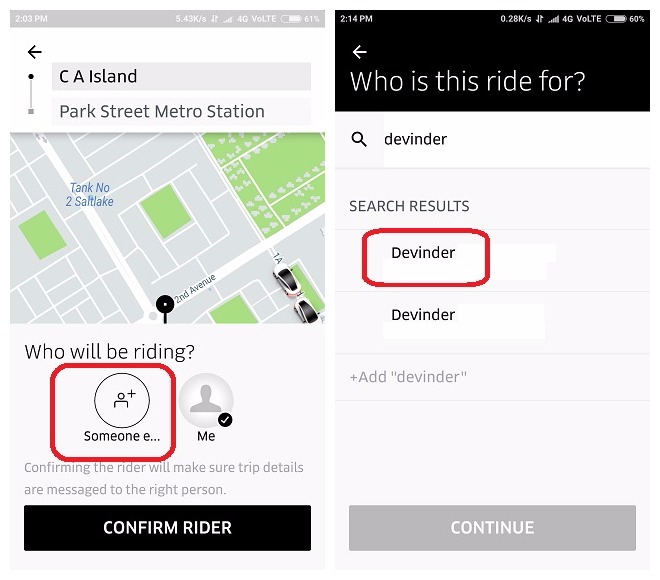
After that, all you need to do is select that particular contact before booking the cab, just so the driver knows who to contact in case he needs any clarification. You can also manually input the contact number of the would-be passenger into the app, in case you either don’t want to grant Uber any extra permissions or you don’t have their number stored on your device.
 As far as the payment is concerned, the eventual passenger can pay by cash in India and other countries where cash is accepted as a mode of payment, but in the U.S., for instance, the person booking the cab will need to pay it with the card they registered with Uber.
3. Edit Pickup Location
Uber lets you alter your pickup location after your booking’s been confirmed, but it does come with quite a few pre-conditions. Firstly, you’re only allowed to do it once for each trip, so make sure you input the right location while editing. Secondly, once an Uber driver accepts your booking, you can only alter your location within a small radius of your initially-requested pickup-point, and not a whole new location across town. Finally, the feature is not available on UberPool, so if you have booked a shared cab, you’ll need to rush to your scheduled pickup-point if you’re not already there.
Now that you know the limitations of this feature, let’s jump right into how you can actually alter your pickup point. Once you’ve booked an Uber, you’ll see an ‘Edit’ button next to your pickup location. Tap on that, and you’ll get a little grey circle around your initially-requested pickup-point. You can now proceed to type in a new address or drag the pin over to the location you want your cab to arrive at. In each case, though, the new location needs to be within that grey circle for your request to be accepted. Once you’re done choosing the new location, you can just tap on “Confirm” to complete your request.

4. Change Final Destination / Enter Multiple Destinations
This is yet another feature that’s available on all Uber services except UberPool. To change your trip’s final destination while you’re in-trip, just tap on the “Enter Destination / Where To” box, start typing in a new address and choose from the options that will show up below. It really is that simple. You will, obviously, be charged for the whole trip based on the distance covered and the time spent in the cab, but you will be able to reach your desired destination without having to go through the hassle of changing cabs if you change your mind about your destination midway through the trip.

You can also use this trick to schedule multiple stops with your Uber in case you want to pick someone up or drop somebody off before reaching your eventual destination. To do that, just put in your first destination to book your ride as usual. Once you’ve reached that location, you can just update your eventual destination in the same way as described in the last paragraph.
5. Save Frequent Locations
Tired of typing in the same address time and time again in your Uber app while booking your ride? Uber’s got a pretty simple solution for you. While you could always save up to two addresses as ‘Work’ and ‘Home’, the company, only recently, rolled out an upgraded ‘Saved Places’ feature that allows users to save multiple locations instead of two. The new version of Saved Places was just rolled out in countries like the U.S. and India a few weeks ago and will be available worldwide by the end of this year, if a post on the company’s official blog is anything to go by.
However, no matter where you are, you’re still able to save at least two addresses of your choice in the app. To do that, tap on the ‘Hamburger Menu’ at the top left of your Uber homescreen and choose Settings. Once on the Settings page, you’ll see the ‘Home’ and ‘Work’ options front and center. Tap on either one, type in the address and pick from the options provided. The moment you do that, your choice will automatically be saved. You can, of course, edit or delete your saved locations at any time.
 You can save both your home and work addresses this way, but you can also save more addresses in your list if Uber has already rolled out the aforementioned ‘Saved Places’ feature in your country. However, you can only save those extra addresses if you’ve already taken a trip to or from that location. In case you have unsaved addresses in your trip history, you’ll also see an option to save those locations to your ‘Saved Places’ at the bottom of the Uber homescreen. Once you save an address this way, it will start showing up in your list of Saved Places that you will be able to access by going into Menu -> Settings -> More Saved Places.
6. Schedule A Ride In Advance
Last August, Uber rolled out a new feature to its app that allows users to schedule a ride up to 30 days in advance. While the feature was initially available only in the U.S., it has since been rolled out to many other markets around the world. So chances are, you should be able to make use of this feature no matter where you are, although, how early you can book your ride varies from city to city.
To schedule an Uber ride in advance, tap on the little timer icon to the immediate right of the ‘Where To’ box that greets you every time you open up the app. You will be greeted with the screen that you can see in the second screenshot below. You can tap on the date and the time to set those parameters to your liking before picking the location as usual, and once you do that, you should get an estimate for your ride.

Depending on where you are, you should be able to schedule your ride with UberGo, UberX, UberXL, or any other tier that Uber offers in your area except for UberPool.
7. Share ETA And Trip Status With Friends
Uber allows you to send your trip status and location details to people in your contact list, provided, you’ve given it the necessarily permissions. You can either use this feature to reassure your loved ones about your safety, or to let your boss see for themselves that you’re really stuck in traffic, and not making excuses for showing up late at work. Once your ride starts, you can share your location and ETA (Estimated Time of Arrival) with people of your choosing by tapping on the ‘Share ETA’ button and selecting your contacts as shown in the image below.

Uber will send them a link to your live trip-map via a standard text message, and they will be able to follow your ride until you reach your destination, irrespective of whether they have Uber installed on their device or not.
8. Unlock Custom Snapchat Filters with ETA Info
Uber introduced a new feature late last year that allows riders to unlock custom filters on Snapchat. What’s really cool is that these filters come with ETA info, so you can just Snap your ETA to your loved ones in a fun way, rather than using the usual messaging service. If you’re an existing Snapchat user, you’ll see the Snapchat card in your ride feed at the bottom of the screen once you start your ride. You can then tap on the card and choose the filter you want, before taking a selfie and right-swiping on the image to send it to the contacts of your choice.

9. Split Fare With Friends
So, you and a bunch of your friends decide to take a trip to the mall for a little shopping, then hop over to the local multiplex for the latest superhero flick and finally, have dinner at the new Thai restaurant that your colleagues just can’t stop raving about. With so many cab rides, keeping a tab on the fares and splitting them evenly afterwards, is often a messy, time-consuming and unseemly affair that sucks the fun out of a fun night out. To avoid that, you can simply use the ‘Split Fare’ option to split the cost of the ride with people on your contact list.
To exercise the option, you’ll need to select the ‘Split Fare’ option that will be visible at the bottom of your screen once a driver has accepted your trip request, and then choose the names of people (from your contact list) you want to split the fare with. Uber will send your chosen contacts an SMS each, notifying them of your intention to split the fare with them. If they agree, the fare will be deducted evenly from the cards stored with each of your Uber accounts, and in the unlikely scenario that someone declines, the fare will be split between the ones who agreed.

The option to split fares is available in most countries Uber operates in, and is applicable to all of Uber’s services, including UberPool, but your friends will need to accept your offer to split the fare before the end of the trip, failing which, you’ll have to make the payment from your own pocket. Of course, this only applies if you are paying by cards or e-wallets, so if you’re using cash to pay for Uber, you’ll still need to take your calculator out to to split the cost the old-fashioned way.
10. Share Invite Code For Discounts And Free Rides
Uber offers a nice little incentive to its existing users to be its flagbearers and brand ambassadors. Once you sign up and start riding with Uber, you’ll get your very own unique invite quote that you can then send to your friends, family, co-workers, acquaintances and just about anybody you think might be interested in signing up for the service. Once they sign up with your unique code, both you and the new registrant will receive discounts on your next ride(s).

While this incentive applies in most markets Uber operates in, the exact amount varies from country to country. For example, in the U.S. and Canada, riders get between $10 – $20 off of their first ride, while in India, they get Rs. 50 off on each of their first three trips. After the new user has successfully completed their first trip, the referrer also receives the exact same discount depending on the prevailing policies in their country/city. The discounts are applied automatically, so no one needs to worry about filling in the invite code again and again.
11. Customize Your Invite Code
So now you know that you can actually use invite codes to not just get discounts for yourself, but also save a few bucks for your loved ones. However, do you know that you can even create your own customized code to replace the automatically-generated gibberish provided to you by Uber? To do that, you’ll need to log into the company’s website (riders.uber.com) with your credentials, as the mobile app doesn’t let you do that. However, if you can look past that little hassle (if you can call it that), the process itself is fairly simple.
 Once you’re logged in to the website, just click on the ‘Profile’ tab on the left, as shown in the image. On your profile page, you’ll see your promo code followed by a ‘Customize’ link. Just click on that link and enter your preferred code in the box and hit ‘Claim’. If it’s available, you’ll get your code then and there, but if it’s already taken, you’ll need to keep trying until you get your desired personalized code.
12. Listen To Spotify and Pandora During Your Trip (iOS only, unavailable in India):
While the 10 tips and tricks listed above are applicable irrespective of whether you use Android or iOS, the Spotify / Pandora integration is only accessible via the iOS app as of now, with no word on when the feature might arrive on Android. What’s more, your driver also needs to have enabled this feature through his app for you to be able to listen to your chosen music during your trip, but once those conditions are met, you’ll see the Pandora music card in your trip feed. You can then tap on the ‘Play Your Own Music’ option to either sign up for or log into a Spotify Premium account. Once you’re signed in, you can choose songs, stations or previously-curated playlists to play during your trip. Goes without saying that this feature won’t be available in places like India where neither Spotify nor Pandora is officially available.
SEE ALSO: 12 Ride Hailing Apps Like Uber Across the World
Use Uber Better With These Uber Tricks
So these were 12 of the coolest things you could do to get even more out of the world’s most popular ride-sharing service. Many of the tricks mentioned above require to have the latest version of Uber installed, so make sure to update the app before trying out these tricks. So, try out these Uber tricks on your Android smartphone or iPhone and do let us know what you think. Also, if you know of any other cool Uber tricks, make sure to mention them in the comments section below.