- The easiest way to take a screenshot on Windows is by pressing the Windows + Print Screen shortcut.
- Similarly, you can press Alt + Print Screen to take a screenshot of the active window.
- Third-party tools like ShareX and Fireshot can help you take scrolling screenshots and are packed with advanced features.
Taking a screenshot on Windows is easy and there are plenty of ways to do so. You can take full-screen screenshots, grab a particular region, or take a window screenshot. Windows comes with a built-in screenshot tool and there are some amazing third-party tools that support annotation as well. On that note, here are all the best ways to take screenshots on a Windows PC.
Method 1: Using Keyboard Shortcuts
Keyboard shortcuts are the easiest way to take a screenshot on Windows. There are many predefined shortcuts to take screenshots of the entire screen, a specific window, or a selected area, and here are all of them:
Take Fullscreen Screenshots on Windows: Windows + PrntScr
One of the most popular methods to take a screenshot on Windows is by pressing the Windows + Print Screen keyboard shortcut. The Print Screen key is usually located at the top-right corner of a keyboard.
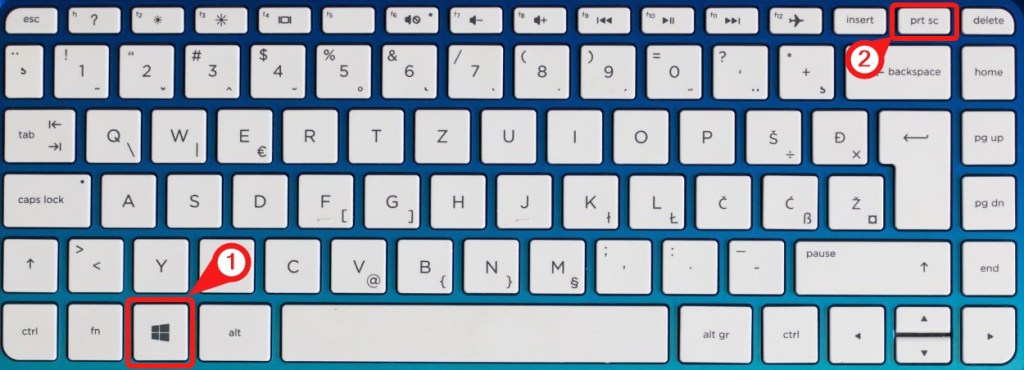
As soon as you press Windows + PrtScr, the screen will dim for a second, indicating that the screenshot has been taken. Screenshots taken this way are stored in the Pictures folder which you can move to using the File Explorer app.
In some PCs, especially laptops, Print Screen can only be activated by pressing the Fn (function key). Hence, you may need to press the Windows + Fn + PrtScr keys instead to take a screenshot.
Using PrtScr
As soon as you press the PrtScr key, Windows grabs the screenshot of the entire screen and copies it to your clipboard. You can then go to any photo editing app or an input field and paste the screenshot, making it one of the easiest ways to take screenshots on Windows.
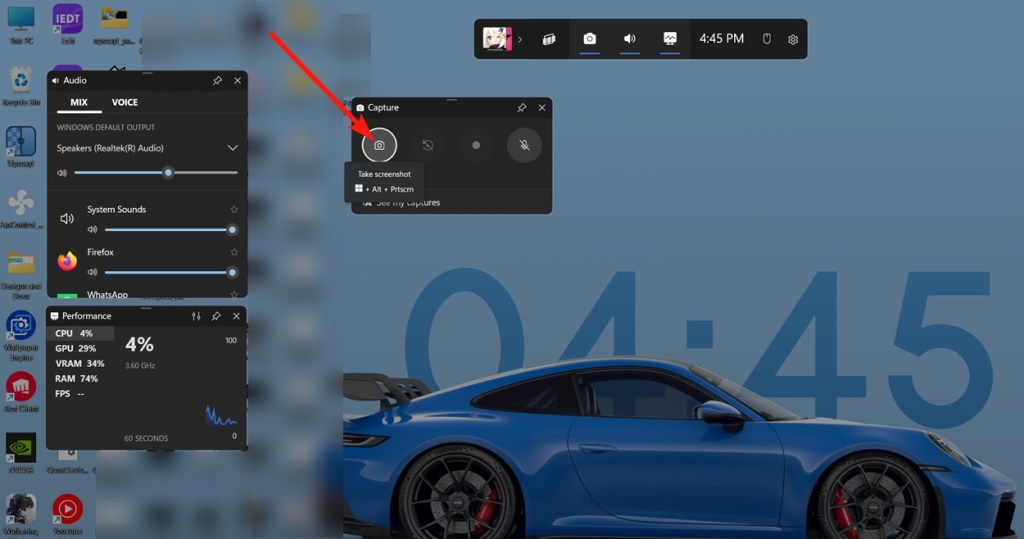
Using Windows + Alt + PrtScr
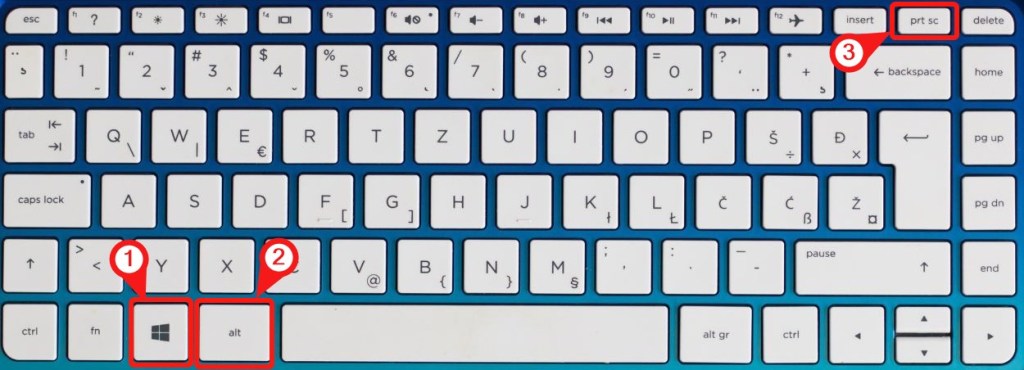
Another way of taking a screenshot on Windows is by using the Windows + Alt + PrtScr shortcut which lets the Xbox Game Bar take the screenshot for you. Once taken, the screenshots are saved in the Captures folder located at “C:\Users\Username\Videos\Captures”. You can also manually take a screenshot by pressing Windows + G and clicking the Camera icon.
The Xbox Game Bar also has a feature that lets you screen record on Windows which could come super handy.
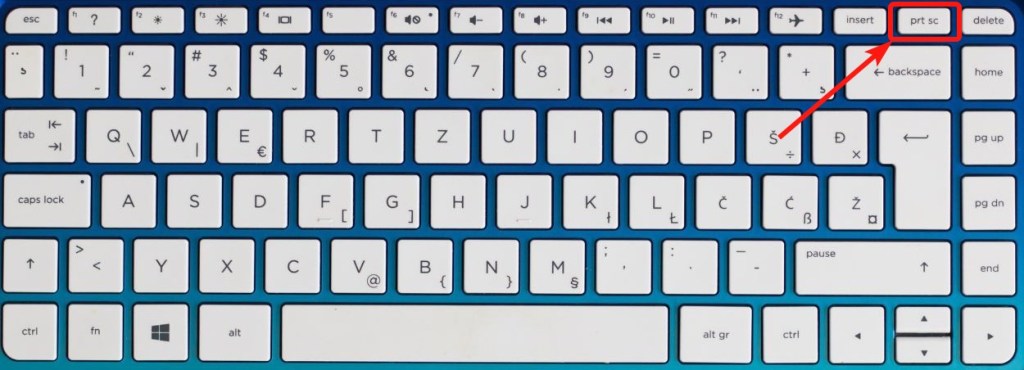
Take a Screenshot of the Active Window: Alt + PrtScr
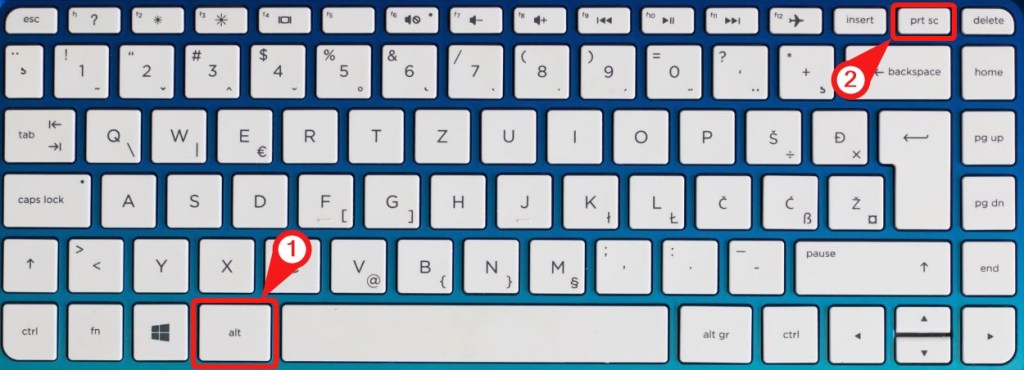
Alt + PrtScr takes a screenshot of the active window and copies it to your clipboard. This could save you loads of editing time as you wouldn’t need to screenshot the entire screen and then crop it.
Unlike the Windows + PrtScr shortcut, there’s no indication of whether the screenshot was taken but going to a photo editing app and pasting using Ctrl + V will paste the screenshot which you can later edit or save.
Take a Partial Screenshot on Windows: Windows + Shift + S
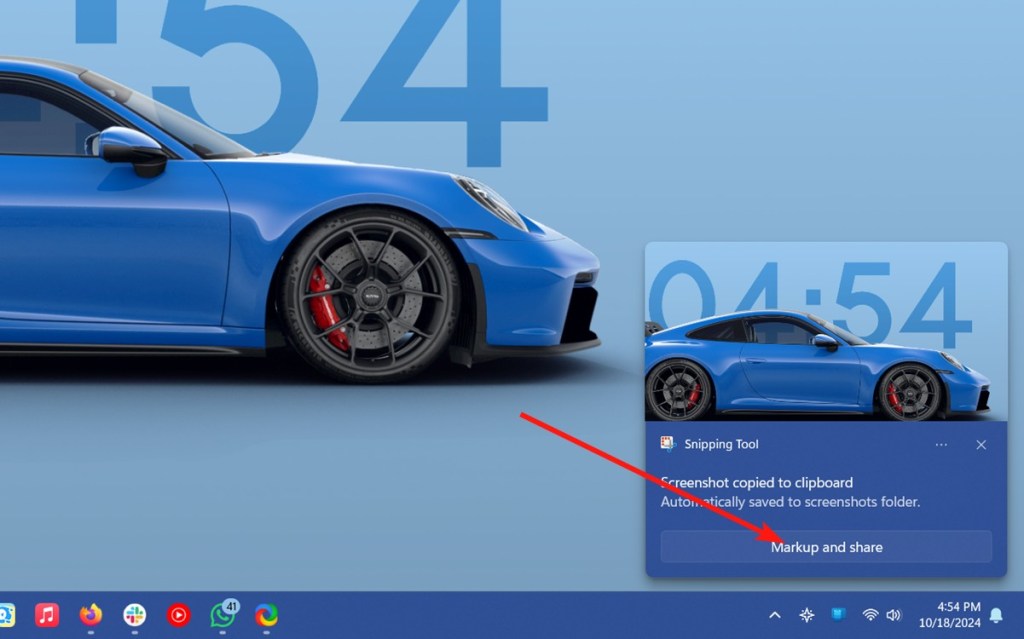
You can use the keyboard shortcut Windows + Shift + S to take a screenshot of a particular area on the screen. The shortcut brings up the Snipping Tool’s Rectangle option.
Once the screenshot is taken, it is saved in Pictures > Screenshots. You can also click the ‘Markup and share’ button to edit the screenshot in the notification that appears right after taking one.
Method 2: Using the Snipping Tool
Snipping Tool is an excellent built-in tool to screenshot or record the screen on Windows. It supports taking full-screen, window, partial, and free-form screenshots, and you can also add a delay to the screenshots.
- Open the Start menu and search for Snipping Tool.
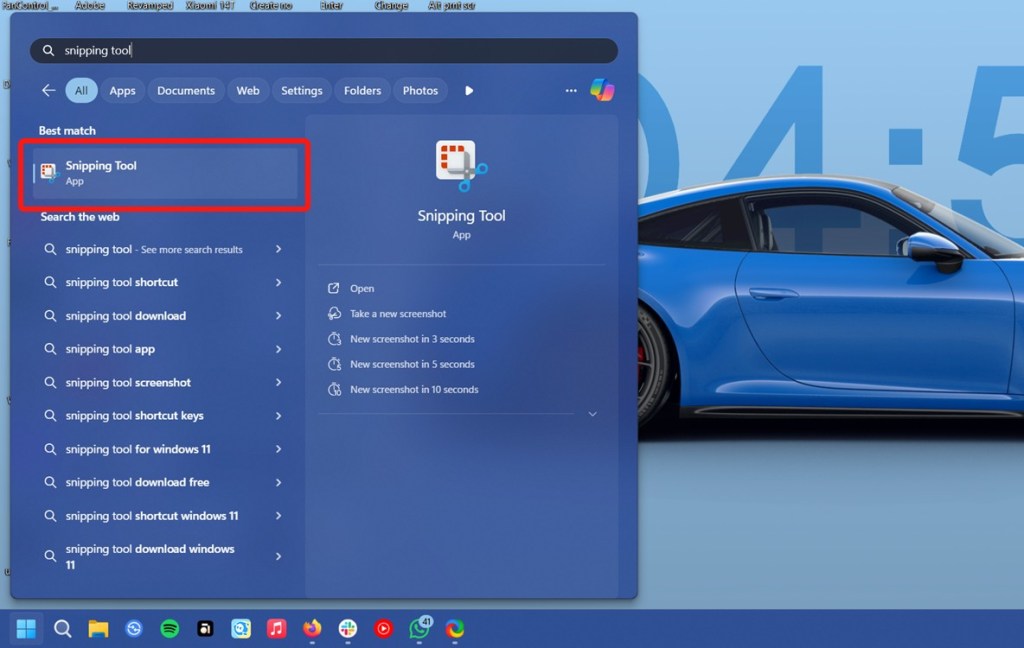
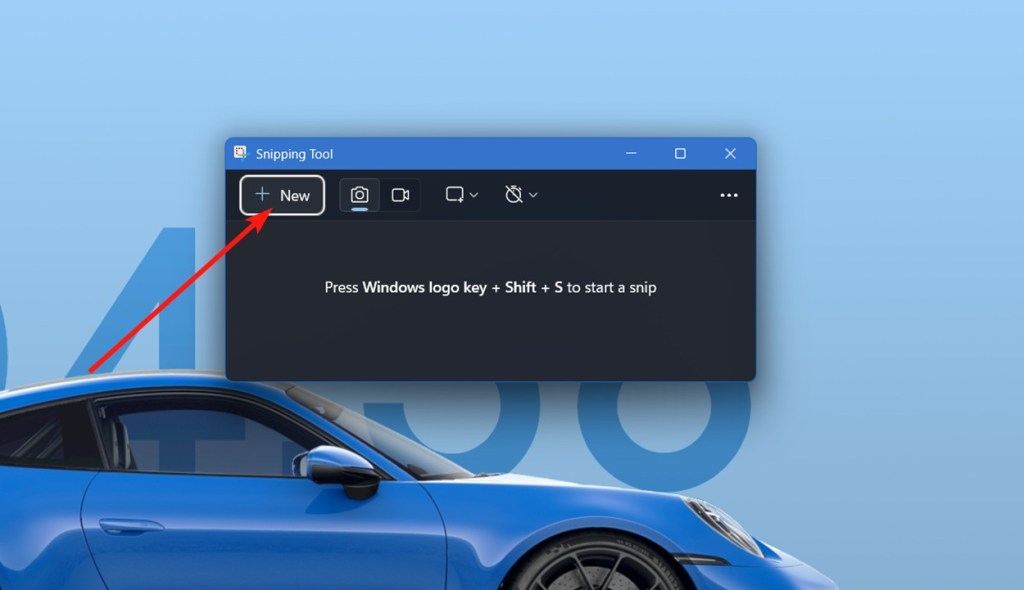
- Launch the Snipping Tool and press the rectangle icon to change the snipping mode.

- Once selected, click New and take the screenshot.
- Screenshots from the Snipping Tool are saved in the Pictures folder.
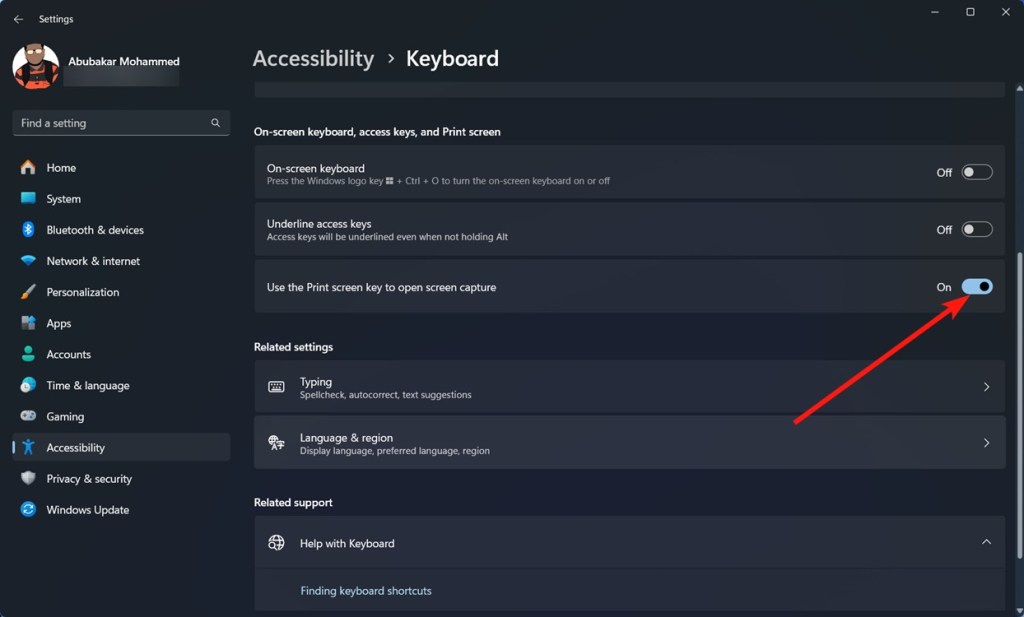
If you like using the Snipping Tool, you can permanently assign the PrtScr key to open Snipping Tool. All you need to do is go to Settings > Accessibility > Keyboard and enable the “Print Screen key to open the screen capture” option.
Method 3: Using a Third-Party Screenshot Tool
ShareX is one of the best third-party screenshot tools you can use to screenshot on Windows. It has tons of features and is completely free and open-source. In fact, it ranks among the best open-source apps for Windows 11.
- First off, download ShareX from the Microsoft Store (Free).
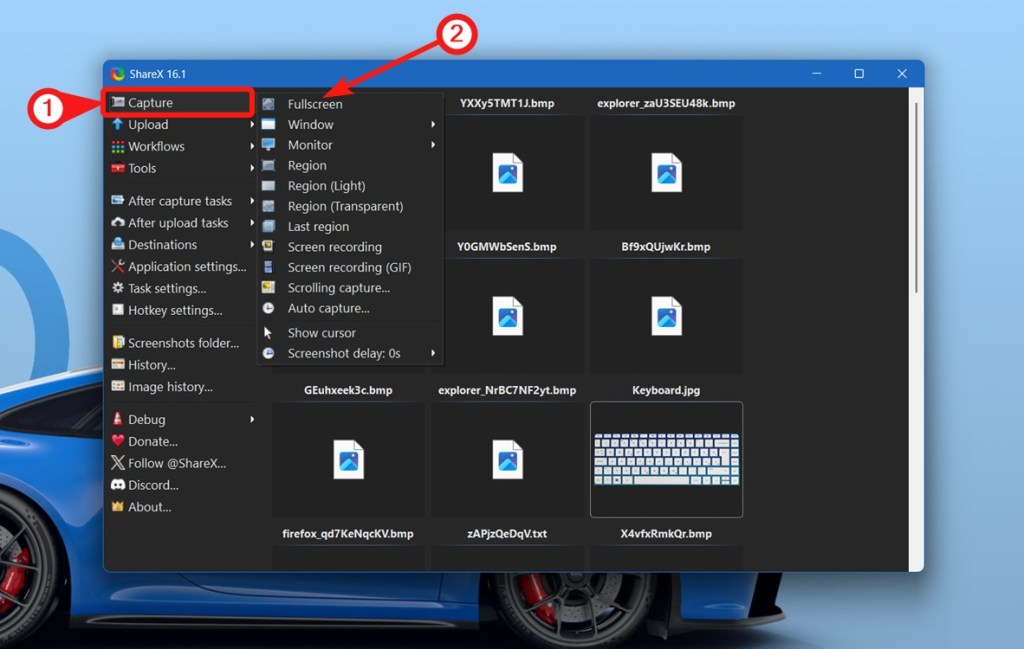
- Now, launch ShareX and click Capture > Fullscreen if you want to take a screenshot of the entire screen.
- The Screenshot will be saved to \Users\Username\Documents\ShareX.
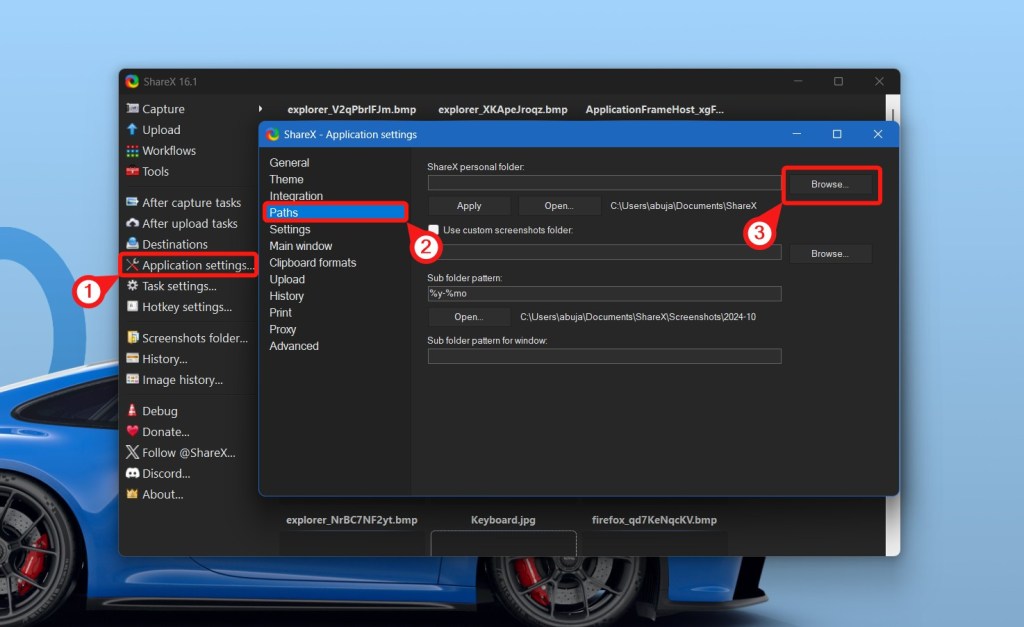
- You can change the default save location by going to Application Settings > Path. Browse and select a new folder.
ShareX has plenty of other options like Window, Monitor, Region, Screen Recording, Scrolling Capture, and more. The list of features is never-ending and deserves its own guide.
Method 4: Scrolling Screenshots on Windows
Windows doesn’t have a scrolling screenshot feature but third-party apps can help you take scrolling screenshots. ShareX and PickPick are two great apps but we will be using ShareX for this guide.
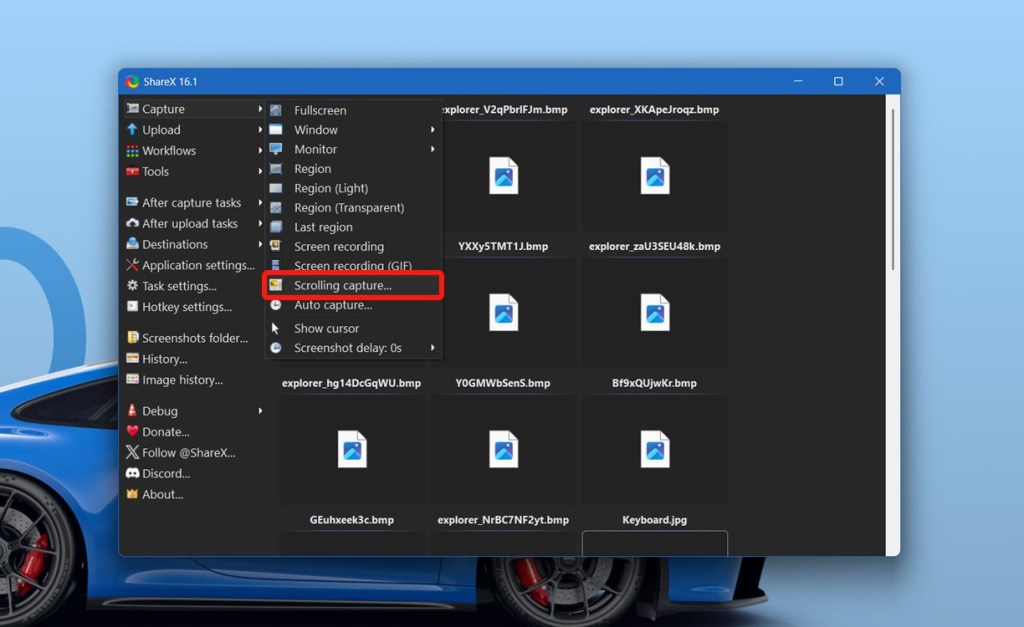
- Go to ShareX and click Capture.
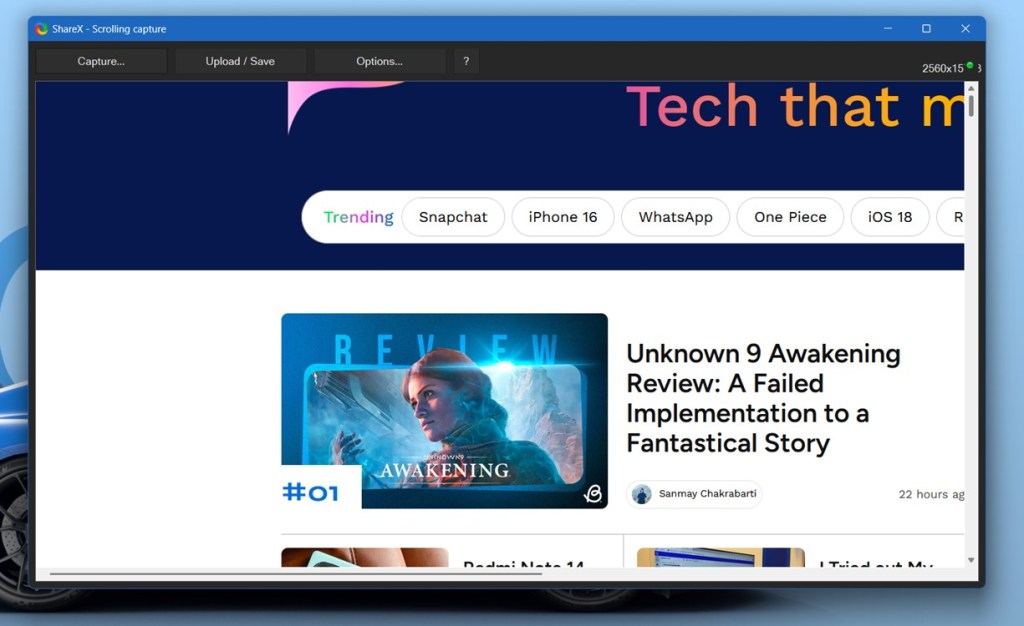
- Click Scrolling Capture and select the area you want to capture.
- If the area is scrollable, ShareX will automatically scroll through the page to take a screenshot. You can right-click to stop the scrolling.
Method 5: Take a Screenshot on Windows Tablets
Windows tablets are still a thing and taking screenshots on them isn’t as difficult as you might think. All you need to do is hold the Power + Volume down button just as you would on an Android device. Or you could just use the Snipping Tool or ShareX and take a screenshot as mentioned above. The screenshot taken this way can be accessed from the Pictures folder in File Explorer.
Change the Default Screenshot Destination
The built-in Snipping Tool automatically saves the captured screenshot in the Screenshot folder within the Pictures library. In case you don’t want to save screenshots in that folder, you can change the default destination by following these steps:
- Open the File Explorer and go to Pictures > Screenshots.
- Right-click on the Screenshots folder and select Properties from the context menu
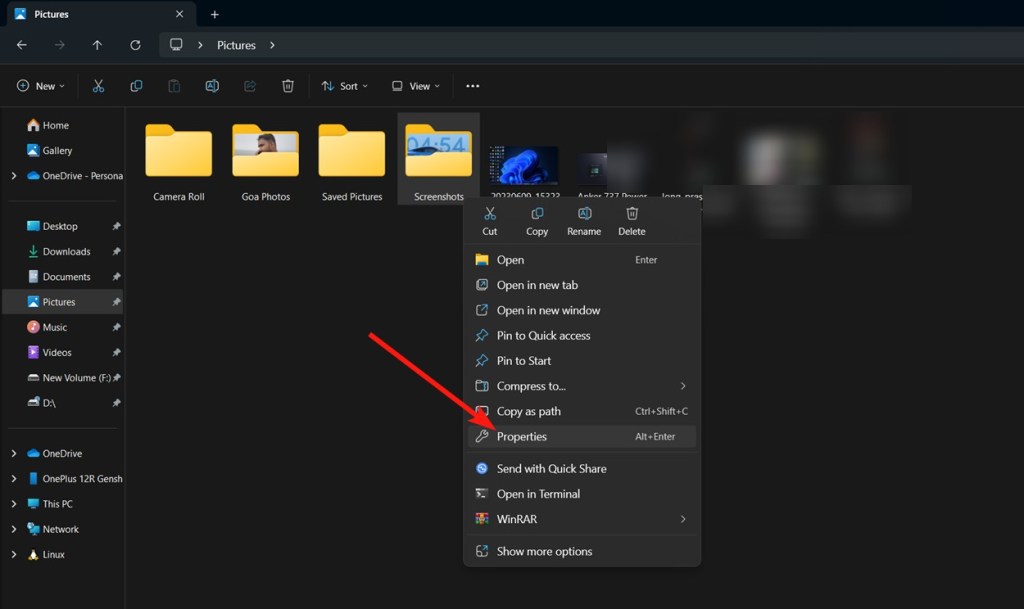
- Click the Location tab. Copy and paste a new destination in the address bar. For example, “C:\Users\username\Desktop“. Click the Apply button.

Your Screenshots will now be stored in the new location that you entered in the address bar. If you wish to revert back any changes to the location, you can navigate to the same window and click on the Restore Defaults button.
Change the Default Screenshot Image Format on Windows
Screenshots captured in Windows are saved in the PNG format by default, but if you prefer working with any other image format, there are a couple of ways to do it. This is where third-party tools like ShareX excel, by allowing users to change the default image format.
Windows doesn’t have a native feature to change the default file format. Instead, you need to manually choose a different file format while saving each screenshot.
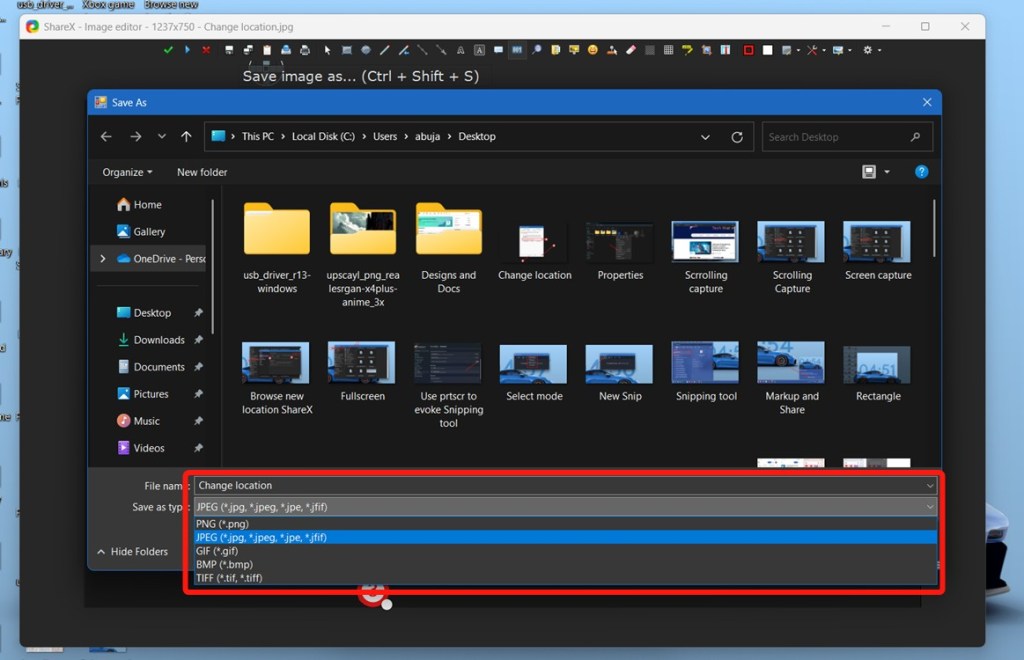
All you need to do is change the type in the Save As dialog and select any of the available image formats. The feature will only work with screenshot tools that require you to save the screenshots manually.
And those are all the ways you can screenshot on Windows, regardless of whether you have Windows 10 or Windows 11. That said, while built-in Windows tools like the Snipping Tool are more than enough, if you need more editing features, you can use apps like ShareX. Some of the other honorable mentions are Fireshot and GreenShot which are also free and open-source.