Today, the art of filmmaking is not something that stays exclusively in the professional filmmakers circle anymore. Anybody can shoot, edit, and upload movies quickly and easily. While the younger generation of us accept that as just another ordinary fact of life, more seasoned net users might be able to appreciate it more.
The fact that everyone can easily produce movies is amazing. Many factors contribute to that, such as high-speed internet connection, better mobile camera quality, accessibility to video sharing services, and simple to use video editing software. Apple’s iMovie is the pioneer of easy-to-use layman’s movie makers, and still the best one available on the market today. The application comes with every new Mac, and available as a free download for iPhone and iPad.
![]()
This tutorial is a complete guide to using iMovie for Mac and is made using version 10.1.1 – the latest version at the time of writing. You can use it to produce better YouTube videos, create simple music videos, document your vacation, present your product, teach remotely, or make any other videos that you want. Let’s start, shall we?
Pre-Production
Scripted – or Not
Whether you want to use iMovie to put together short clips from your hard drive or to create the next blockbuster, a good movie is a well-planned one. So, before you begin, you have to have some ideas of what the result would be. Knowing what you want beforehand will help you work faster and easier.
The right approach to creating a good movie is to have a “script” ready, and then shoot scenes according to the script. It’s even better to create some storyboard so that you know how to shoot each scene. Other things that you should prepare are properties that you would use, and the cast that will star in your movie.
But then again, it’s perfectly fine to start with whatever movie clips that you have in hand. Sticking too much to the script might take the excitement out of the process. The most important thing is for you to have fun.
Early Pointers
The editing process would be much easier if you have good clips. And they can’t come from poor shooting process. While you don’t need to have advanced filmmaking techniques to produce home movies, knowing few basic composition rules, camera angles, and lighting techniques would be helpful. A quick web search will give you plenty of learning materials to go through.
One more thing that I remember my filmmaker friend told me is that modern human has a very short attention span. To keep your movies less boring, make sure that the scenes change around every 3 seconds. It means the more clips that you can compile and edit, the better.
And, the most important of all, always back up your work. Making home movies or not, losing precious digital memories is not something that you want to experience. Prepare a spare external hard drive and connect your computer to several cloud hosting services. You can’t be too careful.
Editing
Trailer Template
The first time you open iMovie, you will have the option to create a New Movie or New Trailer.

The quickest and easiest way to start is choosing Trailer mode. It has Hollywood-style less-than-2-minutes trailer templates that will guide you step by step. They even come with the soundtracks. All that you have to do is to follow the instructions, and you will have your first short movie in no time.

You can hover your mouse pointer over a template and click Play button to preview what kind of movie you will get if you use that template. When you are ready, choose one of the templates and click Create at the bottom right corner of the screen.

Then set the title that you want for the clip and click OK.

Start creating your trailer by editing the Outline below. Make the necessary changes to the details such as the cast names, gender, logo style, etc. The details would depend on the trailer template that you choose.

The next step is the middle tab: Storyboard. You can edit the text inserts if you want to, then go to the media library to choose the videos and photos that you wish to use in the trailer. Follow the instructions to the letter, and you are good to go. For example, choose an action clip when the storyboard says Action. The placeholder will move one by one to the next after you insert a clip until you reach the end. To edit, select a placeholder and choose another clip to add.
And that’s it. Your short trailer is ready, and you can share it via the File – Share menu. There are several options including email, YouTube, Facebook, and file.

It’s possible to dabble further with the audio, titles, background and transitions; but for a quick start, it’s better to stick with the default.
For those who wants to go deeper, let’s continue with a more advanced editing.
Full Movie
If you are ready to move beyond movie trailer, start a new project in iMovie (click the Plus “+” button at the top-left corner of the screen) and choose Movie.

The Basic Workflow
You can start from scratch by selecting No Theme, but unless you are already familiar with iMovie, it’s better to use one of the themes to understand how the process goes.

Themes are different with templates. You only have the overall tones and aesthetic of the movie, without the step by step “insert here” placeholders like the trailers.
The working environment is similar to trailers; there are the Media Library and Preview pane. But instead of the curated Outline and Storyboard, you’ll get the blank slate to paint on. It’s called Timeline.

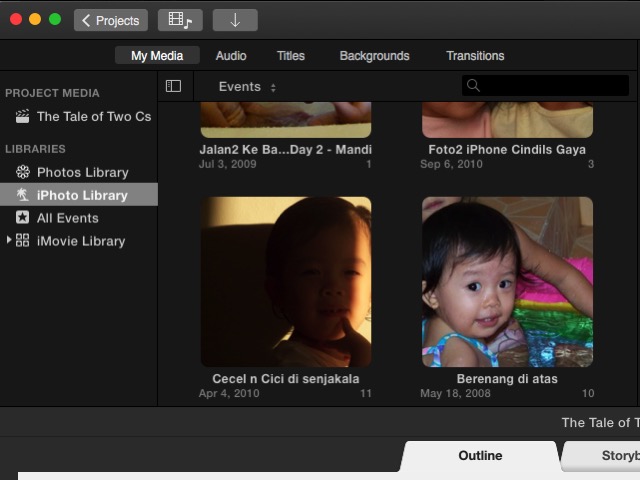
Import Media
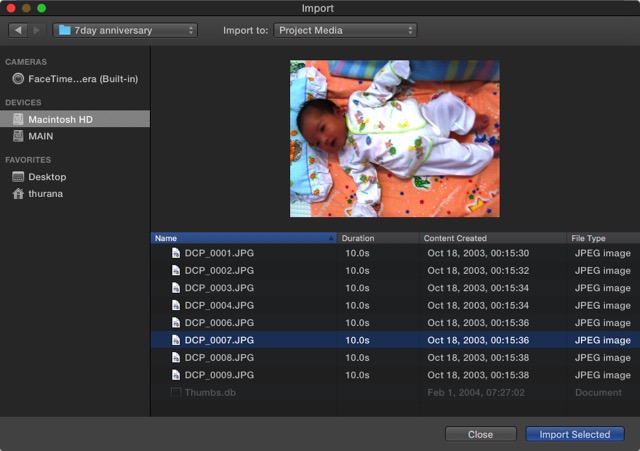
One longer movie is a compilation of shorter clips. So, the first step of creating your movie is collecting all the clips that you need. You can start with the photos and videos that you have in your Photos library. They are readily available from the Media Library. Or you can import other media from the folders in your hard drive by using the import button, or using the File – Import Media menu (Command + I). If you have iMovie installed in your iPhone or iPad and used it to edit a video, you can also import the project using File – Import iMovie iOS Project menu.

After choosing a movie/photo/folder, you can start importing the media by clicking the Import Selected button, and they will be available in the Media Library. You can import them to the Project Media, but it would be easier if you create a new Folder for them.
One annoying thing that I found in the importing process is the lack of search feature. You have to find the media that you want to use manually, and it takes time. It would be very useful if Apple added a search feature in the import window within the next version of iMovie.
Adding Media to the Timeline
After that, you can select a clip from the Media Library, and determine the segment of the clip that you want to use by clicking and dragging on the clip. The selected part will be framed by yellow box, and you can add it to the timeline by dragging it or by clicking the Plus (+) button at the bottom right corner of the yellow frame. Also, it’s also possible to add photos as part of your movie.

But video and photos are not the only things that you can add to the timeline. You can also add audio files that will serve as the background music or soundtrack. The process is similar to adding video, but you have to select Audio instead of My Media from the option tabs. You can choose your music collection in iTunes as the source. As an alternative, you can also use Sound Effect, or Garageband if you want to produce your music.

Other things that you can add to your timeline from the option tabs are Titles, Backgrounds, and Transitions. But they are to be discussed in later chapters.
Editing Video
Now that you have all your clips in place let’s start with the editing.
Split Clip
One of the first things to know is how to split clips. Breaking one clip into several shorter ones allows you to edit each chunk separately, so you will have more flexibility. You can insert effects, transitions, backgrounds, etc. between chunks. You can also move the chunks around by dragging and dropping, or delete the chunks that you don’t want.

To split a clip, hover your mouse to a location in the clip, click the mouse to fix the position, then go to Modify – Split Clip menu, or use Command + B shortcut key combination. You can also click and drag the mouse to select a portion of the clip.

Insert Transitions
As the name suggest, transitions allow you to move from one clip to another with style. You can insert transitions from the insert tab. There are many transitions available, and each video theme – including the one that you choose when you start the project – has its unique transitions. To insert transition, select an inserting point between clips.

And then pick one of the transitions and drag it to the inserting point.

You can edit the length of the transition by double clicking on it, typing in the value that you want, and click Apply.

To delete a transition, select it and hit the delete key.
Fade In, Fade Out, and More
You can also create a fade in and fade out effect at the beginning and end of a clip/project by adding appropriate transitions. But the easiest way to do so is via Project Settings. In the middle of the screen’s right side, next to the zoom slider, there’s the Settings button (which doesn’t look like a button). If you click on it, you will have a small Project Settings window. Check the Fade in from black and Fade out to black checkboxes.
There are other options that you can customize from this window, such as changing the project’s Theme and applying Filter.

But the one that I find most useful is the ability to adjust the Clip Size. Sliding the slider to the right will enlarge the clips on the timeline and make the editing process easier.
Rotate and Crop
Sometimes, either for artistic purposes or just to fix rookie mistakes, you want to rotate or crop a clip. In iMovie, you can do it easily by selecting a clip and choose the Rotate tool above the preview pane. But there’s a limitation, you can only rotate the clip in the 90 degrees steps.

Picture in Picture and Side by Side
Another neat thing that you can do with iMovie is to do picture in picture effect. Or if you shoot your clips in portrait mode, you can put two different clips side by side to create a cool scene where two event happen at the same time in different places.
To create the effect, select a clip and drag it on top of another. If necessary, adjust the length of both clips to match by dragging one of the ends of the clip.
Then, while the clip is selected, click on the Video Overlay Settings tool located above the preview pane, and choose the effect that you want to apply. Every effect has further settings that you can adjust. I suggest you play with them to get a better understanding of what they do. Research has proven that learning by doing will have a more lasting effect on your muscle memory.

Video Speed: Slow, Fast, Freeze
For dramatic effect, for example for action scenes, you can put a clip into a slow motion. Select a clip – or if you want to select part of the clip, you can split it first – and choose the Speed tool (the speedometer icon) above the preview pane. Then choose the speed effect that you want. The options are Slow, Fast, Freeze Frame, and Custom.

There’s a checkbox that offers you to preserve the pitch of the sound, but I feel that the effect would be more dramatic if the slow motion clip is accompanied by a slow and low pitch sound. As for the fast motion, you can choose the speed factor percentage. This type of effect is perfect to shorten up a very long clip, or to make less important part of the movie more bearable.
The freeze frame will hold a frame for a few moment. It’s perfect if you want your audience to focus on a part of the movie.
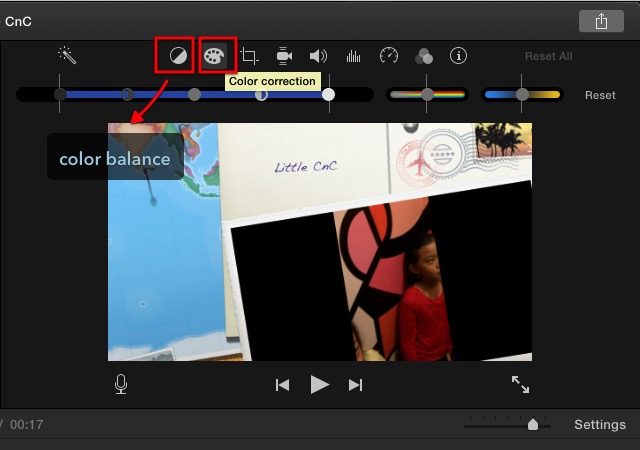
Color Balance and Correction
Let’s move on to the color editing. There are two kinds of tools that you can use: Color Balance and Color Correction.
Color Balance can help you to correct the color of your clip, either automatically with Auto, use Match Color to imitate the tone of another clip, use White Balance or Skin Tone Balance and pick a color from the clip using the eye dropper as a guidance.
Color Correction allows you to use highlights to make your clips lighter or darker, adjust color saturation to make the clip more or less colorful, and also adjust color temperature for warmer or cooler picture.
Video and Audio Filters
Another video editing tools that you can find above the preview pane is Clip Filter and Audio Effects.

Both give you many options that you can use. For example, the Clip Filter has noir, romantic, dreamy, x-ray, sci-fi, and many more. You could use different effects for different clips if you want to, but the best way to use this tool is to give one scene a different focus.

Audio effects tool is also fun to play with. You can change the sound for a clip to sound like robot voice, landline telephone, shortwave radio, cathedral, change the pitch, or other effects.

Background
There are tons of Background that come with iMovie. You can add backgrounds to your videos using one of the available choices located above the media pane. One of the possible uses of background is to combine it with the picture in picture tool. Click the background tab above preview pane, choose one, drag it to the timeline, and put it between clips.

After that, drag a clip above the background and select the picture in picture tool. You can adjust how big the clip will be and where is the position of the clip.
Editing Audio
In any movie, the sound is as important as the picture. It can set a different mood for the same image; it can also emphasize what message that the movie director wants the audience to see. A romantic scene would be ruined by lively background music; a scary setting will have less impact without the terrifying tunes and sound effects. Let’s see what features iMovie offers in the sound department.
Controlling Volume
Maybe the most important part of editing audio is the ability to control the volume, and you can do this easily in iMovie. If you have meddled with GarageBand before, you will feel right at home because iMovie uses similar approaches to the volume control.
When you go to the timeline and select a clip, you can see a horizontal line somewhere in the middle of the audio part (the blue blocks). This is a general volume control, drag it up to increase the level or down to decrease.

If you see yellow spikes in the audio waveform, it means that the volume is a little bit above the recommended level, but in most cases it’s still fine. But if you see red spikes, it’s recommended that you lower the volume level to avoid distorted sound output.
Inserting External Audio Track
Other than the original sound that comes with the video, you can add another layer of sound from external sources such as music and sound effect. Go to the Madia Library and pick a sound from iTunes Library, Sound Effects, or Garageband – if you have created one yourself.

After you choose, drag it to the audio layer below the video, then adjust the position and length to fit the clip. You can also adjust the volume using the similar method as described above – by dragging the volume line up and down.

Fade In, Fade Out
It’s also possible to use fade in fade out effect on the sound. If you look closely, there are these little dots at the beginning and end of the sound clip. Those are the fade in fade out markers. All that you have to do is to drag them horizontally along the volume line to the position where you want the standard volume level to start/end. The effect is visually represented by a curved line.

Split And Edit
Especially if you have long clips, you’d want to split them into shorter chunks for easier editing. We have discussed the technique to split clips in the video editing section, but for a quick memory refresh, it’s placing the time marker in the position where you want to split the clip and hit the Command + B key combination.
You can split the clip to isolate a part where you want to use different audio setting. For example, there’s a part of the clip with a loud train noise that pass by in the background and you want to mute it, or a part where you can barely hear the speaker, and you need to increase the volume. And there are many other different scenarios where splitting the clip would be a good idea.

Voice Over
If you need to add a comment, narration, explanation, or any other voice related things to your clip, you can use the voice over feature. It’s so simple that I couldn’t think of a reason I missed it the first time I tried iMovie.
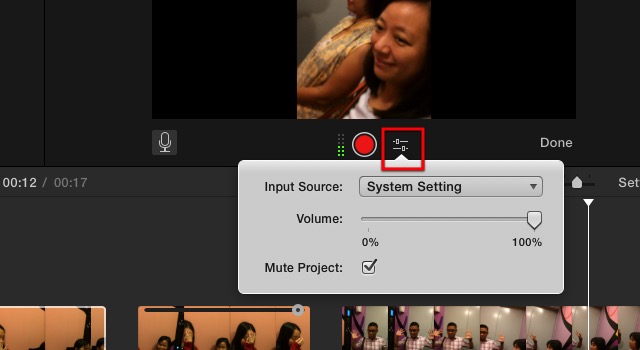
Select a clip and view it in the preview pane. There’s a microphone icon below the pane. Clicking on it will bring up the record button. Put the time marker at the beginning of the location that you want to start, click on the record button, and start recording your voice while the clip is played. There’s the 3-2-1 countdown to prepare you before the recording start.

You can adjust the voice over settings by clicking the icon next to the record button. Here, you can choose the input source, volume level, and whether you want to mute the project or not.
The result will be displayed in green under the clip in the timeline. You can further edit this voice over layer if you want to.

Option Key for More Advanced Audio Editing
Another method to isolate a part of the clip and use different audio settings without splitting the clip is by using the option key.
If you click anywhere on the volume line while holding the Option key, you will see a dot which serves as break marker. If you create several dots in the locations where you want to apply different volume levels, you can play with individual level for each area.
You will get the gist of it after playing with the dots for a while, but the basic rule of thumb for beginners is that you need four dots to isolate one area: one group of two dots on the left and another on the right of the area. Then you can drag the line between the inner dots up and down.

Detach Audio
Another trick of audio editing that I can share is how to detach the audio from the video. You might want to do this if you want to get rid of the audio that comes with the video, and use background music from another source, something like making a music video. Or maybe if the audio and video are not synchronized with one another, you could detach the audio and drag it a little bit to synchronize it with the video. Since detached audio is also moveable, editable, split-able, and copy and paste-able; you can also do many other things as far as your imagination can go.
To detach the audio apart from the video, select a clip and right click on it. Then choose Detach Audio from the pop-up menu, or use Command + Option + B key combination.

Adding Titles
Title is another important part of a movie. You can put it in the beginning as the film title, at the end as the credit title, or within the movie as additional information or chapter title. Title feature is all about adding text to your movie.
Title is available from the tab above the Media Library. Click on the Title tab and choose one of the many available options. There are the standard choices, but if you use a theme for your movie, there are more additional theme-specific choices. There are many title effects that you can use, such as Pull Focus, Boogie Lights, Scrolling Credit, Pixie Dust, and many more.

To use titles, you can drag and drop them to the location that you want. In addition to spots between clips, you can also add titles as an overlay to clips – or as another layer of the movie. To do it, add the titles above the clip and adjust the position.

After placing a title in its respective position, you can start the editing process in the preview pane after selecting the element. The basic editing features are there: you can change the font, font color, and font size; and the ability to make the title bold, italic, or outlined.

Publishing Video
The final piece of video making is publishing. There are many publishing options available in iMovie via File – Share menu.

Theater and iCloud
The default publishing option is Theater (Command + E). If you choose this, your movies and clips will be collected in the Theater – accessible using Window – Go To Theater menu and automatically uploaded to your iCloud storage.

They will be available to your other iCloud-connected devices – including iPhone, iPad, and Apple TV; as long as the devices are using the same iCloud account.

As convenient as it sound, there are things to consider about Theater: you have to have enough iCloud storage to hold your movies, and make sure your internet connection is good enough for the traffic (both the speed and the data limit).
YouTube and Others
You can also send your works via email; save them in iTunes library; upload them to YouTube, Facebook, and Vimeo; or keep the videos as image or movie files inside your hard drive.
Uploading to YouTube, Facebook, and Vimeo requires you to log in with your account. The uploading process will take some time, depending on the size of your video and the speed of your internet connection.

Notes On Copyright
Creating home movies to keep in your hard drive and to watch with your family in the comfort of your home is one thing, but uploading them to the internet is another. Entering public space means paying extra attention to copyright.
To avoid any future problems, you should not upload content which contains copyrighted materials whatsoever, whether they are images, movie or audio clips. For example, it’s very easy to use your favorite song from your iTunes library as the background music, but you really shouldn’t.

As a safe bet, everything that Apple provides within iMovie is copyright-free materials that you can use. Other alternatives are making your materials, or buy video-making-related commercial products.
And That’s A Wrap
That concludes our long discussion about iMovie. I hope it’s a fun ride for you as it is for me. But what is an iMovie tutorial without the example of a real project? So, allow me to share my take on creating a quick amateur home movie.
It’s just a quick one – about my family vacation to Sukabumi – a nice small city in West Java, Indonesia, with lots of delicious food to try. The trailer is created in less than five minutes (plus few more minutes to upload it to YouTube), using the basic iMovie’s trailer feature with a bit editing here and there.
Considering the copyright risk and the lack of self-confidence in my ability, I decided not to share the longer movies that I created. Maybe we’ll save them for the later time.
Regardless, here’s my humble creation. All the credit on the near-professional-like result should go to iMovie. My part is just shooting and compiling the clips.
SEE ALSO: Top 7 Video Sharing Sites
Have you tried iMovie? Share your experience in the comments section.


