When NVIDIA originally introduced G-Sync back in 2013, it was a game changer for the industry. Most people considered it to be the holy grail of PC gaming for what it offered and rightfully so, because it brought about the best possible gaming experience on monitors. For those of you who don’t know yet, NVIDIA G-Sync is a hardware level display technology which synchronizes GPU’s render rate with the monitor’s refresh rate. As a result of this, you’ll immediately notice the difference while playing games, because G-Sync ensures buttery smooth and stutter-free gaming sessions while completely eliminating screen tearing. G-Sync is incorporated into monitors with the help of a module and these monitors are usually more expensive. However, if you already have a G-Sync monitor, you need to set it up properly, as there are some confusions that should be avoided. So, lets take a look at how to set up and configure NVIDIA G-Sync:
Setting Up G-Sync Using NVIDIA Control Panel
There are certain minor mistakes that people often tend to do while setting up G-Sync and as a result, the feature doesn’t work properly. We certainly don’t want you to be in that situation, so make sure you follow these steps below to properly set up G-Sync:
- Right click anywhere on your desktop and click on “NVIDIA Control Panel” in order to open it. Once done, click on “Set up G-SYNC” under Display section of the control panel. By default, if you have a G-Sync monitor, you’ll notice that the feature is enabled only for full screen mode. We need to change that, by checking “Enable G-SYNC for windowed and full screen mode”, because there are several games that run on borderless window mode as well, and we just cannot neglect them.

- Now you’ll need to click on “Manage 3D Settings” under 3D Settings section of the NVIDIA Control Panel. Once done, scroll a little bit to the bottom and you’ll see an option named “Monitor Technology”. If the monitor technology is shown as Fixed Refresh Rate, (which is normally the case for monitors without G-Sync), change it to “G-SYNC” by clicking on the dropdown button.

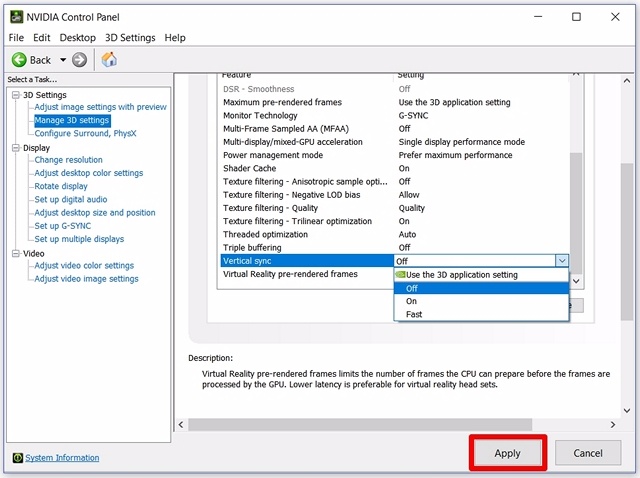
- Well, this is the step where most people get confused about. At the bottom of the same menu, you’ll notice an option for Vertical Sync. By default, it’s set to “Use the 3D application setting”, but we don’t want that. Vertical Sync, which introduces input lag is pointless when you have G-Sync. So, by clicking on the dropdown, set Vertical Sync -> Off.
Configuring G-Sync For Games
We’re not done with configuring G-Sync properly yet. We’ve a couple more steps that is absolutely crucial in determining the proper functioning of G-Sync. So, carefully follow the steps below:
- In several games, V-Sync is enabled by default, but we don’t need V-Sync at all. It totally depends on the game. If you want to disable V-Sync, you will have to get to the Graphics/Video settings within the game and turn it off, so that G-Sync will be able to work properly.

- This is arguably the most important step in this process and I’ll explain it to you exactly why. As we discussed above, G-Sync works by synchronizing the GPU’s render rate with the monitor’s refresh rate. So, suppose your game is rendering at a lower frame rate than the refresh rate of your monitor, G-Sync will reduce the refresh rate of your monitor to match the GPU’s render rate, in order to ensure smooth gameplay. However, this process doesn’t work the other way round. If the GPU renders the game at a higher frame rate than the monitor’s refresh rate, G-Sync won’t do anything and you will experience screen tearing while playing. In order to avoid this, you need to lock the frame rate of your game to the refresh rate of your monitor. You can do this by going to the graphics/video settings of your game.

Note: Not all games let you lock the frame rate to the refresh rate of your monitor. In such cases, you will need to use something in addition to G-Sync. This can be done on the NVIDIA Control Panel by enabling Fast Sync in the Vertical Sync option, instead of completely turning it off. If you don’t prefer doing this, you can make use of a third-party software like RivaTuner which comes along with MSI Afterburner that can limit the frame rate.
How To Check If G-Sync Is Working Properly
If you haven’t configured G-Sync properly, you will still run into the issues that normal monitors face. So, screen tearing is the first sign that your monitor’s G-Sync is not working properly. If you’ve followed all the steps that we discussed, we’re pretty confident you’ll never run into these issues. However, a single screenshot is not good enough to show you the difference in performance, so we’ve included NVIDIA’s own video which you guys can check out and then compare it with your gameplay, in order to confirm the proper functioning of NVIDIA G-Sync on your monitor.
SEE ALSO: How to Overclock GPU For Better Gaming Performance
Use NVIDIA G-Sync For The Best Gaming Experience
Once you go G-Sync, there’s no turning back. There’s no doubt you’ll hate missing out on the buttery smooth, stutter-free and tear-free gaming sessions. That being said, if you currently don’t have a G-Sync monitor, you should definitely consider getting one. Having a G-Sync monitor alone isn’t good enough, especially if you haven’t configured properly. We’ve noticed several users having trouble setting it up properly, and therefore, we decided to do our part by addressing it. So, have you properly configured G-Sync now? Do let us know how this article has helped you by simply dropping a few words in the comments section down below.


 Varun Mirchandani


