
We use our iPad for a plethora of purposes. Whether it’s jotting down something using Quick Note or adding widgets to the iPad to keep track of things, the actions may vary depending on the user. However, if there’s something universal, it’s screen recording the iPad for when you want to capture something specific or the entire screen to share it with someone. If you don’t know how to go about recording your screen on the iPad, don’t worry. We have created a guide to show you how to screen record on your iPad with ease.
Record Your iPad Screen: A Step-by-Step Guide (2021)
This guide not only contains instructions on how to screen record on iPad but a list of recommendations for third-party screen recording apps as well. All these apps are for users who want more control over their screen recordings. Use the table below and go through your desired section.
How to Add Screen Recording Button to Control Center
Before we begin to screen record on the iPad, we must first set it up so that the option is always available in the Control Center. This way, you can swipe down and start recording instantly. Don’t worry, it’s not difficult. Follow the steps below to do so:
1. Open the Settings app on your iPad.


3. To do that, scroll down to “More Controls” until you see “Screen Recording”. Then, tap the green (+) icon, and you are done.

4. Next, scroll back up and turn on the “Access Within Apps” toggle so you can screen record across apps on your iPad in the future.

You will now see the Screen Recording button when you swipe down from the top right corner of your iPad’s screen. It will be denoted by a classic recording icon.
How to Screen Record on iPad
Now that the grunt work is done, let us see how you can start screen recording on your iPad. Since screen recording on iPad also records internal audio, including games and even Youtube, so feel free to use it with any app of your liking. We will record the home screen for this tutorial.
1. Swipe down from the top-right corner of your iPad’s screen to open the Control Center.
2. Now, tap the screen recording button. You will then see a small countdown begin.


3. Swipe up to close the Control Center and wait for the Screen Recording to turn on. You will know the recording has started when you see a red recording icon on the top right. Now, you can screen record whatever you want on your iPad.

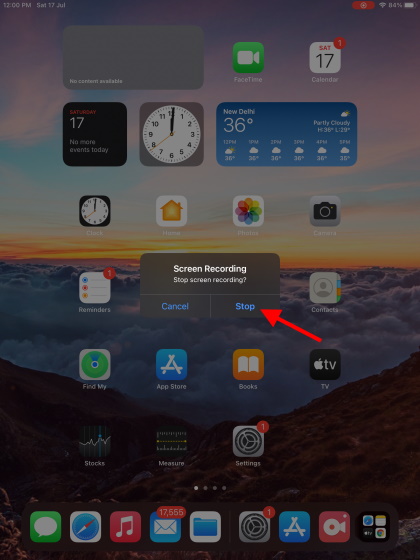
4. To stop the screen record on the iPad, tap the red button on the top right and select “Stop” from the confirmation pop-up.
Congratulations, you have officially saved your first screen recording! You can repeat the above process and choose to screen record any app or website as many times as you want. You can find your screen recordings in the Photos -> Screen Recordings folder.
How to Screen Record with Audio on iPad
There are times when you need to have audio in your screen recordings to convey a particular piece of information. This feature could come in handy for giving feedback on school projects or office work. Fortunately, the iPad lets you use the native microphone to record your voice while you are screen recording. Follow the steps below to screen record with audio on the iPad.
1. Swipe down from the top-right corner of your iPad’s screen to open up the Control Center.
2. Next, tap and hold the screen recording icon, and a small menu will open up.

3. From the pop-up menu, tap the “Microphone” icon to turn it on. The icon will turn red, indicating that you have enabled the iPad’s microphone for voice-over while screen recording. You can also select other locations to save your recordings. This list will vary based on the availability of compatible apps on your iPad.

4. Now, when you start recording the screen, you will know when the microphone is in use, thanks to the orange indicator that shows up alongside the red recording icon on the top right corner.

And that’s pretty much it. You can now record your iPad’s screen while having audio. Just narrate whatever you want, and it will be captured as well. Repeat the above steps to turn it off if you wish.
How to Edit Recorded Videos on iPad
So you are done recording the screen and want to edit the video? There are plenty of options available for users looking to quickly edit their iPad screen recordings. Follow the steps below to edit a recorded video:
1. Open the Photos app on your iPad. Under “Media Types” on the left sidebar, find and open the “Screen Recordings” section.

3. Then, tap the thumbnail of the video you want to edit, and it will start playing. Pause it, and tap the “Edit” button on the top right corner.

4. You have now entered the video editing console. You will see the video’s timeline at the bottom, along with the various editing options, including crop, filters, color and contrast adjustment, and more. The left bar includes all of the main editing options, which upon clicking reveal more options on the right.

5. To quickly trim your video without adding any effects, tap the camera icon on the left to get to the timeline. Now, tap and hold the start or end of the timeline to make any changes. Once done, you can save the video and write the changes over the old one or save it as a new clip. Check out the GIF to get a better understanding of how it works:


You can use the built-in video editor to add various effects and filters, adjust finer settings like exposure, saturation, and shadows, and more. Furthermore, you can even adjust the tilt of the video by using the editor. So, go ahead and edit your screen recordings on iPad before you share them with anyone.
Use Third-Party Apps to Record the iPad Screen
The native iPad screen recorder does the job for pretty much everyone. However, if you are the type of user who wants more control over the quality of their recordings and other settings, you will need third-party apps. There are many third-party screen recording apps available for the iPad that you can download. For this demo, we will use a third-party recording app called Record it!. Have a look at the steps below to see how it works:
1. Download and install Record it! from the App Store (Free, in-app purchases start at $4.99).
2. Upon opening the app, one can see the variety of options available to you. The app lets you choose the quality of the video output, the bitrate, and the framerate. As for users who want to add their reactions, there are options for Face Cam and Commentary too.

3. Tweak the settings as you wish and press the big red icon in the middle to begin screen recording on your iPad. A small confirmation pop-up will then appear to let you choose whether you want the mic on/off. From the pop-up, tap “Start Broadcast” to record whatever is on your screen.

Record it! works in the same way as the native screen recorder but provides more room to play and choose the specific settings. While the higher video quality output is locked behind a paywall, the freedom to choose your bitrate and framerate, along with general ease of use, makes it worth it.
Pros:
- Ease of Use
- Ability to choose Bitrate and Framerate
- Attractive Design
Cons:
- HD output locked behind paid plans
Other iPad Screen Recording Apps You Can Check Out
Besides the app we have demonstrated above, there are plenty of other apps you can download to screen record your iPad. Find some of the apps we liked below.
1. Screen Recorder+

This popular screen recording app is a fine recommendation for iPad users looking to have more control over their screen recordings. Screen Recorder+ has a simple design and offers a wide array of video options, including resolution, which goes all the way to 4K (Paid), bitrate and framerate, and even Recording orientation. There’s also a video editor available in the app, and it works well. If you can look past the advertisements that appear occasionally, this free tool is one of the best to screen record on your iPad.
Pros:
- Easy to grasp design
- Supports up to 4K video output
- Orientation Selection
Cons:
- 4K locked behind Pro Plans
- Occasional Advertisements
Price: Free, in-app purchases start at $1.99
Get Screen Recorder +
2. Mobizen Screen Recorder

For gamers who wish to record the screen and stream from their iPad at the same time, Mobizen will do the trick. This screen recording app for iPad is a good combination of ample screen recording features with many streaming and editing options.
The app is easy to use and has a minimalistic design. While Mobizen screen recording caps the recording quality to 720p unless you pay, it compensates by giving many streaming tools such as direct YouTube, Twitch, and RTMP streaming. The facecam, commentary, and online GIF maker options are also a welcome addition. Gamers among you should try out Mobizen.
Pros:
- Livestreaming Options
- Bonus Added Features
- Onboard GIF Maker
Cons:
- Occasional Advertisements
- Full HD recording locked behind paid plans
Price: Free, in-app purchases start at $0.99
Get Mobizen Screen Recorder
3. Go Record: Screen Recorder

This incredibly lightweight app is for users who like iPad’s native recorder but want to spice it up with a commentary or two. When it comes to adjusting things like video quality and other settings, Go Record offers no choice. Instead, the app relies on a no-nonsense approach and presents users with a Start Recording button.
While you can pay for a paid plan to add a face cam, if you are looking to shoot or import a video and add audio commentary, Go Record will do just fine. Moreover, there are no ads to distract you here.
Pros:
- No Advertisements
- No-Nonsense recording approach
- Video editor included
Cons:
- Lacks customization options
- Some users might find it too simple
- Facecam locked behind paid version
Price: Free, in-app purchases starting at
Get Go Record: Screen Recorder
Bonus: How to Take a Screenshot on iPad
So now you know how to record, edit, and save iPad screen recordings. However, what if you want to take screenshots on your iPad. Don’t worry, we have you covered. Taking a screenshot on an iPad is easy. Depending on your model, there are two methods you can use to take a screenshot on the iPad.
Method 1: For iPads with a Home Button
Users who have a home button on their iPad, follow the steps below:
1. Press the top button and the Home button of your iPad at the same time. Hold down the buttons for half a second and then release them.
2. You will hear a camera shutter sound, and a tiny screenshot thumbnail will appear in the bottom left corner of your iPad. You have successfully taken a screenshot.
3. You can tap the thumbnail that appears to open the screenshot directly or make your way to the Photos app and find it there.
Method 2: For iPads Without a Home Button
Even if you don’t have a Home button on your iPad, it is easy to take a screenshot. Follow the steps below.
1. Press the top button and the volume up button of your iPad at the same time. Hold down the buttons for half a second and release them.
2. You will hear a camera shutter sound, and a screenshot thumbnail will appear in the bottom left corner of your iPad.
3. Tap the thumbnail that appears to quickly edit the screenshot or access it later via the Photos app.
And that’s how you take a screenshot on the iPad. Keep doing it enough, and you will get the hang of it pretty soon!
Frequently Asked Questions (F.A.Q)
1. Can I Record Internal Audio Using iPad Screen Record?
Answer: Yes, you can. The native iPad screen recorder picks up the internal audio of any app you use while recording, including games. Furthermore, you can also record your own voice through the microphone and internal audio simultaneously.
2. Can I Record Music from Apple Music or Spotify in iPad Screen Recording?
Answer: The answer to this question differs across apps. In our testing, streaming services like Spotify and Youtube recorded the audio with or without the mic flawlessly during the screen recording on iPad. However, Apple Music has built-in measures to prevent this and kept fading the music out until we stopped the recording. Depending on the service you use, the answer will be subjective, so better try it and find out.
3. Does Screen Recording on iPad Consume a Lot of Battery?
Answer: While screen recording on iPad does consume battery, the amount is almost negligible. The iPad Air and Pro supports a long battery life, so we doubt a few screen recordings should get in the way of your daily workflow.
4. Where Can I Find All My iPad Screen Recordings?
Answer: All your screen recordings can be found in the Photos app itself. Simply open Photos on your iPad, and you will see the Screen Recordings folder under the “Media Types” section on the left sidebar. You will find all your iPad screen recordings there.
Screen Record on your iPad with Ease
As you just learned, screen recording on your iPad is incredibly easy. While you can stick to the native screen recorder for quick use, we understand if you opt for a third-party screen recording app for more functionality. Besides, there are a lot of things you can do with the iPad. These best iPadOS 15 features are only the tip of the iceberg. Need help with screen recording? Are you stuck on any of the steps? Share your queries with us in the comments below, and we will help you out.


