Linux Containers (LXC) are a lightweight virtualization technology and they have various uses. It is part of the Linux kernel, and can let you emulate one, or multiple Linux distros on a single Linux host. Think of it as a middle ground between a chroot and full virtualization technologies such as VirtualBox, KVM or Xen. A similar technology present in the BSD world are FreeBSD Jails.
As an example, the machine I am writing on is a laptop running Linux Mint 18, powered by an Intel Atom processor, and has a meager 2 GB of RAM. Yet, I am running three Linux containers, each with an instance of the Apache web server running, without a big performance hit. This would be unthinkable with a traditional virtual machine like VirtualBox. So, if you have been wanting to run multiple distros on your Linux system, Linux Containers should do the job for you just fine.
Installing and Configuring Linux Containers
We are setting up LXC on Linux Mint 18 64-bit. The installation instructions provided here will also work unmodified on Ubuntu 16.04 and above. If you are using another distro, please refer to your distro’s official documentation if something does not work as expected. A familiarity with the command line and general troubleshooting is also assumed.
Prerequisites
Here are a few things you should set up to start using multiple distros:
1. Install LXC and other prerequisite software using:
[sourcecode]sudo apt install lxc lxc-templates uidmap[/sourcecode]
2. Now you need to configure your profile. Enter the following commands to set it up:
[sourcecode]mkdir -p ~/.config/lxc
echo "lxc.id_map = u 0 100000 65536" > ~/.config/lxc/default.conf
echo "lxc.id_map = g 0 100000 65536" >> ~/.config/lxc/default.conf
echo "lxc.network.type = veth" >> ~/.config/lxc/default.conf
echo "lxc.network.link = lxcbr0" >> ~/.config/lxc/default.conf
echo "$USER veth lxcbr0 2" | sudo tee -a /etc/lxc/lxc-usernet[/sourcecode]
3. Then, you need to set up the user permissions as follows:
[sourcecode]sudo usermod –add-subuids 100000-165536 $USER
sudo usermod –add-subgids 100000-165536 $USER
sudo cgm create all user
sudo cgm chown all user $(id -u) $(id -g)
cgm movepid all user $$[/sourcecode]
Setting Up Your Container
Now that you have LXC Container installed along with other prerequisite software, here are the steps to set up the Container:
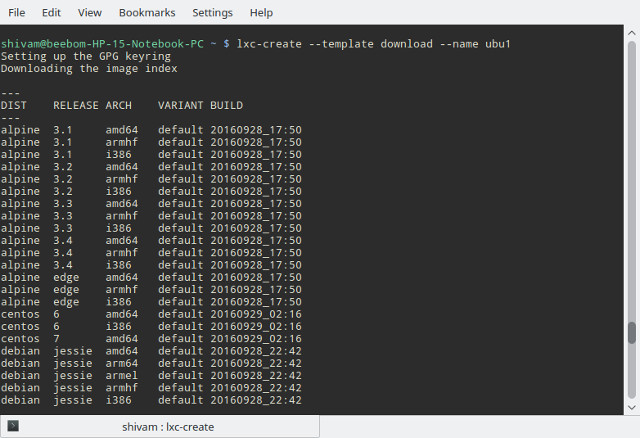
1. In this example, we will set up an Ubuntu container, named <code>ubu1</code>. To do it, execute the following command:
[sourcecode]lxc-create –template download –name ubu1[/sourcecode]
2. Here, the <code>–template</code> parameter tells lxc to download a preconfigured image from the internet, while the <code>–name</code> parameter specifies the name of the container – <code>ubu1</code> in this case. You can use whichever name you like.
3. You will now see a list of supported distro images:

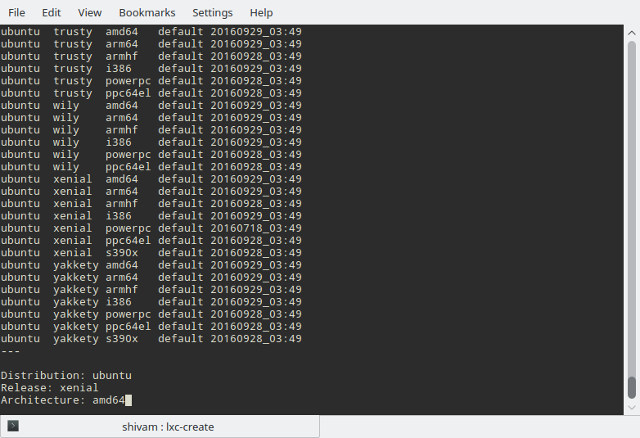
4. Enter the specifics of the distribution that you wish to install. I will install the 64-bit version of Ubuntu 16.04 (codename xenial) here:

5. If you wish to install the image non-interactively, the following command achieves the same result as the above:
[sourcecode]lxc-create -t download -n ubu1 — –dist ubuntu –release xenial –arch amd64[/sourcecode]
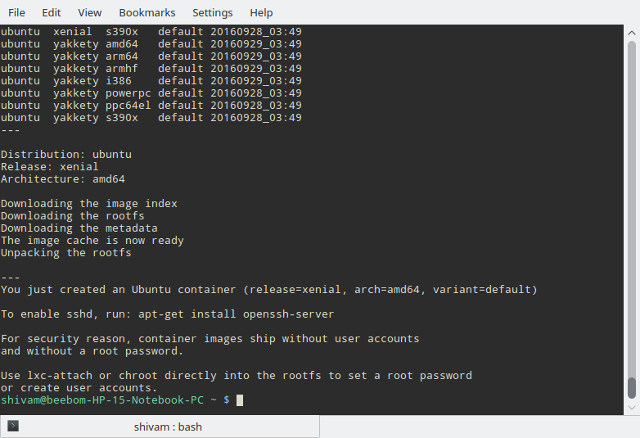
6. LXC will now download and install a minimal Ubuntu xenial image on your host system. The download and installation might take a bit of time depending on your internet connection and your PC’s speed. After the installation, you will see a screen like this:

You are now ready to use your newly set up Ubuntu container.
Using Multiple Distros with Linux Containers
Starting Up The Container
Start your container using the <code>lxc-start</code> command:
[sourcecode]lxc-start -n ubu1 -d[/sourcecode]
Here, the <code>-n</code> parameter specifies the name of the container that you wish to start (<code>ubu1</code> in this case), and the <code>-d</code> parameter makes it run in the background.
You can verify that the container started by using the <code>lxc-ls</code> command:
[sourcecode]lxc-ls -f[/sourcecode]

The <code>-f</code> parameter enables fancy reporting. Here, you can see that I have two containers – one Debian (stopped) and one Ubuntu (running).
Accessing and Using Your Container
You can access the container’s console using the <code>lxc-attach</code> command:
[sourcecode]lxc-attach -n ubu1[/sourcecode]
You will now have a root shell on your container. It is recommended that you set up a password for the root user, and create a regular user account:
[sourcecode]passwd
adduser beebom[/sourcecode]
Of course, replace beebom with the username you want. You can then install software and configure your container like you would do on a regular system. For example, in a Debian or Ubuntu container:
[sourcecode]apt install wget openssh-server htop tmux nano iptables[/sourcecode]
Stopping Your Container
After you are done playing with the container, either use the <code>exit</code> command to return to the host system. Now use the <code>lxc-stop</code> command to stop your container:
[sourcecode]lxc-stop -n ubu1[/sourcecode]
This will make the container shut down cleanly and it will not consume any more resources on your system, except for disk space.
Cloning and Snapshots
Clones
Once you have installed programs in a container and configured it to your liking, you might want to create one or multiple copies of it for easy provisioning. You can do this by creating a clone, which is an exact replica of a container.
For instance, to create a clone of the <code>ubu1</code> container (let’s call it <code>ubu2</code>), first stop the container using <code>lxc-stop</code>, then use the <code>lxc-copy</code> command:
[sourcecode]lxc-stop -n ubu1
lxc-copy -n ubu1 -N ubu2[/sourcecode]
Here, the -n option specifies the source container, and the -N option specifies the name of the clone. To verify that the container was cloned, use the <code>lxc-ls</code> command:

Snapshots
Suppose you are about to make some potentially dangerous or hard to recover from changes to a container, such as re-configuring a web server. To minimise the damage, you can create a snapshot of the container before making such a change. In case something goes wrong during the configuration, you can simply stop the container and recover it to its previous working state by restoring a snapshot.
To create the snapshot, first stop the container:
[sourcecode]lxc-stop -n ubu1[/sourcecode]
Then, create a snapshot using the <code>lxc-snapshot</code> command:
[sourcecode]lxc-snapshot -n ubu1[/sourcecode]
This creates a snapshot called <code>snap0</code>. Any subsequent snapshots you create using this command will be called snap1, snap2, etc.
After this, you can start the container, and make the changes you want. If at any time you want to return to a snapshot you created, stop the container , and use the <code>lxc-snapshot</code> command with the <code>-r</code> parameter to restore a snapshot:
[sourcecode]lxc-snapshot -r snap0 -n ubu1[/sourcecode]
This will restore the snapshot <code>snap0</code> to the <code>ubu1</code> container.
Auto-start Containers at Boot
You can make a container, for example, a web server container, start up automatically when you boot up your system. To do this, go to the container’s config file, located in <code>$HOME/.local/share/lxc/<NAME OF CONTAINER>/config</code>, and add the following lines:
[sourcecode]lxc.start.auto = 1
lxc.start.delay = 5[/sourcecode]
The first line specifies that the container should be started at boot. The second tells the system to wait 5 seconds before starting the next container, if any.
Troubleshooting
If you are having trouble starting containers, the first thing to try is to run the <code>lxc-start</code> command in Foreground mode. For example:
[sourcecode]lxc-start -n ubu1 -F[/sourcecode]
This will show you the errors on the current console, which is very useful in identifying the nature of the problem.
Problems With Running Multiple Containers Simultaneously
If you try to run multiple containers at once, you might see errors such as “Quota reached”, or “failed to create the configured network”. This is because you are running more network interfaces than allotted to you. You can increase the number of network bridges a user can run by modifying the <code>/etc/lxc/lxc-usernet</code> file as root. It might look something like this:
[sourcecode]# USERNAME TYPE BRIDGE COUNT
beebom veth lxcbr0 5[/sourcecode]
You can change the number at the end (5 in this example), to a bigger number such as 10. This will allow you to run up to 10 containers at once.
Other Uses of Linux Containers
Linux containers have various uses. You can use them as lightweight test boxes, for example, to test out various configurations of a web or database server before committing them to a production server. Another use case is to test how an application runs on different versions of various distros.
You can also use them to isolate applications that you do not trust – any damage such an application does will be limited to its own container, and will not affect the host system. Please note that while it is possible to run GUI applications in a container, it takes a significant amount of time and effort, and is thus not recommended. If you wish to run GUI apps in a sandbox, refer to our article on how to sandbox apps in Linux.
SEE ALSO: 7 Best VirtualBox Alternatives You Can Use
Run Multiple Distros Simultaneously With Linux Containers
Thus ends our How-To on running multiple Linux distros on a single computer, without the overhead of a full-sized virtual machine. The utility of this technology is only limited by your creativity, so feel free to experiment and find out novel use cases. If you have trouble setting up containers, feel free to ask us a question in the comments section.


Your code tags aren’t formatted properly, it’s unreadable.