
While working with Linux, you must have heard of some strange names like bash, zsh, csh, etc., but never got to know about them. So you head over to the internet to read about the various shells in Linux. On Unix and Linux-based systems, the default shell that ships with the systems is bash, but zsh catches your attention right away. zsh is a customizable Linux shell that supports plugins and helps increase your productivity vastly. In this article, we will explain what is zsh and how to customize it using Oh My Zsh in Linux.
What is the z Shell (zsh) in Linux?
The Z-Shell (zsh) is a powerful and highly-customizable Unix shell, which is popular among developers and power users. It was developed as an extended version of the Bourne Shell (sh) by Paul Falstead in the year 1990 and is packed with some great features and options.
Zsh is highly customizable and the users can configure it to their preferences with the config files or even use various plugins to extend its functionality. Both zsh and bash are two of the most popular shells available for Linux. Though both are based on Bourne Shell (sh), there are many critical differences between them. Let’s see some of the differences which make users choose zsh over bash:
- Zsh has better auto-completion, autocorrect, and plugins than bash.
- Zsh has better support for scripting and globbing and pattern matching than bash.
- Overall, zsh is a more powerful and customizable shell than bash.
Overall, zsh offers new and improved features, making it a popular choice for many users. It is now the default shell in macOS, while bash remains the default shell in most Linux distributions.
How to Install zsh in Linux Systems
Now that you know all about its features, let’s move on to installing zsh in Linux. Make sure you meet the following prerequisites before we can proceed further.
- Any popular Linux distro, preferably updated to the latest version
- Sudo access or any user with root privileges
- the latest version of wget, git, and curl
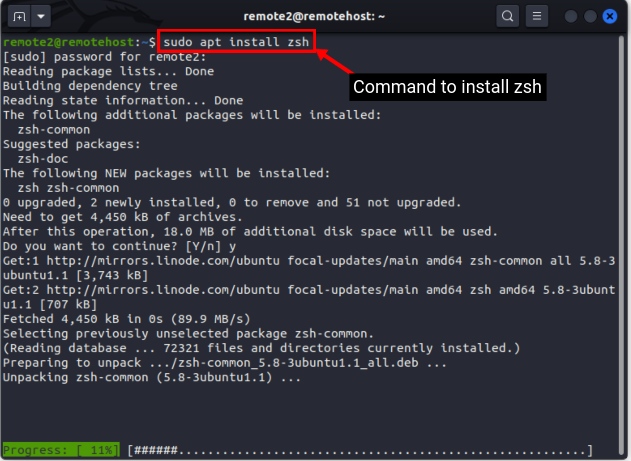
Now, you can install zsh with the following commands based on your distribution:
For Debian-based Linux systems:
sudo apt install zshFor Fedora-based Linux systems:
sudo dnf install zshFor Arch-based Linux systems:
sudo pacman -S zsh
2. Once installed, you can verify the installation with the following command. This command will show the currently installed version of zsh.
zsh --version

3. To make zsh the default shell on your Linux system, use the following command. Enter the root password when prompted.
chsh -s $(which zsh)

4. To use z shell, reboot your system. Once it boots back again, open the terminal, and you will be asked for the new configuration. Press “0” on the keyboard to create an empty config file as we will teach you how to configure zsh with plugins and themes.
How to Install Oh My Zsh in Linux
There are loads of plugins and themes that you can use to customize and configure zsh. It can be difficult for beginners to manage and keep track of the configurations.
To solve this problem, Oh My Zsh was developed by Robby Russell in 2009. Oh My Zsh is a community-driven framework to install and maintain zsh plugins, themes, make new shell aliases, and more. It includes a set of pre-configured settings and functions to make customizations easy for users of every type. To install Oh My Zsh, use any of the following commands:
sh -c "$(curl -fsSL https://raw.github.com/ohmyzsh/ohmyzsh/master/tools/install.sh)"OR
sh -c "$(wget https://raw.github.com/ohmyzsh/ohmyzsh/master/tools/install.sh -O -)"

Either of the above commands will download the Oh My Zsh script and install it. Once the installation is completed, it will make a backup of the existing .zshrc file (where all your configurations are stored and loaded from) and a new .zshrc file will be created with the default template.
Customize Z Shell in Linux using Oh-My-Zsh
Now that Oh My Zsh is installed on your Linux system, let’s see how to configure the Z Shell with it. Oh My Zsh comes bundled with many themes, which you can use to customize the Terminal.
1. Use Preinstalled Oh My Zsh Themes
By default, oh my zsh will apply the “robbyrussell” theme. But if you need to change the theme, you can choose from the wide variety of pre-installed themes. You can preview the themes on the official oh my zsh wiki page. To see the list of pre-installed themes. use this command:
ls ~/.oh-my-zsh/themes/

Once you have chosen a theme, you need to modify the .zshrc config file. Use the following command to open the config file in the Nano text editor in Linux:
nano .zshrcNow look for the line that reads ZSH_THEME="robbyrussell". Change the theme name to one you like in the following pattern:
ZSH_THEME="<your_preferred_theme_name>"For example — if you wish to use the “agnoster” theme in zsh on Linux, your parameter should look like this:
ZSH_THEME="agnoster"

Then, press CTRL + X to exit the nano editor. You will be prompted whether to save the changes made or not. Here, press “Y” to save the changes and then press Enter to finally save and exit the nano text editor. Use the following command to have the changes take effect:
source ~/.zshrc2. Install a Custom Theme
If you do not like the pre-installed themes in oh my zsh on your Linux machine, you can even install custom themes of your choice. For example, if you want to install the “powerlevel10k” theme, you first need to download the theme repository with the command below:
git clone --depth=1 https://github.com/romkatv/powerlevel10k.git ${ZSH_CUSTOM:-$HOME/.oh-my-zsh/custom}/themes/powerlevel10k

Then open the .zshrc file in the nano command line editor or any other Linux text editor of your choice:
nano .zshrcNow, look for the line which says ZSH_THEME. Change the theme name as under:
ZSH_THEME="powerlevel10k/powerlevel10k"

Then, follow the steps shown earlier to save and exit the editor. To apply your changes, use the following command once again. You will then be prompted with the powerlevel10k configuration wizard. Follow the steps to set up as per your preference.
source ~/.zshrc3. Enable Bundled Plugins
Plugins expand the functionality of zsh to the next level. Oh-My-Zsh comes with a wide variety of plugins, which you can use by modifying the config file. You can see the entire list of available plugins on the official GitHub page or run the following command to see the complete list of plugins:
ls -a ~/.oh-my-zsh/plugins/

Once you have chosen the plugin to use, open the .zshrc file in the nano text editor with the following command:
nano ~/.zshrcThen look for the line which says plugins=(). Add the plugin name inside the brackets in the following syntax:
plugins=(<plugin_names_to_use>)For example — if you want to use both the git and docker plugins, use this command:
plugins=(git docker)

Now save and exit the text editor as shown above. Then, run the following command to apply the changes:
source ~/.zshrcYou can now use the plugins in your workflow but consult the official documentation to know more about the commands.
4. Install Custom Plugins
Besides using the bundled plugins, you can even install some popular custom plugins to make your workflow more efficient. Follow these steps to install third-party plugins with oh my zsh in Linux:
1. Clone the plugin git repository into the $ZSH_CUSTOM/plugins. For example — if you need to install the auto-suggestions plugin, which recommends commands based on the history, use this command:
git clone https://github.com/zsh-users/zsh-autosuggestions ${ZSH_CUSTOM:-~/.oh-my-zsh/custom}/plugins/zsh-autosuggestions

2. Once the repository is cloned, open the .zshrc in your preferred text editor and look for the line that begins with plugin= and add the plugin name inside the parenthesis as shown below:
plugin=(<custom_plugin_names>)In this case, add zsh-autosuggestions inside brackets as shown below:
plugin=(zsh-autosuggestions)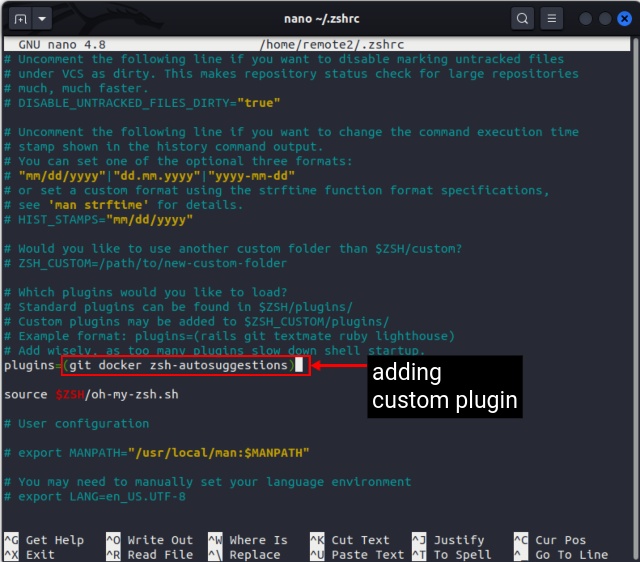
3. Once you are done adding the plugin names, save and exit the editor. Now run the following command to finally apply the changes you have made:
source ~/.zshrcStart typing any command that you have executed, and it will suggest to you the most recent version of it. Press the right arrow key or the END key to accept the suggestion.
5. Configure Oh My Zsh Automatic Updates
With the .zshrc file, you can configure the entire shell to your heart’s content to make it yours completely. Zsh loads the configuration from this file whenever a new terminal session is started. In this file, you can add your custom functions, aliases, key bindings, etc.
Generally, Oh My Zsh configures automatic updates, but if it is not enabled by default, uncomment the following line inside the .zshrc file:
zstyle ':omz:update' mode auto


