
If you you are building a desktop PC for the first time or upgrading your storage space for the better, installing a new hard drive can prove to a daunting task for some. While most users these days install SSDs in their PCs, a hard disk drive (HDD) is still one of the most popular storage devices for those who want high capacity at an affordable price. So today, we will explain the process to install a hard drive in your PC in simple steps. The process is straightforward and sees you mount the HDD, plug in the cables, and format the drive to make it usable on your computer. We will go through these steps one-by-one, so keep reading. Let’s learn how to install an HDD in your PC.
Things to Remember Before Installing a Hard Drive
Select the Right Form Factor
Internal hard disk drives (HDDs) are designed for internal use in desktops and come in two form factors. You can get 2.5-inch HDDs, like Seagate BarraCuda, or 3.5-inch HDDs, like this popular WD Blue drive. The thickness varies based on which hard drive model you buy. For a small-size ITX Build, a 2.5-inch HDD is ideal. The internal HDDs in laptops are usually the 2.5-inch kind as well. For most people though, we recommend getting a modern 3.5-inch HDD with a 7200rpm speed.
Note: In 2022, you should not use a hard drive as your main boot partition for Windows. Using a modern OS such as Windows 10/11 on a hard drive tends to be an unoptimized experience. The UI, opening apps, everything is sluggish and feel intolerable. Instead, check out the best NVMe and SATA SSDs you can consider in 2023.
Gather the Necessary Tools
Firstly, you need a Philips Head screwdriver to install the drive in the hard disk bay. Your workplace should be clean, and you must ground yourself before touching your PC components. An anti-static bracelet is a great tool to avoid electrostatic damage. In this guide, you will be needing a SATA Cable, SATA Power Connector (included with power supply), and HDD mounting screws provided with the case.
How to Install a Hard Drive in Your Desktop PC
Step 1: Open Side Panel of Your PC Case
First, you must open up all side panels of your case and set them aside to gain access to the motherboard. In this guide, we expect you have already installed the power supply (PSU) and the motherboard with its various components in your PC. You will need to use a Philips Head screwdriver for this. We will require it while mounting the hard drive in the PC case as well.
Step 2: Locate the Hard Drive Mount
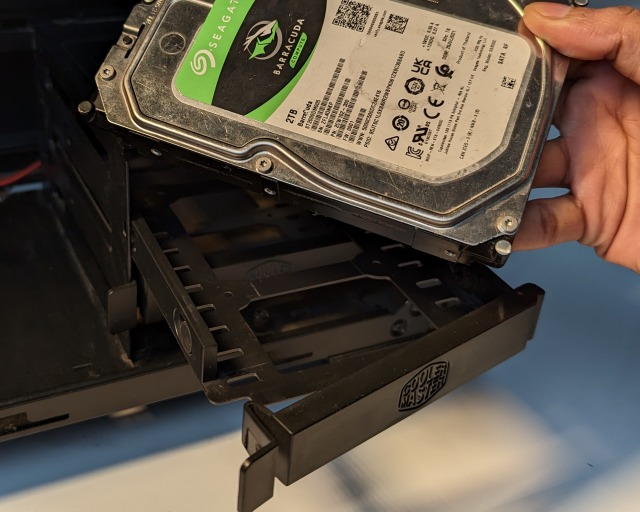
Next, locate the 3.5-inch drive mounting bay in your PC case. In many cases, including ours, the case comes with a tool-less bay for easy installion. Depending on your case though, the drive bay might require you to screw in the drive. Once you find it, position your hard drive in the bay and start to screw it in with the Philips Head screwdriver, and the relevant drive-mounting screws provided with your PC case.
In our installation, we didn’t need any screws, and the HDD simply rests inside the 3.5-inch drive day with nubbins that go inside the screw holes. The hard drive itself rests firmly in place inside the dedicated drive bay of our Cooler Master ATX case.

Note: If you have a 2.5-inch HDD, simply install it in the 2.5-inch drive mount location in your PC case in this step instead of the 3.5-inch one. The other steps in this tutorial will remain the same.
Step 3: Plug In SATA Cable in Hard Drive
Next, plug in one end of the SATA cable to the HDD. You will notice notches on the SATA port and the cable itself, which align in a specific orientation. Also, retrace the power supply cables to find the SATA power connector. Then, route the cable toward the drive bay of your case, and plug in the SATA power connector to the hard drive.

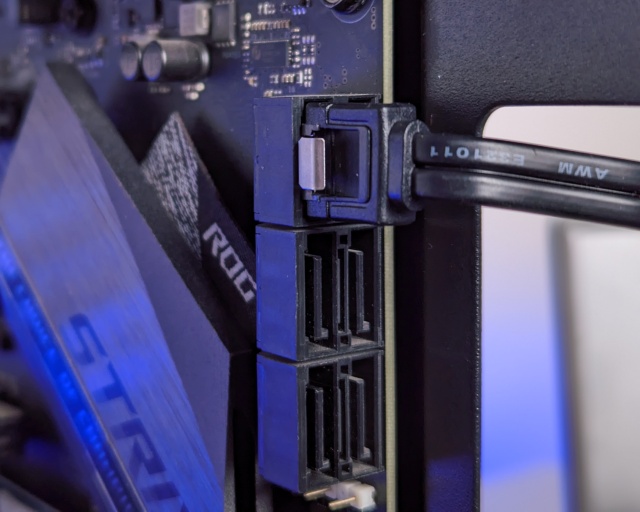
Step 4: Plug In SATA Cable in Motherboard
Next, locate the SATA ports on your motherboard, and plug in the other end of your SATA cable. You can refer to your motherboard manual in case you need help in finding the port. If you have a big graphics card installed, it becomes quite hard to plug in a SATA cable as the ports are usually positioned around the PCI-e slot area where you plug in the GPU. So, you might need to uninstall the graphics card if needed.
You hard drive Installation is now complete. We can now move to the next section, where we make our new storage device ready for use.
Step 5: Confirm If HDD Was Installed Correctly
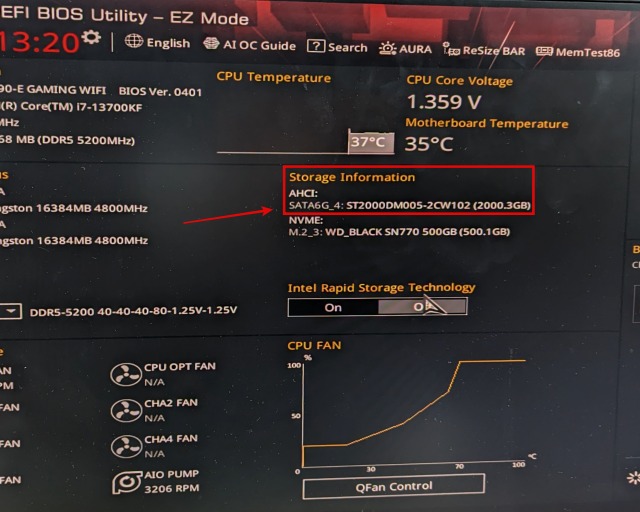
Boot up your PC and enter the BIOS setup. On most motherboards, the key to enter the BIOS is F2 or Delete. You can refer to this guide for help on how to enter the BIOS. The POST screen, which shows up when you first start your PC, also lists the keys you can press to enter the BIOS.
Under Storage Information or another similar term (specific to your BIOS), you can see your newly installed HDD. The model number and capacity should be listed here. Then, you just need to format it in the next step, which will make it ready for storing data.
Step 6: Format Hard Disk for First-Time Use
Usually, when you install a new hard drive, Windows 10/11 asks you to format the storage device before you use it. When you boot into the Windows OS, there will be a pop-up that asks you to format the drive. Proceed with the formatting process, and your drive will now show up under “My PC” in hte File Explorer.
In the rare case that you do not get the pop-up, follow these steps to make your hard drive ready for use. Press the Windows key and type “Create and format hard disk partitions” in the search bar at the top. Click on the utility in the search results, and you will see your new drive at the bottom. In this case, it should show up as “Unallocated Space.” Right-click on your drive and select the “New Volume” option. After that, follow the steps in the wizard to format the drive. You can refer to this guide for detailed steps on how to format a drive with the disk management utility. It also includes other alternative methods for formatting a storage device.
That’s pretty much everything you need to know about installing a hard drive in your PC. After following the steps mentioned in our guide, your HDD is now ready for storing data. While there were a few things to keep in mind, and the installation mostly involved mounting the hard drive and plugging in the cables. It wasn’t too hard, right? Now, to manage the partitions in your HDD, check out this guide about the best partition software to use. It has some free utilities mentioned as well. For further storage expansion, buy one of the best external HDDs listed in this guide. And in case you have any doubts, comment down below, and we will help you out.
Hard drives are slightly difficult to install, but it mostly depends on your PC case and whether you have the required SATA cable and power connectors on hand. Some PC cases are designed with hard-to-reach drive mounting locations, so installing a hard drive can be especially time-consuming in these cases.
Installing another hard drive in your PC depends on how many SATA ports you have. You can check this in the motherboard’s manual and make sure to confirm how many SATA power connectors you have available.
HDD is only better for your PC if you have a massive need for storage space. While SSDs cost more, they are more reliable and do not break as often. A modern SSD costs almost double the price of an HDD with the same capacity, but this difference has become almost negligible over the years.
While most desktop PCs will accept both 3.5-inch and 2.5-inch HDDs, there are a few small cases and mini PCs that will probably only accept 2.5-inch HDDs. Not every HDD can fit in any PC, and you must confirm the compatibility with your PC case manual.


