If the processor (CPU) is the brains, you could say the graphics card (GPU) is the heart of your PC build. GPUs are specifically designed to excel at demanding graphical tasks such as high-end gaming or 3D rendering. Without a dedicated GPU, your PC automatically resorts to using the GPU integrated into the CPU, and it’s not that powerful. So, if you have bought a new graphics card and find it daunting to open the PC case and install the GPU, well, we are here to help. Whether you are upgrading the graphics card on your system or building a new PC, we will explain how to install a dedicated graphics card on your motherboard in this guide.
We will help you line up the graphics card perfectly to avoid the risk of damaging your motherboard’s expansion slot. This is a step-by-step guide on how to install a GPU on your motherboard. If you are upgrading your existing PC with a new graphics card, we have even added a section to teach you how to remove the graphics card from your motherboard. That said, let’s first look at the prerequisites:
Things to Remember Before Installing GPU
Gather the Necessary Tools
While this might feel like an obvious requirement for installing your graphics card, remember to gather and organize the various tools you will for this installation. Here, you will need a Philips Head screwdriver. Also, your PC case comes with screws that are specifically used for installing PCIe devices, such as the graphics card. So, remember to gather those too before proceeding.
Ensure your workplace is clean and ground yourself before working with PC components. We recommend using an anti-static bracelet, which will prevent electrostatic damage.
Check Power Supply Compatibility
Remember to check if you have the right amount of power connectors on your PSU to plug in your graphics card. These are labeled as ‘PCI-E’. Picking the right power supply is a important step while upgrading your GPU. The power supply you own has a maximum power rating, which determines the kind of graphics card you can install.
You need to use a power supply calculator and enter your system components details, including the graphics card you are installing in your PC. When done, the tool will tell you the power reading demanded from your power supply by the various system components. Then, make sure to have a solid 20-30% overhead over the calculated rating, which is an optimal way of running your system.
Does Your PC Case Have Enough Room?
The graphics card you are going to install might have a large footprint, like the Founder’s edition Nvidia GeForce RTX 4090. Confirm the dimensions of your GPU and how many expansion slots you need to install it in your case. Even if your case does support a massive GPU, some optimizations might be required to ensure your GPU isn’t limited by the cooling setup.
Install Other PC Components Beforehand
We expect you have already installed the motherboard in your PC case and other various components such as the power supply. If you haven’t, read our dedicated guides linked above. We have even explained how to easily install the CPU on your motherboard and apply the thermal paste before installing the CPU cooler in your PC build.
How to Install Graphics Card (GPU) In Your PC
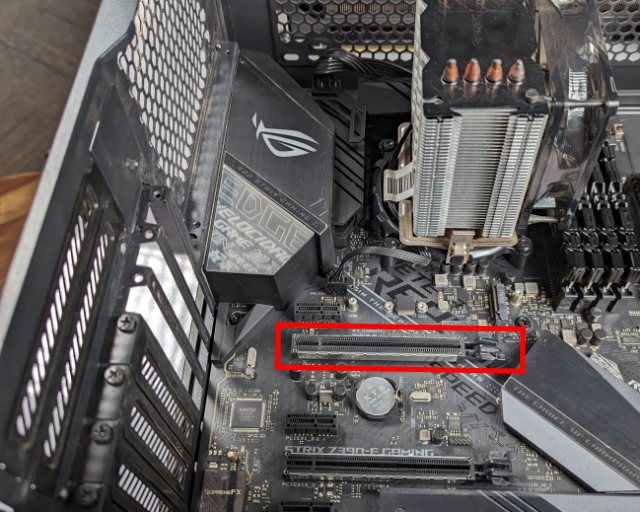
1. Start by placing your PC case down horizontally, and locate the PCIe x16 Slot with maximum bandwidth on your motherboard. It is usually the top slot on the motherboard. Refer to your motherboard’s manual for help in understanding the various PCIe expansion slots on your board, and thus, finalize the PCIe slot to install your dedicated graphics card in.
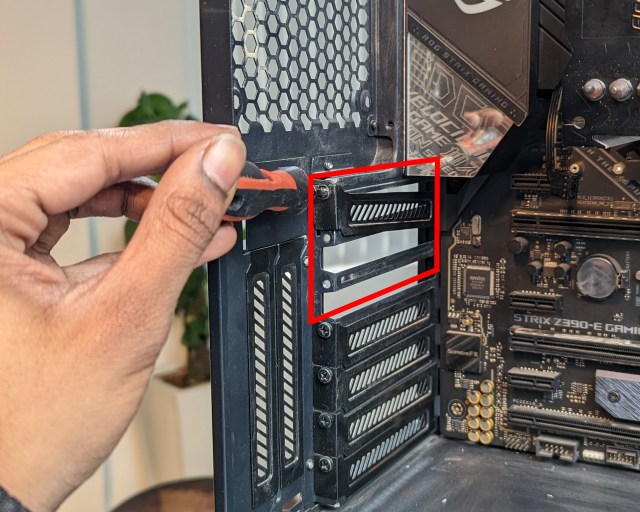
2. Next, you have to remove the PCIe expansion slot cover in your PC case. By default, a new PC case covers the expansion slots, and you can selectively remove the ones you wish to use. Usually, you can detach them by pulling or pushing them out. But your PC case could have a special way to remove them. Certain PC cases also feature a modular bracket for vertical GPU installation. In our PC case, we had to unscrew the PCIe expansion slot covers.
Remember to remove all the expansion slot covers necessary for GPU installation. In our case, the ASUS Strix GeForce RTX 3070 Ti requires three slots, so we are removing the covers accordingly.
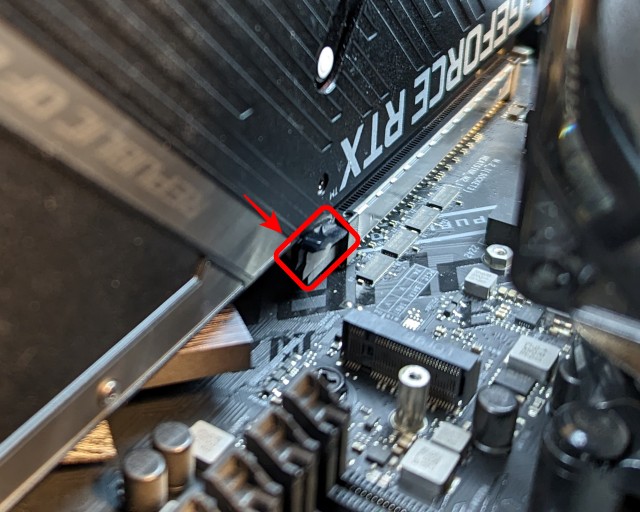
3. Next, open up the PCIe x16 slot on your motherboard. You can do this by pressing the clip outwards to un-clip it, making it ready for the graphics card installation. The way to do this can differ from board to board, so you should refer to your motherboard manual if needed. In the Asus Z790-E Strix, a button press releases the PCI-e x16 expansion slot instead of a clip next to the slot

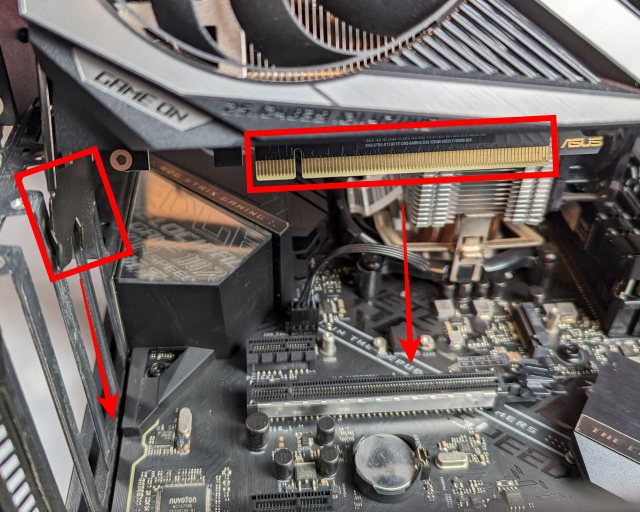
4. Next, position the graphics card above the connector, and line up the gold PCIe x16 connector contacts of the GPU against the slot on the motherboard. You also need to make sure that the graphics card I/O bracket’s top side lines up with the PCI-e expansion slots on your case.
Note:
All this must line up perfectly before you push your graphics card into the motherboard’s slot. Otherwise, you risk damaging the PCIe x16 slot of your motherboard and the graphics card’s connector as well. Do take time with this step, and look at the representation below to understand how the GPU orientation should be before it is lowered into the slot itself.
5. Now, gradually lower the graphics card into the slot. You should keep in mind that the gold PCIe connector of your graphics card lines up with the slot perfectly. Then, once aligned perfectly, push the graphics card into the slot firmly with both palms into the PCIe x16 slot. You will hear a click, which is the PCIe slot’s clip reverting back to its previous state, locking the graphics card in place.

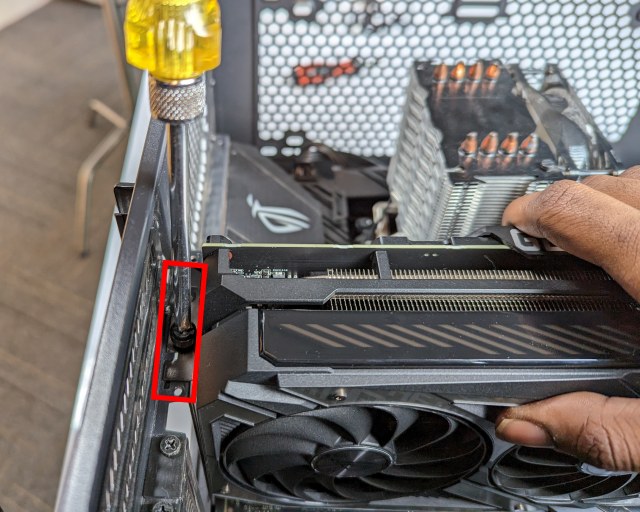
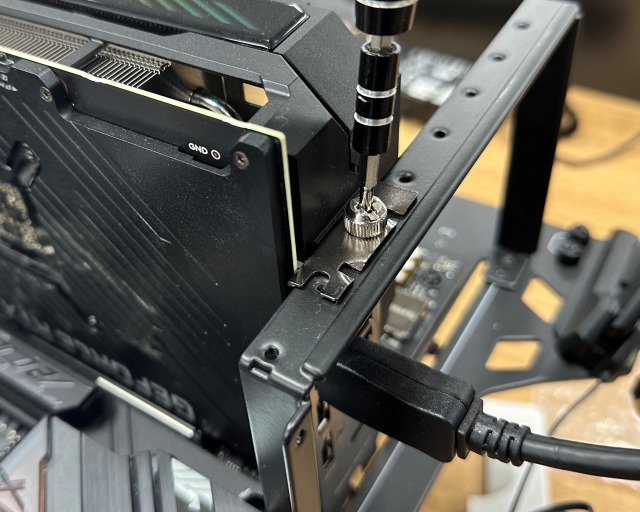
6. Next, make sure you keep holding the graphics card firmly. You have to protect it from sinking (also referred to as sagging). This happens when the GPU is heavy. In certain conditions, GPU sagging can even break the PCI-e x16 slot cover. So, you must hold the GPU firmly after seating it into the slot. Then, line up the screws needed on the case’s PCIe expansion slots and proceed to screw them in, ensuring your GPU is held in place.
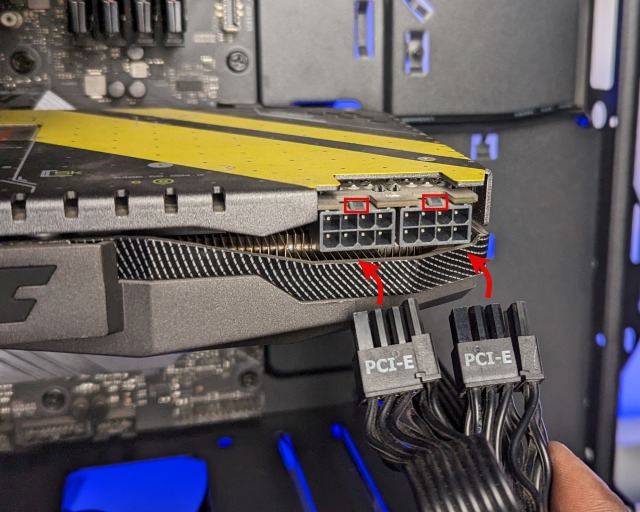
7. Now, it’s time to plug in the power connectors required by your graphics card. You need to retrace the various cables coming out of your power supply. Find the PCIe power cable that plugs into graphics cards. Then, you have to plug in the required 8-pin or 6-pin power connectors into the GPU. But before that, make sure the orientation is right. You have to notice the ‘squares’ and ’rounded squares’ on the graphics card. Also, there’s a little raised section where the power connector clips in. These visual cues will help you to align the power connectors perfectly before plugging them in.
8. Well, you have now successfully installed the GPU in your PC. But there are a few things left to do. If your GPU looks like it is sagging, you can install a GPU anti-sag bracket to prevent it from doing so.
How to Remove Graphics Card from Your PC
Before proceeding to remove the graphics card from your PC, it’s a good idea to run the Display Driver Uninstaller (DDU) by visiting this link. This utility removes the existing driver files and settings completely. Also, when you plug in a new graphics card in your PC, you will have to install drivers for it.
1. First, you must remove the screws that hold the graphics card in the case. These are located near the PCIe expansion slot bracket. Also, remember to detach the power connectors and any video cables, , like the DisplayPort or HDMI cable, that are still plugged in.
2. Next, you have to press outward on the PCIe slot clip on the motherboard. This will open up the PCIe slot and release your graphics card from it.
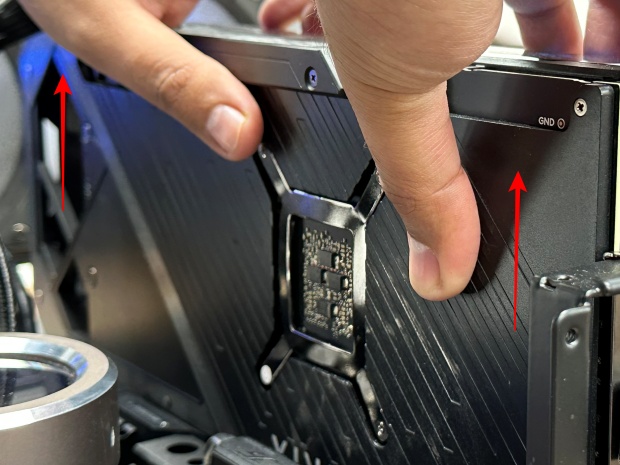
3. Now, you can simply pull out the existing graphics card slowly. Lift it up vertically, and make slight adjustments to remove it from your PC case effectively.
4. Good job! You have successfully uninstalled the graphics card from your motherboard. Now, you can go back to the start of this guide to install your new GPU.
So, as you can see, installing a graphics card in your PC is a simple process. By following the steps in this guide, you will be able to upgrade or install a new GPU in your PC build with ease. Upgrading the GPU will allow you to experience faster 3D editing workflow and improved gaming performance. That said, if you have any questions or encounter any issues during the installation process, do let us know down in the comments section, and we will assist you.
hat’s all you need to know about installing a graphics card on your PC. After following the aforementioned steps, you would have successfully installed the GPU in your system. We also showed you how to uninstall the GPU, in case you’re performing an upgrade on your existing PC build. You’ll be able to edit faster, or game better with your new graphics card. With the new RTX graphics cards, users get the feature of real-time ray tracing. This includes realistic reflections and other major visual fidelity improvements. Another new feature of RTX GPUs is NVIDIA DLSS, in which users get an innovative AI-based anti-aliasing technique and marginally better frame rates. Also, check out Intel’s fresh entry into the dedicated GPU market with the Arc lineup here. If you have any doubts or face any issues during the installation process, do let us know in the comments below.
Some sagging of the graphics card is normal. But if it’s a heavy graphics card, it might sag even with screws installed. This is a sign of too much sagging. When your GPU sags, its weight causes it to ‘sink’ because of gravity. If your graphics card’s footprint is really big, it is definitely a great idea to also invest in an anti-sag bracket.
In order to use your graphics card (GPU), you will need to download drivers for it. Intel, Nvidia, and AMD have their respective websites, where to host the latest graphics drivers. You can easily search for the graphics card’s model and download the driver software. Windows Update also installs drivers automatically, but it’s best to get drivers from the video card brand’s website.
Different graphics cards have their own advantages. The user must choose the GPU based on their performance expectations. Other factors, such as streaming features also make an impact on the overall experience. Read an in-depth comparison between the Nvidia RTX 4090 and the last-gen RTX 3090 Ti.


