Compared to hard disk drives, Solid-state drives (or SSDs) have now become more popular among PC enthusiasts for two simple reasons — superior speed and reliability. If you are still using an HDD and looking for an upgrade or are building a new desktop PC, choosing an SSD will give your computer a major performance boost. You will notice a considerable difference in app load times, copying files, and more. So, let’s not waste time and go through the step-by-step process to install an SSD in your desktop PC. Installing an SSD is not that difficult, but the nerves can be too much for new PC builders. With that said, don’t worry, as we explain how to choose a compatible SSD, find the right slot, and install the storage drive in your desktop.
In this article, we will help you differentiate between the different SSD slots on a motherboard, as they support different SSDs based on the pin connectors. Your SSD won’t work until it is plugged into the right slot on the motherboard. To know more about SATA and M.2 slots on your motherboard, check out the linked article. With that out of the way, let’s learn how to install M.2 and 2.5-inch SATA SSD in your PC.
Things to Remember Before Installing an SSD
Check SSD Compatibility with Motherboard
Every modern motherboard supports NVMe SSDs up to a certain generation. Most motherboards in the market today have NVMe Gen 4 SSD support. These slots are backward compatible with Gen 3 as well. You can configure M.2 slots in your BIOS, and we recommend that you do this before proceeding with the SSD installation guide. If you are planning to buy a budget SSD, we have listed the best options for you here.
Additionally, there are SATA SSDs that either come in a 2.5-inch or M.2 form factor. The slot for plugging in an M.2 SATA SSD is not the same as NVMe M.2 SSD slots. Refer to your motherboard manual to confirm what M.2 slots you have available. Also, some motherboards now come with NVMe Gen 5 SSD support, supporting Intel’s 13th Gen Raptor Lake CPUs (read Core i9-13900K review) and Ryzen 7000-series CPUs. However, these new SSDs are rolling out right now and are quite expensive.
Migrate or Install the Operating System
Be ready to migrate your existing operating system (OS) or have the installation disk for a new OS at hand. Cloning Windows partitions onto a new SSD can lead to a few issues sometimes, at least in our personal experience. The most recommended method is to back up all your data and perform a clean install of Windows 11 on your new SSD. However, there are many OS migration tools available out there in case you need to retain your OS partition and its data.
Check for Required Power Cables
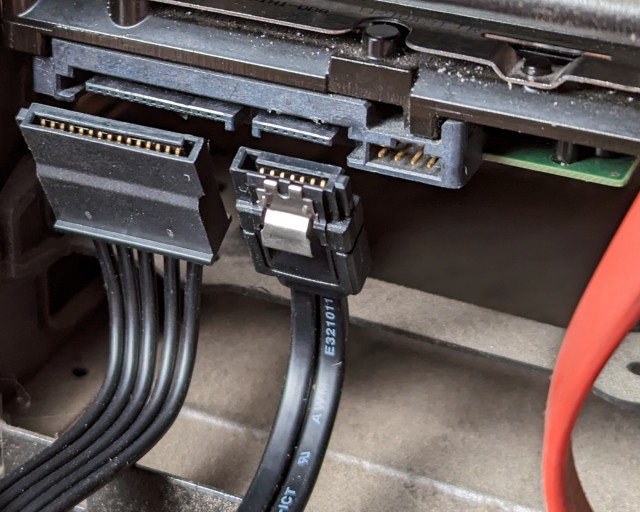
The power supply (PSU) has several connectors that plug into the motherboard on your PC. Among these connectors, you will find SATA power connectors, and you must have it ready before installing a 2.5-inch SATA SSD in your PC. Additionally, you will require a SATA cable, provided in your motherboard box and is also available online. These SATA power connectors and cables look like this.
Gather the Necessary Tools
Although this goes without saying, you need some essential tools to install the SSD in your PC build. In this case, you need a Philips Head screwdriver. Additionally, ensure you have the mounting screws (provided with the motherboard for M.2 SSD or with the PC case for a 2.5-inch SATA SSD).
Your workplace should be clean, and the required tools must be organized before you proceed further. You should have the motherboard manual on hand to confirm a few things that vary from board to board. Lastly, remember to ground yourself to avoid electrostatic damage. A great way to ensure this is to wear an anti-static wrist bracelet.
How to Install M.2 SSD in Your PC
Before proceeding with the SSD installation, remember to open up the side panels of your PC case using a Philips Head screwdriver. You will have then gained access to the motherboard and its various ports. Also, remember to enter the BIOS on Windows 11 and change the settings to select the right NVMe generation of your SSD.
Installation Guide for M.2 NVMe SSD
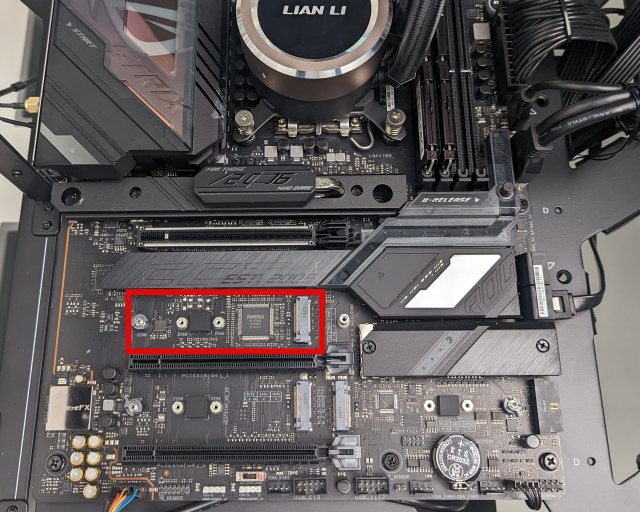
1. Firstly, confirm which M.2 slot supports the NVMe standard on your motherboard. Usually, there are different M.2 slots on a modern motherboard that can take either a SATA M.2 SSD or an NVMe M.2 SSD with specific slots for different NVMe generations. You have to refer to your motherboard manual to confirm the position of NVME M.2 slots and that will be the final position to install our M.2 NVMe SSD.
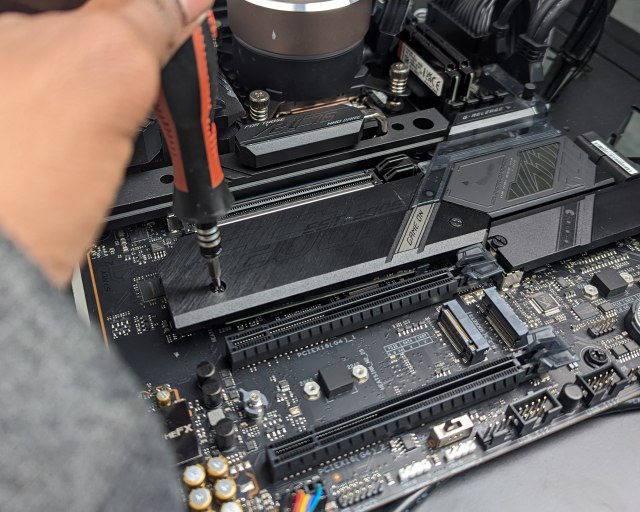
2. When you are sure about the correct location to install your NVMe SSD, open up any SSD heatsink cover that might be present on your motherboard.

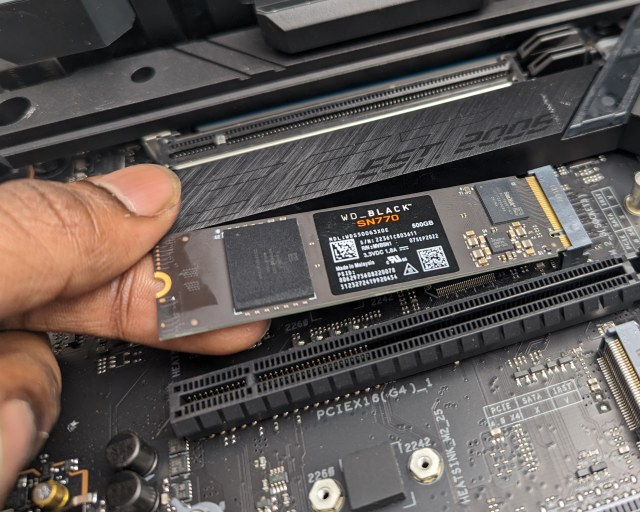
3. Next, slide your SSD into the motherboard’s NVMe M.2 slot at a 45-degree angle.
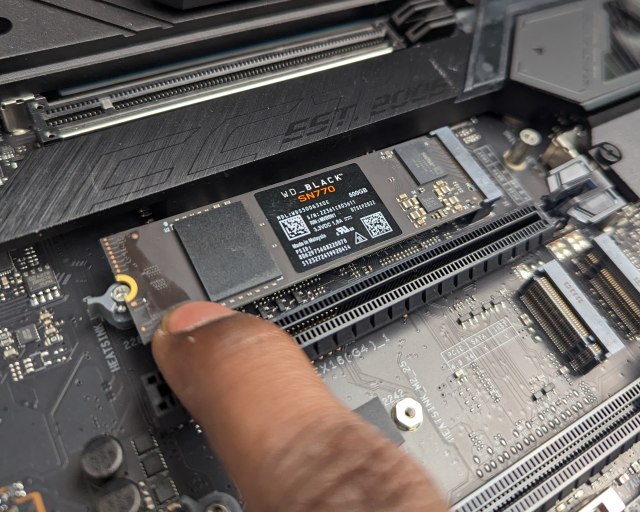
4. After it slots in firmly, press down from the opposite end of the SSD. Under the M.2 slot will be a standoff, and your NVMe SSD will firmly rest on top of it. Ours had a standoff with a tool-less installation method — refer to your motherboard manual if something feels unfamiliar.
5. Now, put the heatsink cover back on top of the NVMe SSD, and the screw for it should line up with the SSD and its standoff underneath. Proceed to screw in the SSD by re-installing the heatsink.
Note: In case an SSD heatsink doesn’t exist in your motherboard, you can directly screw in the SSD with a unique screw provided with your motherboard. Ensure the standoff exists below, and if it’s not in the right location you can simply remove it and screw it in the right place (determined by your SSD’s length). You also need to make sure to remove the SSD heatsink’s plastic cover, if any.
6. Well, that’s it. You have successfully installed an NVME M.2 SSD in your computer. You can now move to the section where we check if the SSD is installed correctly and make it ready for use.
Installation Guide for M.2 SATA SSD
Furthermore, if you are planning to install an additional M.2 SATA SSD or upgrade an existing one, confirm which M.2 slot supports SATA SSDs on your motherboard.
1. Modern motherboards have dedicated M.2 slots where the SATA SSDs are supported. These are located at different positions, usually at the bottom. You can refer to your motherboard’s manual to find out which M.2 slot supports SATA SSDs.
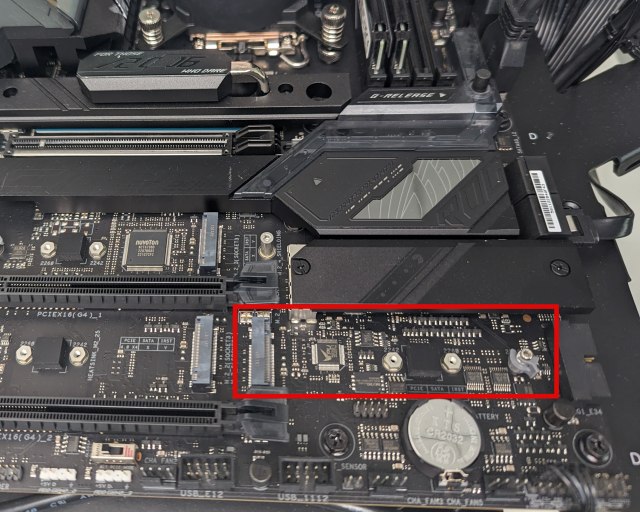
2. Now, you can proceed to install the M.2 SATA SSD in the same way as the NVMe SSD, which we described above. The only change you need to make is to ensure you install it in the SATA M.2 port instead.
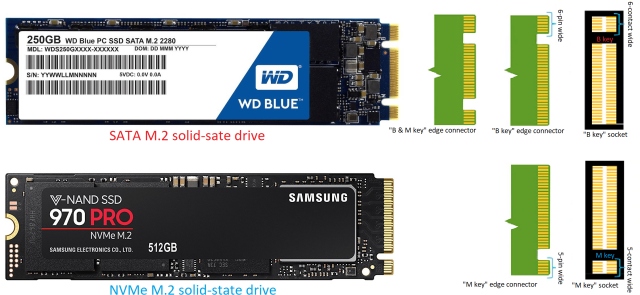
Note: Here is a visual description of the pin-out differences between NVMe M.2 and SATA M.2 SSDs.
How to Install 2.5-inch SATA SSD in Your PC
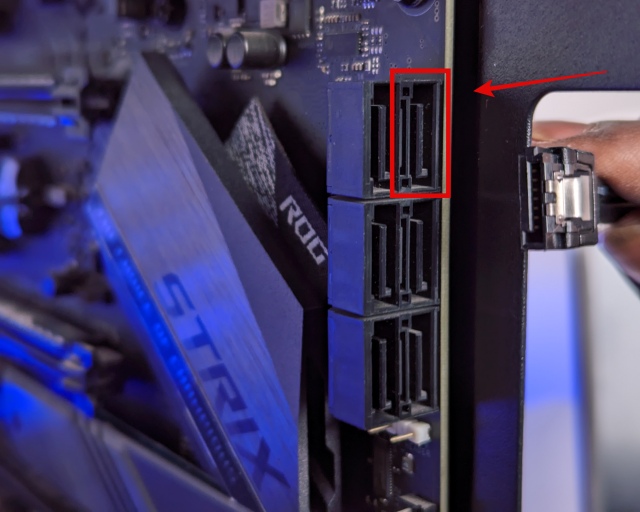
1. First, confirm the location of SATA Slots on your motherboard. Now, use the SATA cable and plug it into one side of the motherboard’s SATA female connector.
Note: Make sure you plug in the SATA cable to one of the initial SATA ports, whichever is available. Modern motherboards sometimes disable the last few SATA ports due to bandwidth limitations caused by other devices.
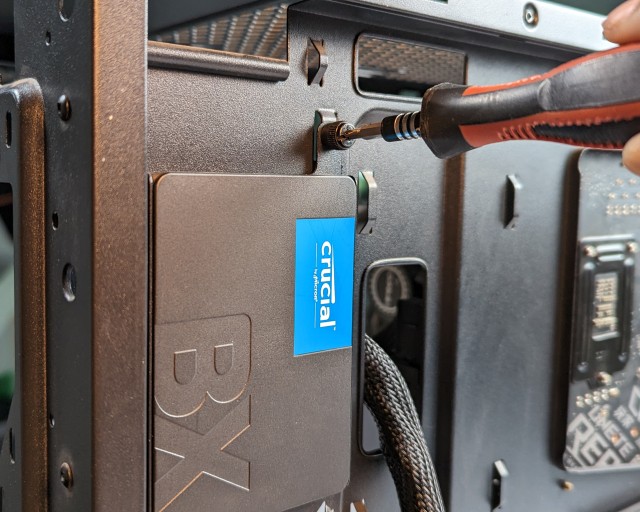
2. Next, locate the position where a 2.5-inch SATA SSD can be mounted in your PC case. Then, place your SSD there and screw it in with the case screws provided for installing drives in the storage bay. You need to use a Philips Head Screwdriver for this step.
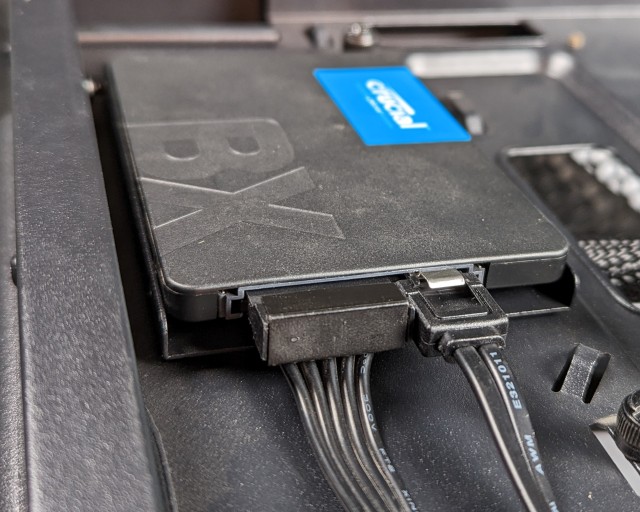
3. Next, plug in the SATA Power Connector and the other end of your SATA cable into the SATA SSD. You can trace the cables of your power supply to find the SATA power connectors.
5. And voila! You have successfully learned how to install a 2.5-inch SATA SSD in your PC. But, there are some things still left for you to do. By accessing the BIOS, you must check if your new SSD is recognized or not. Then, you need to format the SSD, which will make it ready to use.
Confirm Your New SSD Is Installed Correctly
Now, boot up your PC and press the Delete or F2 key continuously to enter the BIOS settings. The first bootup screen in your PC will also tell you the right button to enter BIOS. Else, you can head to your motherboard manufacturer’s website or refer to the manual to find info on the same.
In the BIOS settings, you will see the various storage devices plugged into your motherboard under the “Disk or Storage Information” section. Here, the BIOS will show your SSD’s brand, type (NVMe or SATA), and capacity.

Make Your New SSD Ready for Use
For users who are upgrading their existing PC and using an existing boot drive, log into Windows first. After the installation of a new SSD, there will be a pop-up that will ask you to format the drive before it’s ready to use. If you get it, simply format the drive through the pop-up, and your drive will be ready to use.
In case the pop-up does not show up, this is how you can format a new SSD and confirm its presence in Windows 11. Open the Start Menu by pressing the “Win” key and type “Create and format hard disk partitions.” Then, clicking on its search result will let you access the disk management utility.
Next, scroll down to the drives list, and you will notice your new drive marked as “Unallocated Space.” Right-click on the SSD listing to access the option which will allow you to create a new volume. Go through this wizard, and once done refer to this guide to format the new SSD in Windows 11.
So that’s pretty much everything you need to know about installing an NVMe or SATA SSD on the motherboard in your desktop PC. After following the steps above, you will have successfully installed an SSD in your PC. Are you coming from a traditional hard drive (HDD)? If so, the difference in speed is going to be astronomical. The boot and game load times will be quick, and you will never go back to HDDs. To actively check the solid-state drive’s health and optimize it, we recommend using SSD management software such as Samsung Magician. Read this article to learn about how Microsoft is using DirectStorage API, exclusive to NVMe SSDs, to deliver better load times and detailed assets in PC games. If you face any issues during the installation or have any doubts, let us know in the comments below.
Yeah, you can simply plug in a new SSD into a compatible slot. For a 2.5-inch SSD, you also need to plug in the SATA power cable. For M.2 SSDs, they run off the motherboard’s power.
The M.2 slots for installing your M.2 SSD on the motherboard differ for both SATA and NVMe SSDs. You must always confirm with your motherboard’s manual which M.2 slot to install your SSD in.
No. A compatible M.2 slot is where you plug in the NVMe SSD. However, SATA M.2 SSDs plug into a different M.2 slot on the PC’s motherboard.
Yes, you can install a Gen 4 NVMe SSD in a Gen 3 slot. But remember that the Gen 4 NVMe SSD will run at Gen 3 speeds. So, don’t waste your money unless you are upgrading to a PCI-e Gen 4 compatible motherboard soon.
Yes, a good Gen 4 NVMe makes a substantial difference in speeds compared to Gen 3. However, its practical use does depend on the user. For example, a content creator needs to work with large amounts of data. The latest NVMe SSDs are useful in these scenarios.
Plugging in the M.2 SATA SSD into an incompatible M.2 slot such as the one designed for NVMe will result in the drive not being recognized.
Plugging in the M.2 NVME SSD into an incompatible M.2 slot such as the one designed for SATA SSDs will result in the drive not being recognized.


