When you set up your HomePod mini, it automatically connects to the same WiFi network as your iPhone. This is great because it lets you quickly get started with using your HomePod for listening to music, controlling your smart home, and more. However, what if you changed your home WiFi network, or maybe you’re shifting cities and need to change the WiFi network on your HomePod mini. Well, worry not, because that’s almost as easy as well. Here’s how to connect your HomePod mini to WiFi.
How to Change WiFi Networks HomePod mini or Connect HomePod to WiFi
In this article, we will take a look at changing WiFi networks on your HomePod mini, and also how you can connect your HomePod to an 802.1X WiFi network. If you’re interested, we have also explained in layman terms how WiFi works on HomePod mini so you can get a better understanding of it. As always, you can use the table of contents below to navigate through this article easily.
How to Change WiFi Networks on HomePod
- Open the Home app on your iPhone (or iPad). Here, you will see an exclamation mark (!) next to your HomePod mini. This indicates that there’s an issue with the HomePod’s network settings.
- Touch and hold the HomePod icon.
- You will see a message saying something along the lines of “This HomePod is on the <WiFi network name> WiFi network, which is different than the network that this iPhone is on.”
- Scroll down, and tap on the “Move HomePod mini to <WiFi network name>”
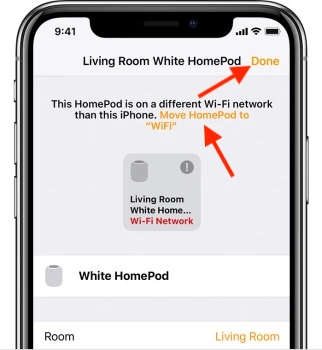
Wait for a few seconds, and that’s it, your HomePod mini will now be on the same network as your iPhone or iPad. Easy, right?
Connect Your HomePod to a 802.1X WiFi Network
You can connect your HomePod to 802.1X WiFi networks that don’t require a one-time password and use the below-mentioned authentication types:
- PEAP
- EAP-TLS
- EAP-TTLS
- EAP-FAST
Depending on your needs, you can choose to share the WiFi configuration from your iPhone/iPad to your HomePod or install a configuration profile to automatically connect.
Share the WiFi Configuration from Your iPhone or iPad
- On your iPhone or iPad, connect to the 802.1X WiFi network and then launch the Home app.
- Now, long-press the HomePod tile. For stereo-paired HomePod speakers, you need to first tap Speakers and then touch and hold the individual HomePod.
- Next, scroll down and hit “Move HomePod to [network name]”. Make sure to tap Done after your HomePod has successfully connected to the new network.
Use a Configuration Profile to Automatically Connect Your HomePod to a WiFi Network
Apple also allows you to install a configuration profile that automatically connects HomePod to an 802.1X WiFi network. As a network administrator, you can make a profile available from a website or an email message.
- Simply, tap the profile on your iPhone or iPad and then select your HomePod.
- If your HomePod doesn’t appear, choose Other Devices and then select your HomePod. After that, follow the instructions to complete the installation.
Find Your MAC Address
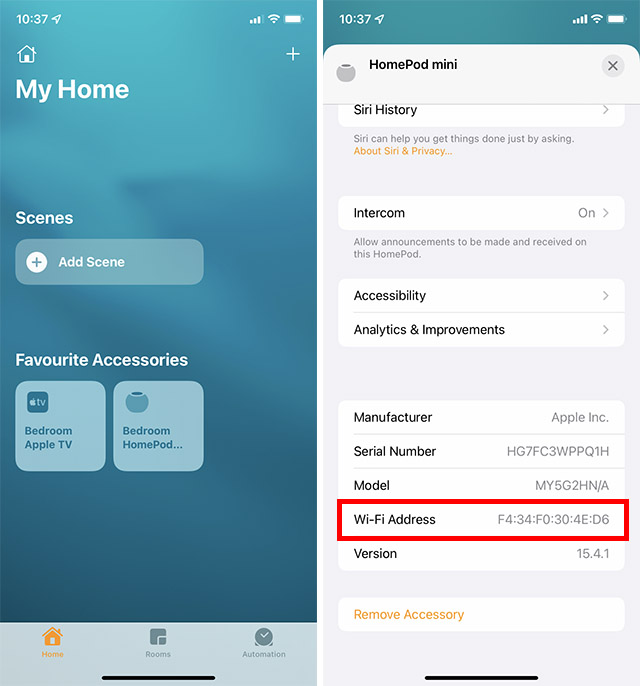
In some cases, your network administrator may need the WiFi address of your HomePod to be able to provide access. The Home app for iOS offers quick access to your MAC address.
- Open the Home app on your iPhone. Touch and hold the HomePod icon. Scroll down and you will find your WiFi address (MAC address) at the bottom.
How Does WiFi Work on HomePod mini or HomePod?
When you set up your HomePod mini or HomePod using your iPhone or iPad, your smart speaker automatically makes use of the same WiFi network that your iOS/iPadOS device is currently connected to. Considering that both the HomePod and the iPhone need to be on the same network to work seamlessly, this automatic use of the same WiFi makes sense. Moreover, it also means you don’t have to worry about manually switching the WiFi network on your HomePod.
But what if you happen to switch to a different WiFi network on your iPhone later? Well, in this case, you will need to manually change the WiFi network since the HomePod doesn’t change the network automatically.
You can connect your HomePod to most 802.1X WiFi networks. Following the release of iOS 15.4/iPadOS 15.4 or later, HomePod can also be connected to captive networks which require additional sign-in steps such as the networks offered by hotels or dorms. Moreover, if your 802.1X WiFi network requires a unique identity certificate for each device, you can also install a configuration profile to connect.
Change WiFi Network on Your HomePod mini or HomePod With Ease
That’s done! So, that’s how you can connect your Siri-enabled speaker to a WiFi network. Even though I’m quite pleased with the way HomePod and iPhone complement each other, it would be better to include both automatic real-time switching and a bit more control over the WiFi setting pretty much in tune with iOS as the existing option is a tad confusing. By the way, make sure to share your thoughts about HomePod and where it stacks up against the likes of Amazon Echo and Google Home.