After many years of seeding Windows 10, Microsoft has finally released Windows 11, and chances are most people will use the default settings that come with the OS. But if you want to go the extra mile and fine-tune the Settings page, you will have a far better experience on Windows 11. For example, you can block ads that appear on many UI elements, you can also tighten the privacy and enable some of the useful Windows 11 features for better productivity. So in this article, we bring you the best Windows 11 Settings you should change right now.
Best Windows 11 Settings You Should Change (2021)
We have included all the important Windows 11 Settings that you should adjust for a secure, privacy-friendly, and bloat-free experience. You can expand the table below to move to any relevant Settings you want to change right now.
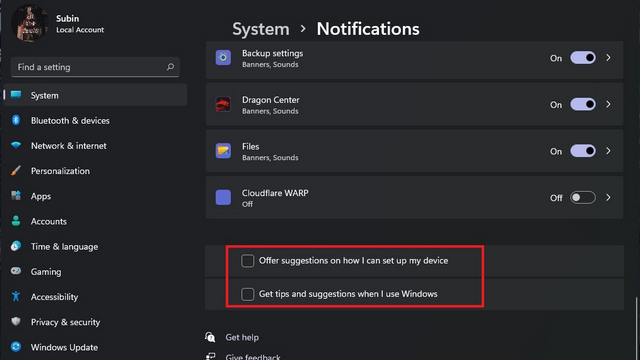
1. Disable Annoying Notifications
Windows 11 is surely polished and clean, but the constant nagging to try out Microsoft-based products is annoying. Once in a while, you will get a notification to install the Your Phone app or try the new Edge browser. After a while, these notifications get on your nerve.
So the first thing you need to do on Windows 11 is to disable these suggested notifications. Open the Windows 11 Settings page and move to System -> Notifications. Scroll down to the bottom and disable the toggles for “Offer suggestions on how I can set up my device” and “Get tips and suggestions when I use Windows”. For a more detailed guide, follow our article on how to turn off notifications in Windows 11.
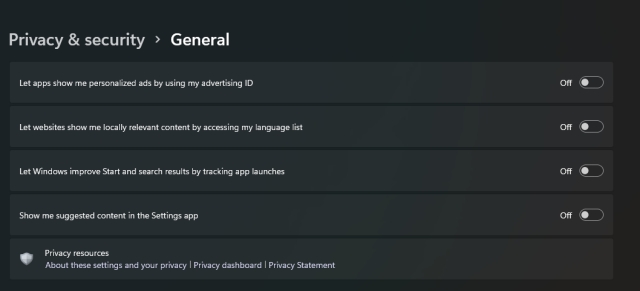
2. Disable Ads in Windows 11
Similar to notifications, ads have gone rampant in Windows 11. You will find promoted apps in the form of ads in the Start menu. Then there are suggested contents on the Settings page. Not to forget, of late, search results also have embedded ads. So if you want to get rid of ads, open the Windows 11 Settings app and move to Privacy & security. Here, under the General section, disable all the toggles (shown in the screenshot below). This will make your Windows 11 experience much better.
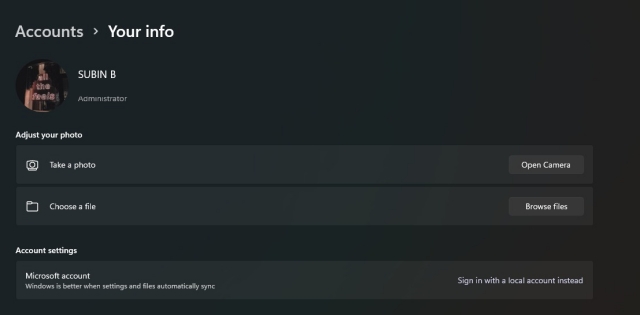
3. Sign in With a Local Account
If you are someone who wants to use your PC locally, you can steer clear of the online Microsoft account. You can simply sign with a local account, just like on Windows 10 and 7. That will stop all kinds of telemetry and tracking services in the background.
To do so, open the Settings app and move to Accounts. Under the “Your Info” page, click on “Sign in with a local account instead”. For users who want strict privacy, this is a vital setting that you should change after updating to Windows 11.
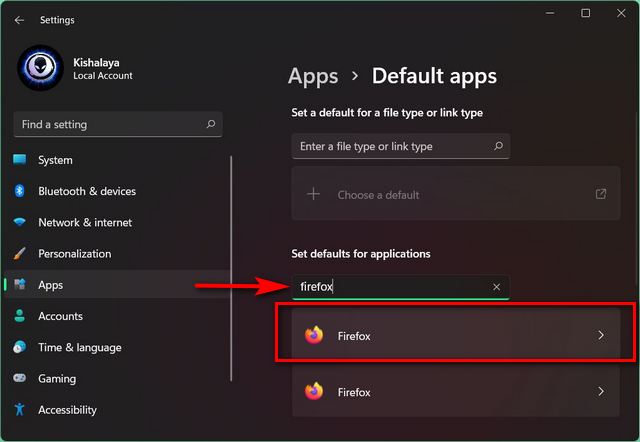
4. Change the Default Browser
After moving to Windows 11, many users would notice that they can no longer change the default web browser with a single click from the Settings page. It’s because Microsoft wants users to try the new Edge browser, which is frankly not a bad option. However, if you prefer to use Chrome or Firefox because of their stability and privacy features, you will need to take some extra pains to change the default browser in Windows 11.
So if you want to change the default browser, open Settings and navigate to Apps -> Default apps -> Edge. Now, click on all the link types and change them to your browser of choice. You can follow our tutorial on how to change the default browser on Windows 11 for in-depth instructions.
Keep in mind that even after changing all the link types, clicking on a link through the new Widgets panel or other Microsoft services will open the webpage in Edge. If you want Windows 11 to respect your browser choice, head over to our article on how to force Windows 11 to open links in your default browser.
5. Remove Recommended Items in Start Menu
The new Start menu redesign in Windows 11 is clean, and it’s a good mix of old elements and new additions such as personalized recommendations. Sometimes the recommended section offers handy shortcuts to files you are looking for, but currently, it requires more fine-tuning.
So if you are someone who wants to have control over the Start menu and keep it decluttered from personalized recommendations, you can very well disable it (sort of). Open Settings and navigate to Personalization -> Start. Here, disable the toggles for “Show recently opened items in Start, Jump Lists, and File Explorer” and “Show recently added apps”.
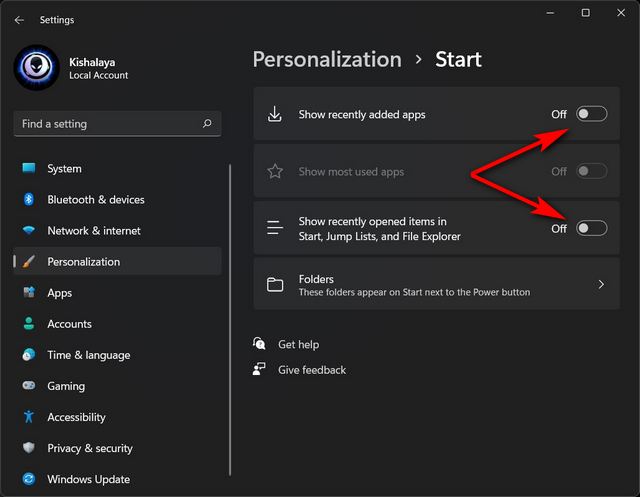
While disabling these toggles will remove the recent apps and files recommendations, the ‘Recommended’ section in the Windows 11 Start Menu will not disappear. It will continue to take up space in the Start Menu, which can be annoying, but there’s currently no way around it. For detailed instructions, you can check out how to remove the Recommended section from Windows 11 Start menu.
6. Add Folders to the Start Menu
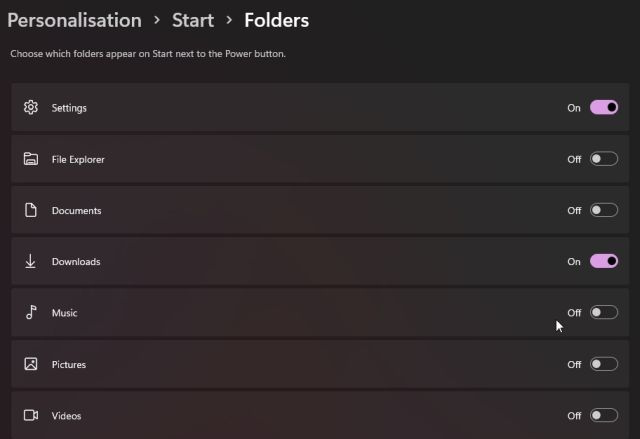
The ability to add folders to the Windows 11 Start menu is awesome, and you must utilize this Windows 11 Setting to get the most out of it. Right now, you can’t add custom folders to the Start menu. But Windows 11 offers pre-defined folder locations like Documents, Downloads, Pictures, etc.
To add folders to the Windows 11 Start menu, open the Settings app and navigate to Personalization -> Start -> Folders. Here, you can enable toggles for the folders you want in the Start menu. To find more ways to customize the Start menu on Windows 11, go through our linked article.
7. Block Third-party App Installation
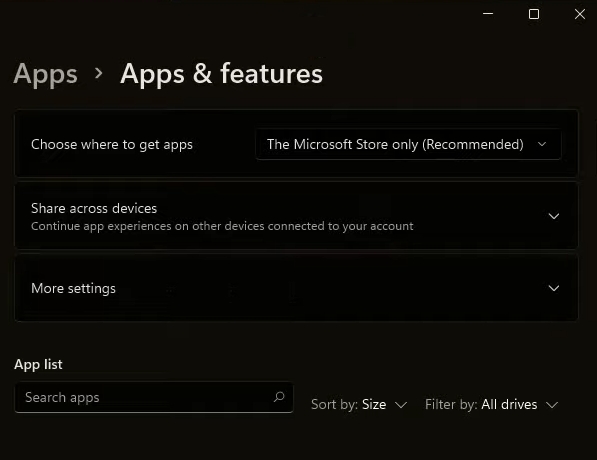
This option is not for everyone, but if you have an elderly parent or a child who will be using a Windows 11 PC, it’s best to lock the third-party app installation method. It will stop the installation of shady EXE files downloaded from the web and keep your computer safe from malware and viruses.
On top of that, the Microsoft Store on Windows 11 is getting most of the commonly-used apps — from VLC and Zoom to WinZip and even Discord. So to block third-party app installation, open the Windows 11 Settings app and move to Apps -> Apps & features. Here, from the drop-down menu next to “Choose where to get apps”, choose “The Microsoft Store only”. That’s it.
8. Sync Clipboard Across Devices
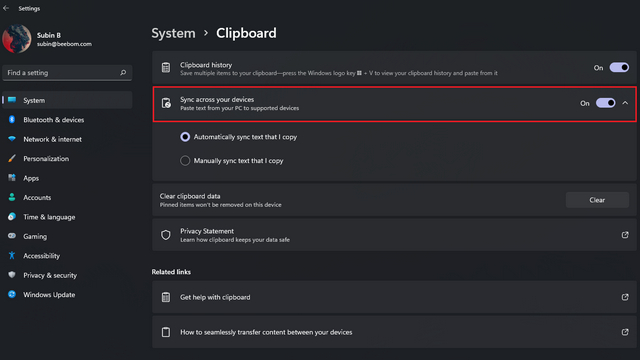
Windows 11 has this cool feature that lets you share the clipboard between your smartphone and PC. You can seamlessly copy an item on your PC, and it will automatically be synced to your smartphone and vice versa.
To enable this option on Windows 11, open the Settings app and navigate to System -> Clipboard. Here, enable the “Sync across your devices” toggle to start syncing your clipboard across devices. Keep in mind that you will need the SwiftKey beta app on your smartphone for this to work. You can follow our tutorial on how to sync clipboard across Windows 11 and Android for detailed instructions.
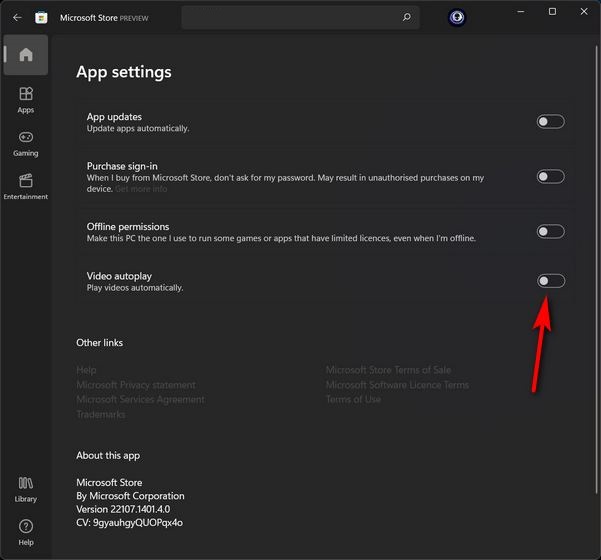
9. Disable Autoplay in Windows 11 Microsoft Store
Sure, the new Microsoft Store is fast and clean, but some people might not like autoplay videos that start playing after you open a particular app page. To disable video autoplay on Microsoft Store, open the Microsoft Store and go to “App Settings” from the profile menu located beside the search bar. Here, disable the toggle for “Video autoplay”, and you are done.
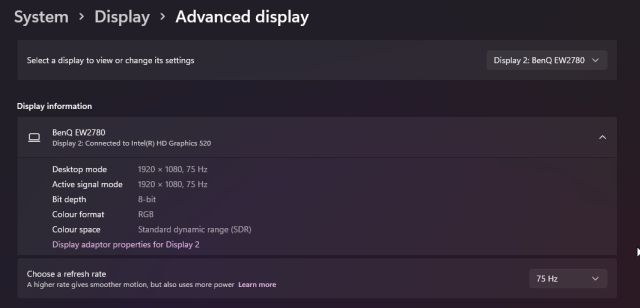
10. Change Screen Refresh Rate
In case you are unaware, Windows 11 supports high refresh-rate displays and can dynamically switch content from 60Hz to 120Hz. If your monitor sports a high refresh-rate screen, you can in fact choose a refresh rate from Windows 11 Settings app.
To do that, open Settings and navigate to Display -> Advanced Display. At the bottom, you can choose the refresh rate from the drop-down menu. It will make your Windows 11 experience even better with smooth animations, app transitions, gaming, and more.
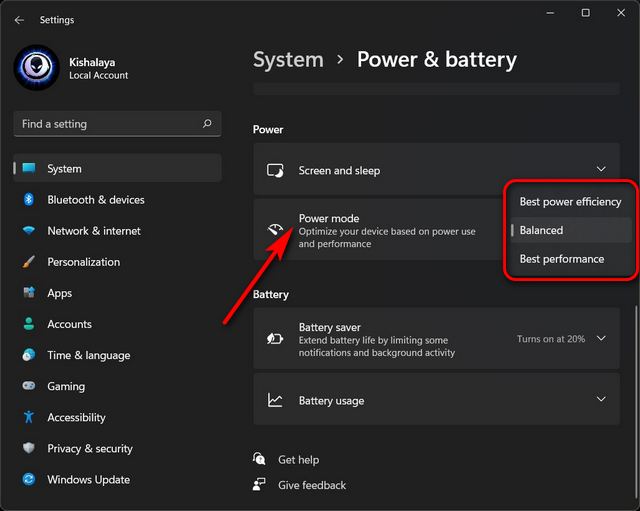
11. Adjust Power Mode in Windows 11
Not many realize that Windows sets the power mode to Balanced to save battery life and offer decent performance on the go. However, if you want the best performance all the time, I would suggest you adjust the power mode on your Windows 11 laptop. Open the Windows 11 Settings app and move to System -> Power & battery. Under Power mode, choose “Best performance” from the drop-down menu. That’s it.
12. Advanced Gesture Controls
If you are someone who regularly uses trackpad gestures to manage multiple virtual desktops, apps, and windows, Windows 11 has a sweet offering for you. From the Windows 11 Settings app, you can customize the three-finger and four-finger gestures as per your needs. Swipe up, swipe down, swipe left, swipe right, tap, everything is customizable with different actions.
To adjust the Advanced Gesture Controls, open the Settings and move to Bluetooth & devices -> Touchpad -> Advanced gestures. Note that you can only find this option if your laptop supports Microsoft precision drivers.

Adjust Windows 11 Settings to Get the Best PC Experience
So these are some of the important Windows 11 settings that you should change to get the best experience out of your PC or laptop. If you are on the Insider channel, either on Beta or Dev, you will find all these options under the Settings app. And those who have received the Release Preview build can also fine-tune all of these features from the Settings page. Anyway, that is all from us. If you have upgraded to Windows 11 from Windows 10, I suggest you free up the disk space on Windows 11 using this tutorial. It will release a massive amount of your PC storage. In case you have any questions, comment them down below and let us know.


