
After virtual background on Zoom, screen sharing has become my second favorite feature on this app. It offers advanced controls like audio sharing, ability to choose a specific window, annotation tools, whiteboard and even an option to choose a portion of the screen. All these features make Zoom one of the most powerful video conferencing apps out there. I would say, even the best alternatives to Zoom can’t compete with it at this point. Anyway, if you want to learn how to share your screen on Zoom then you have landed at the right place. I have put together a dedicated guide for all major platforms and have mentioned simple ways to use screen sharing on Zoom. So without further delay, let’ get started.
Share Your Screen on Zoom in 2020
In this article, we have showcased, how you can share your device’s screen on Zoom. We have divided the article in three sections. The firs section shows you how you can share screen on desktop (Windows, macOS, and Linux) while the next two sections are dedicated for Android and iOS devices. So, feel free to move to the section that pertains to your use.
Share Screen on Zoom on Windows, macOS, and Linux
The steps are nearly identical for Windows, macOS, and Linux. However, for macOS Catalina, you need to make a few changes before you can share your screen in Zoom meetings. Here is how to go about it.
1. For macOS Catalina users, Open “System Preferences” and navigate to Security & Privacy -> Privacy -> Screen Recording. Here, enable the option for “zoom.us” which will allow Zoom to record your screen.


2. Now when you are in a Zoom meeting, you will find a “Share Screen” option at the bottom. Click on it. You can also press “Alt + S” to quickly start/stop screen sharing on Zoom.


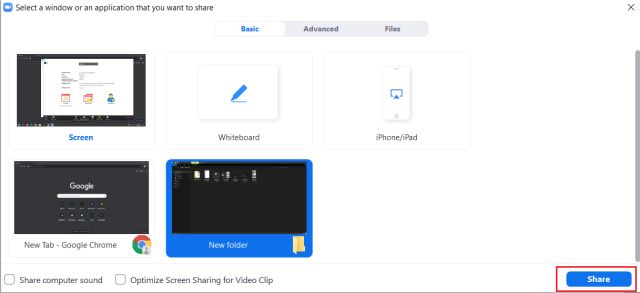
3. Next, it will ask whether you want to share the whole screen or an app specific window. You can also choose “Whiteboard” if you want to teach something using annotation tools. And if you want to share a portion of the screen then move to the “Advanced” section. Once you are ready with your choice, click on the “Share” button.


4. Voila, the screen will be shared with the participants instantly. You will also get a movable menu bar where you can access most of the controls.


Share Your Android Screen on Zoom
1. On Android, the process is pretty simple and straightforward. During a Zoom meeting, simply tap on the “Share” button at the bottom and choose “Screen”. You can also choose “whiteboard” if you want.


2. Now, your Android device will prompt you if you want to share the screen. Tap on “Start Now” and you are done. Zoom will run in the background and a small control bar will be available at the bottom, in case you want to annotate or end the screen sharing. Keep in mind, the internal audio will not be shared, but your mic will be active.


Share Your iOS and iPadOS Screen on Zoom
The steps are slightly lengthy on iOS and iPadOS, but it’s certainly doable. You just need to add “Screen Recording” to the Control Center and then everything is a breeze. If you have already done that then you can simply skip to step #2. Apart from that, your device must be on iOS 11 or higher to access the screen sharing feature on Zoom. Here are the steps to follow.
1. First of all, add “Screen Recording” to the Control Center. Open the “Settings” app and move to Control Center -> Customize Controls -> Add Screen Recording.


2. Now, during a Zoom meeting, tap on “Share Content” at the bottom and then select “Screen”.

3. After that, swipe up to open the Control Center and tap and hold the “Record” button. Finally, Zoom will appear in a small dialog box. Select it and tap on “Start Broadcast”. At the count of 3, the whole screen will be shared with the participants.

4. To stop screen sharing, tap on the red bar at the top and choose “Stop”.

How to Start a Screen Share Meeting on Zoom
If you want to start a screen share meeting– basically where you have access to audio, screen window, annotation tools, and whiteboard– then follow these steps. It is mostly useful for teachers and students. However, bear in mind, you can only start a screen share meeting on the desktop including Windows, macOS, and Linux.
1. Open the Zoom app and click on the down “Caret” icon and unselect the “Start with video” option.
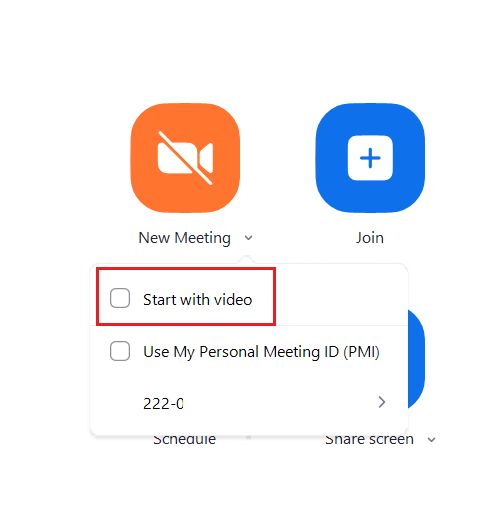

2. Now, click on “New Meeting” and it will show you a couple of details about your Zoom meeting. Here, click on “Share Screen”.


3. Following that, you will be asked to choose a specific window or the whole screen. After that, click on “Share” and that’s basically it.

Educate and Learn with Screen Sharing
So that is how you can share your screen on Zoom using the native feature. As we went through the article, it became clear that Zoom has some powerful features for screen sharing including annotation and whiteboard. Apart from that, it also has some optimization options for better delivery of screen sharing in real-time. Anyway, that is all from us. If you want to learn more such tips and tricks about Zoom then stay tuned with us. And if you found the article informative then do comment down below and let us know.

