
Realtek HD Audio Manager is a popular application which allows you to tweak audio-related settings on Windows computers. For many users, the Realtek HD Audio Manager was the go-to place for enhancing the overall sound quality. However, due to some major changes in Windows 10, the application keeps disappearing and sometimes does not work at all. But you don’t have to worry. We have done thorough research on Realtek HD Audio Manager and found some easy ways to enable it. Apart from that, I have also shared simple and easy steps to update Realtek HD Audio drivers using both automatic and manual method. So having said that, let’s briefly learn about Realtek HD Audio Manager first and then move to the steps.
Install and Update Realtek HD Audio Manager
Before we start our article, let us first talk a little about Realtek HD Audio Manager. If you are someone who is already quite familiar with the subject, you can skip to the next section.
What is the Realtek HD Audio Manager
Realtek HD Audio Manager is an advanced application which lets you configure various sound settings. The reason Realtek HD Audio Manager is so ubiquitous in Windows computers is that most of the PCs have Realtek’s sound card. Besides the hardware, Realtek also provides an audio driver and a standalone app called Realtek HD Audio Manager to manage audio configuration.
Now, what exactly does Realtek HD Audio Manager offer? Well, to begin with, you can enhance the sound with equalizer, mixer, and different pre-defined sound profiles. You can even create your custom sound profile as well. Further, you can enable features like noise suppression and echo cancellation. The application also lets you enable multi-streaming playback which basically means you can stream multiple audios to different output devices simultaneously.
All in all, Realtek HD Audio Manager is an excellent utility and if you are an audiophile, you should definitely use it more often. So now let’s go through some common issues users face with Realtek HD Audio Manager and learn how to fix them.
Download Realtek HD Audio Manager for Windows 10
To give you some context, Realtek HD Audio Manager was easily accessible on Windows 7. It was available out of the box and used to sit in the system tray. However, with Windows 10, Microsoft cut down on many additional utilities to make the OS minimal and light. But long-time Windows users are clearly not happy with it.
Nevertheless, if you want to access Realtek HD Audio Manager on Windows 10, you don’t have to download anything. It’s because the application is already installed, but hidden from users’ direct access. Here is you can access it.
Note: While the guide is for Window 10 PCs, the same instructions apply to Windows 7 users as well. If for some reason Realtek HD Audio Manager is not working on Windows 7 too, you can follow the same steps below.
1. Open the C drive or whichever drive you have installed Windows 10 on. After that, navigate to Program Files -> Realtek -> Audio -> HDA. Here, you will find “RtkNGUI64”, open it.


2. Voila, there you have the Realtek HD Audio Manager. Now go ahead and configure the music as per your taste.


3. Also, if you want to use Realtek HD Audio Manager regularly, just right-click on “RtkNGUI64” and send to “Desktop”.


In case, “RtkNGUI64” is not present or the Realtek folder does not exist in the OS drive, move to the next section to resolve it.
-
Fix Realtek HD Audio Manager Missing Error
Most of the time, Realtek HD Audio Manager is missing because the audio driver is not properly installed on your PC. So to install the dedicated Realtek driver for your sound card, follow these steps.
1. Right-click on the Windows Start button and open “Device Manager”.


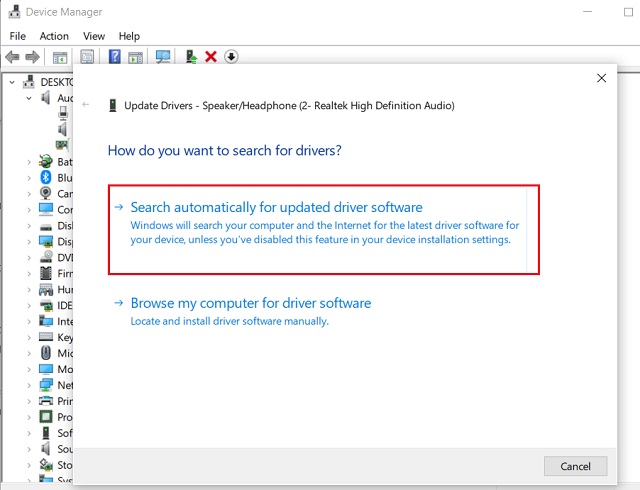
2. Here, double click on “Audio inputs and outputs” to expand it. Now, right-click on “Speaker/Headphone (2- Realtek High Definition Audio)” and click on “Update Driver”. If it shows “High Definition Audio Device”, it’s the same thing.


3. On the next screen, click on “Search automatically for updated driver software”. Now, your PC will find the dedicated driver online and install it thereafter.

4. After a few minutes, the installation will be complete. Now, restart the PC and navigate to the Realtek folder as I mentioned in the above section and you will find Realtek HD Audio Manager.


-
Update Realtek HD Audio Driver Manually
Sometimes, the automatic driver update from Microsoft’s server does not work properly. In such cases, you will have to manually install the drivers. Do note that this will also fix any audio problem you were facing including microphone and headphone issues. Having said that, here is how you can do it.
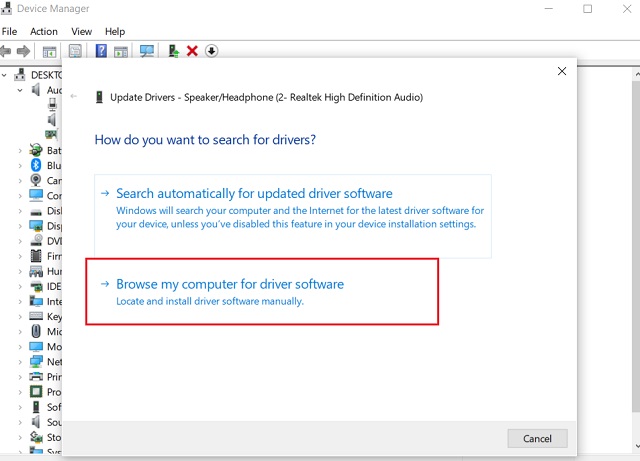
1. Open the Device Manager again and right-click on “Speaker/Headphone (2- Realtek High Definition Audio)” or “High Definition Audio Device”. Here, click on “Update driver”.
2. After that, choose “Browse my computer for driver software”.

3. On the next window, click on “Let me pick from…” at the bottom.


4. Here, select “Audio Endpoint” or “Realtek HD Audio Driver” and click on the “Next” button.


5. Finally, the sound drivers will be updated to the latest version.


6. In case, Realtek HD Audio Manager is still not working, you can download the drivers manually from Windows Update Catalog. Click on this link and download the latest build based on your Windows 10 version. After that, extract the CAB file using WinRAR or 7-Zip.
7. To find the Windows 10 version, press “Windows” and “I” keys at once and navigate to System -> switch to About tab at the bottom -> scroll down and find the specifications.


8. Once you have downloaded the dedicated driver, go to step 3 again and then click on “Have Disk”.


9. Here, click on the “Browse” button and locate the extracted CAB folder.


10. Select the first INF file and click on the “Open” button. The audio driver will be installed instantly. Now, restart your computer and Realtek HD Audio Manager should be in place.


-
Alternate Ways to Install Realtek HD Audio Driver
While we can update Realtek audio driver from Device Manager, there are also other ways which can do the job in a few clicks. For example, you can directly download the audio driver from the website of your motherboard manufacturer. This way you will be sure that the audio driver is correct and will eventually enable Realtek HD Audio Manager. Generally, the file is in EXE format so you just have to run it and install like a standard Windows application. You have to do a bit of Googling, but that’s about it.
Another way is to download the audio driver directly from Realtek’s website. It provides a bundled EXE file which has support from Windows Vista to 10 and for both 32 and 64 bit. You just have to download the EXE file and run it. Depending on your system configuration, the installer will itself choose the correct driver and install it. Voila, you just installed the latest audio driver with Realtek HD Audio Manager built-in. Enjoy!
Best Settings for Realtek HD Audio Manager on Windows 10
So now that we have learned how to enable Realtek HD Audio Manager and resolve some related issues, let us find out the best settings for Realtek HD Audio Manager. In this section, we will learn about the various sound configurations which you can apply in Realtek HD Audio Manager.
First of all, let me make it clear that taste in music is a subjective thing. Also, sound quality vastly differs from different sets of speakers to headphones. So there is no one-size-fits-all sound profile. The best way to find your sound profile which suits your ears is by adjusting the equalizer and finding the perfect balance. Having said that, here are some general tips which may help you bring out the best sound.


If you are using a headphone with your PC, make sure Stereo sound is enabled. And if you are using speakers, the pre-defined Rock or Bass profiles do a great job. Also, you can increase Treble a notch high, but make sure you find it convenient to your ears. Besides, when you are using a microphone for video calls or recording, make sure Noise Cancellation feature is enabled. Apart from that, always set the frequency to 44100 Hz as it’s the most common sampling frequency for all kinds of media. All in all, you should use Realtek HD Audio Manager more often and mess with the Equalizer to get the best out it.
SEE ALSO: 11 Best Free Tools to Download and Install Drivers in Windows
Enable Realtek HD Audio Manager and Experience a New Wave of Sound
So that was our article on Realtek HD Audio Manager, its issues, solutions and a lot more. If you want to get the best sound experience on Windows, you should seriously use Realtek HD Audio Manager. The app lets you tweak several audio settings and it does make a lot of difference. In case you are unable to find Realtek HD Audio Manager, I have included an easier and automatic method which can fix the app as well as many related issues. And if the automatic method is not working, you can, of course, install the drivers using the manual way. So that is all from us. If you found the article informative, do let us know in the comment section below.

