We all know that Windows PCs become slower over time and while some of it has to do with the aging hardware, how you have treated your PC in the past years also plays a big part in it. Since the launch of Windows 10, the operating system has become better at managing itself, however, there are still certain steps that you can take to rejuvenate your PC’s performance and get a couple more years out of it. So, if your PC is slowing down or crashing on you from time to time here are some of the steps that you can to clean your PC and make it faster:
Clean Your Windows PC and Make It Faster
1. Disk Cleanup
Over several months and years of usage, your computer tends to accumulate junk files which not only take up storage on your system but also play a big role in making the overall system slow. To make sure that your storage is running in optimal conditions and there are no junk files unnecessarily taking up room on your hard drive, you must perform disk cleanup from time to time.

Fortunately, Windows 10 allows you to easily perform this action with just a couple of clicks. To start disk cleanup of your Windows PC, first, right-click on any drive in file explorer and then select “Disk Cleanup” under the General tab. When you do that, a window will pop up showing the types of file this process will be targeting. Normally, the process targets files including system memory dump files, temporary internet files, and cache files among other things. Just review the things that you want to delete and hit the Ok button to confirm the cleanup process.
2. Stop Unnecessary Start-up Loading Programs
If your PC takes longer than usual to boot up, one of the reasons behind this delay might be the start-up loading programs. These programs are basically software which you have knowingly or unknowingly given permission to launch when your computer boots up. Since all these programs launch at the same time they put a lot of strain on your computer and cause it to load slowly. To make sure that you don’t have any unnecessary program starting up when your computer boots up, you will need to revoke the start-up permission given to those programs.

To do that, first, use the Ctrl+Shift+Esc key combo to launch the Task Manager utility. Here, click on the Startup tab where you will find the list of apps which have been given permission to launch at startup. Here, disable the programs that you don’t want to launch at startup. On Windows 10 devices, you can also go to Settings -> Apps -> Startup, and disable apps from there. If you find any program that you are not sure about, it’s better to leave it be as it can interfere with the bootup process.
3. Uninstall Unwanted Applications
This step is basically common sense, however, I am still amazed by the number of people who keep tens of apps installed when they know that they are never going to use them. Not only these apps take space on your computer, they might also be hogging up all the RAM and processing power in the background. That’s why it’s a good practice to check and uninstall unwanted apps every once in a while. If somehow you still don’t know how to uninstall apps on Windows 10, just open Settings and click on Apps. Here, click on the app you want to remove and then click on the Uninstall button.

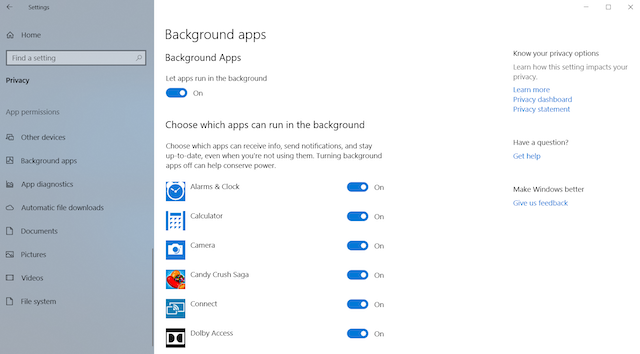
4. Disable Background Apps
Another thing that should do to make your PC feel swifter is disabling background apps. Most of the times we don’t know how many apps are running in the background and eating up our system resources. The background apps are one of the biggest culprits behind the slowness of our computers. To find out the list of apps running in the background and disabling them, go to Settings -> Privacy, and scroll down to find the Background apps option. Click on it, and then disable the apps that you don’t want eating up resources.
5. Diagnose Problems and Perform System Maintenance
While all of the above steps can be performed by any normal user, this step does require a bit of technical know-how of the Windows operating system. Even then, I normally don’t suggest users carry out the system maintenance all by themselves as there are a million things that can go wrong at any time. Personally, I trust Windows’ problem diagnosing and maintenance processes with a proven third-party app which can perform these actions with just click of a button, and my favorite tool to do that is the Auslogics BoostSpeed.

The app runs a complete checkup of your entire system locating junk files, speed-reducing issues, and causes of any system or application glitches or crashes. Once these issues are found, you just need to click on the Resolve All button to solve the issues. One of the best things about this app is that you can automate your OS maintenance. Basically, you can schedule automatic maintenance that detects and eliminates issues in real time. This feature allows me to forget about manually checking the status of things like junk files, system problems, application failure, and more as BoostSpeed automatically takes care of it all for me.
Not only that, if you buy the full version of the app, you can perform most of the other actions mentioned in this list using the app itself. So, whether you want to manage startup items, defrag your disk, clean Windows registry or do any task which potentially improves your PC’s speed, Boostspeed can do that in seconds. Basically, this is the only app that you need to keep your PC in the best possible shape. While the app costs $59.95, there is a free version which you can install by clicking on the link below. If you do decide to buy this app, use our link to get 30% off of its price.
6. Defrag your Hard Drive
If your computer is using a solid state drive, also known as SSD, you don’t need to carry out this task, however, if it uses a spinning hard drive, you need to defrag it from time to time to make it faster. The reason behind this is pretty simple. Over time, files on your hard drive get fragmented, and your computer slows down because it has to check multiple places on your drive for those pieces. What defragmenting does is rewrite all the files in a sequential manner so it is easier and faster for your hard drives to access those files.

Now that you know what defragging means, let’s see how we can do it. First, open the disk optimization tool by searching for the term “defrag” in the start menu. Now, click to select the drive you want to defrag and click on the Analyze button. Now, your computer will do its job and come up it with a result which will show you the percentage of fragmented files on your system. While there is no hard and fast rule about defragging, but as a rule of thumb, whenever that number goes above 5%, you should certainly defrag your hard-drive.
7. Change Power Setting to High Performance
By default, every Windows computer is running on “Balanced” power mode which basically means that the Windows operating system is managing performance and battery life. However, if you ever feel that your computer is getting slow and you are ready to sacrifice some battery life to improve performance, you should change the power setting from Balance to High Performance. To do that, go to Control Panel -> Hardware and Sound-> Power Options -> Create a Power Plan and then select the High-Performance setting and create it. While your computer’s battery life will suffer a little bit, you will be getting the best performance out of this.

SEE ALSO: 10 Best Game Recording Software For Windows
Revitalize Your PC With These Performance Tips
If you carry out all the above-mentioned steps, you will see a significant boost in your PC’s performance. I have been using these steps to speed up the computers of my friends and family and every time I see a nice boost in both start-up and usage speeds of the PC. Just try them out and you will be surprised by the results. Also, let us know how speedy your computer got by writing in the comments section below.