
- Recall in Gmail helps you unsend an email you forgot to attach something in or made a lousy mistake.
- The feature is enabled by default on all the platforms.
- You can extend the time you can recall by going to Gmail settings on your browser.
We’ve all been in situations where we forgot to attach the required documents to the email after the text “Please find the documents attached below”. It could be quite embarrassing to send the documents via another email, and you may come out as careless in the eyes of the receiver, especially when the first email was supposed to contain your Resume. Google has a solution in Gmail for these kinds of situations, and the feature is called Unsend. Here’s how to recall an email in Gmail.
The Recall feature in Gmail is enabled by default, and you may have noticed that as soon as you click Send to send an email, an Undo option appears in the toast. Gmail allows you to recall a sent email in under 30 seconds at the maximum. Considering you’re reading this now, you may have already surpassed that 30-second limit.
Recall an Email in Gmail on PC
You can unsend or recall an email you sent from a PC using the Undo option. Here’s how you can do it:
- As soon as you send the email, click on the Undo option that appears in the toast.
- Wait for Gmail to undo sending, and the toast should read “Sending undone.”
- Now, go to the Drafts folder and here, you will see your unsent email.
- Make the necessary changes to the email and then click on Send.
- You can click Undo again if you think you forgot something else.


Extend Email Recall Time
The default duration of unsending an email is set to 5 seconds, but you can extend it to 30 seconds at the maximum. Here’s how:
- In Gmail, click on the cogwheel icon and select See all settings.
- Click on the Undo Send dropdown and select 30 seconds to extend the time.
- Finally, scroll to the bottom and click on Save Changes.


Recall an Email Using Gmail Mobile App
Similar to the web, Gmail mobile app on Android and iPhone also lets you unsend or recall emails. Here’s how you do it.
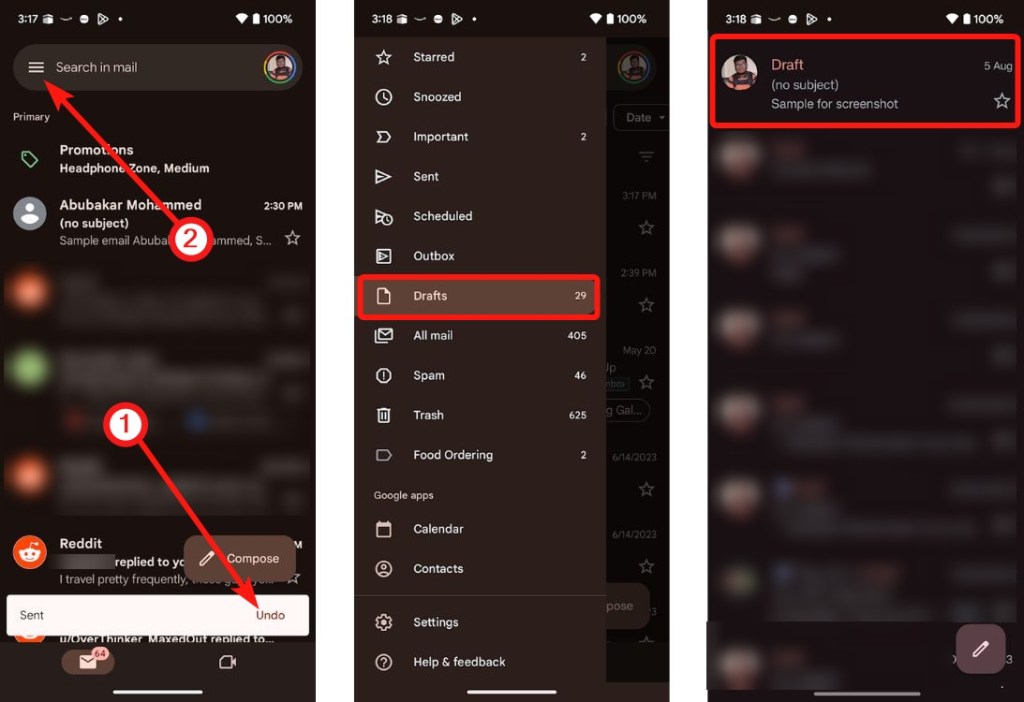
- As soon as you send the email from your device, look for a toast below.
- Tap on the Undo option in the toast, and you will return to the draft.
- Once Gmail succeeds in recalling the email, tap the hamburger icon at the top left to open the side menu.
- Select Drafts and you should find the unsent email here.

Unfortunately, there’s no way to change the duration of recovery on the Android or iPhone app, like you can do on the web app.
And that’s how you can recall or unsend emails on Gmail. While there’s no way to recall an email sent more than 30 seconds ago, it’s enough time for someone to realize they’ve made an error or forgot to attach something important. Let us know your thoughts about the feature in the comments below.


