
So you spent money on a high-performance CPU, and perhaps it was one of the 13th-Gen Intel CPUs that you’ve paid extra for as well. And now, you want to overclock it to get the maximum performance out of the processor. Fair enough! Usually, people are somewhat scared of overclocking because it’s basically like running your processor at settings that are completely different from the stock limits. But don’t fret. Whether you want to do some basic overclocking and performance tuning or are trying to break past the turbo speed of your CPU, we have you covered. Here is a step-by-step guide to overclock your Intel or AMD CPU.
You need to use the motherboard BIOS or certain software like Intel’s Extreme Tuning Utility (XTU) or AMD’s Ryzen Master to overclock your CPU. But first, we will explain things you should remember and then dive into basic and advanced overclocking methods.
Things to Remember Before Overclocking CPU
- Overclocking Can Void Your Warranty
We don’t mean to discourage you straight away, but it wouldn’t be right to not tell you the dangers of overclocking your CPU. The warranty policies set by CPU manufacturers in relation to overclocking mention that both Intel and AMD reserve the right to void your warranty for using almost any overclocking feature. Features such as Intel’s Multi-Core Enhancement (MCE) or AMD’s Precision Boost Overdrive (PBO) will also “technically” void your CPUs warranty. But, many users have reported being able to pass warranty checks without any issues, even with features like XMP, PBO, or Auto OC enabled in the past or present.


- Ensure Motherboard & CPU Support Overclocking
Next, do check if your motherboard and CPU support overclocking. The ‘K’ series CPUs from Intel support overclocking, but not all their motherboards do. For AMD Ryzen, while overclocking is unlocked even on the lower-tier Ryzen 3 processors, certain Non-x variants like the Ryzen 7 2700 don’t support PBO or Auto-OC features. So, before you begin the overclocking process, check the user manuals for the CPU and motherboard to confirm this.
- Ensure Your Cooler & Power Supply Is Sufficient for Overclocking
While this might be obvious to many, your CPU will consume more power when overclocked compared to its stock state. Now, to combat that, ensure that your CPU cooler is sufficient enough for overclocking, i.e. it should be able to adequately support the max TDP (thermal design power) of your processor.
For overclocking, your CPU cooler should a lot of headroom. So, check the CPU temperatures during intensive tasks such as the Cinebench R23 benchmark (used often in our CPU reviews) or a heavy game like Cyberpunk 2077. If, at any point, the CPU temp reaches around 80-90 degrees Celcius, you need a better cooling solution. The buyer’s guide linked here will help you find the best AIOs and air coolers to avoid thermal issues.
Additionally, you need a power supply with tons of headroom and a good thermal paste for your CPU. For suggestions on some of the best overclocking-friendly thermal pastes, read our best thermal pastes guide linked here.
- Take a Benchmark of Your Stock Performance
Finally, remember to take a benchmark of the stock performance of your CPU. Why, you ask? So, you can compare the performance before and after overclocking your CPU with ease. Synthetic benchmarks such as Cinebench R23 are perfect for this task.
How to Overclock Intel CPU: A Step-by-Step Guide
As a prerequisite, manufacturers ask you to update your BIOS and get the latest driver updates (especially for your chipset) before running utilities like Intel XTU or AMD Ryzen Master. So follow this guide to update Windows 11 and install all the latest drivers for your PC. When done, proceed to update your BIOS by following this guide, which shows you how to find the BIOS update file and update it with ease. After that, time to start the overclocking process:
1. First, head into your motherboard’s BIOS. To do this, shut down your PC completely and press the F2 or Delete key on your keyboard as soon as the PC starts. If that doesn’t enter you into BIOS, look at the bottom of the startup screen to discover the key you need to press to enter your BIOS. Follow this guide on how to enter the BIOS in Windows 11 if you are still confused about the process.


2. Now, reset your motherboard BIOS to the default settings. This step is highly recommended before we start using AMD Ryzen Master or Intel’s Extreme Tuning Utility (XTU) to enable overclocking features.
3. Next, you have to disable VBS in your Windows. This is required for running AMD and Intel’s overclocking utilities. For this, refer to our guide on how to disable virtualization-based security (VBS) in Windows.


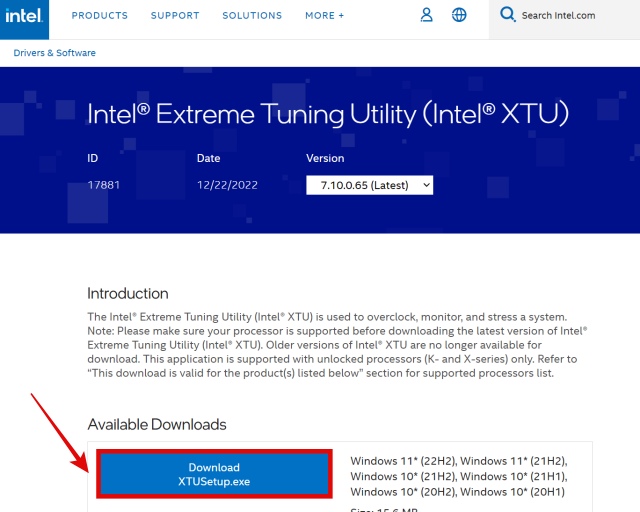
4. With that out of the way, let’s start by downloading Intel’s Extreme Tuning Utility (XTU) from this link. Once you have downloaded it, go through the setup and install it on your PC. You need to restart your PC before beginning to use XTU.
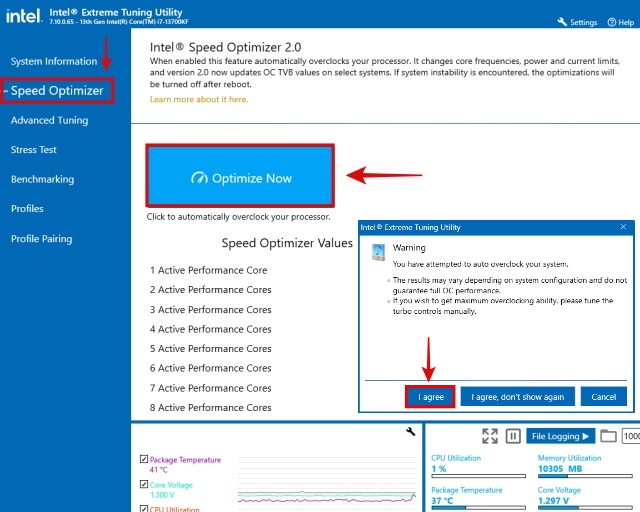
5. Next, open Intel XTU and navigate to the “Speed Optimizer” section. Here, click on Optimize Now in the right pane. Click on “I agree“ when prompted, and Intel XTU will overclock your CPU by modifying its core frequencies and increasing its power limits.
Note: Is this option greyed out or not visible for your processor? Don’t worry, you can still overclock your CPU. To do so, skip to the sixth step in this section.
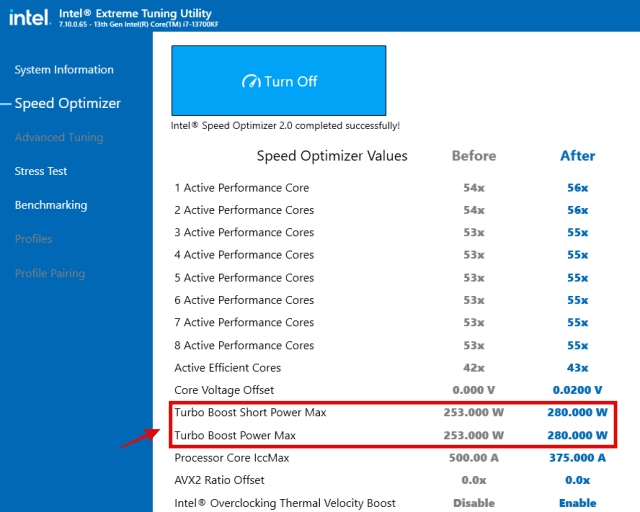
6. Now, you can look at the various changes that Speed Optimizer did by scrolling down below in XTU. As you can see, it overclocked our i7-13700KF with an increase of about 200MHz on every core. Along with this, it turned on Intel’s Thermal Velocity Boost setting and increased the Turbo Boost Power limit. Do remember to note the newly changed turbo boost power limit here because in a later step we will show you how to increase this if it is feasible to modify your turbo power limits further.
Note: The Speed Optimizer feature and Intel Thermal Velocity Boost both work on the basis of your CPU cooler’s capability. For example, if you have a mid-range but high-performance air cooler, which has about 50W of TDP headroom for your CPU, then ISO & TVB will both analyze that and boost your CPU frequencies and power limits. So if you have a high-performance AIO liquid cooler, which gives you over 100W of headroom (a hypothetical assumption), these features will leverage that for even higher power limits and frequencies.
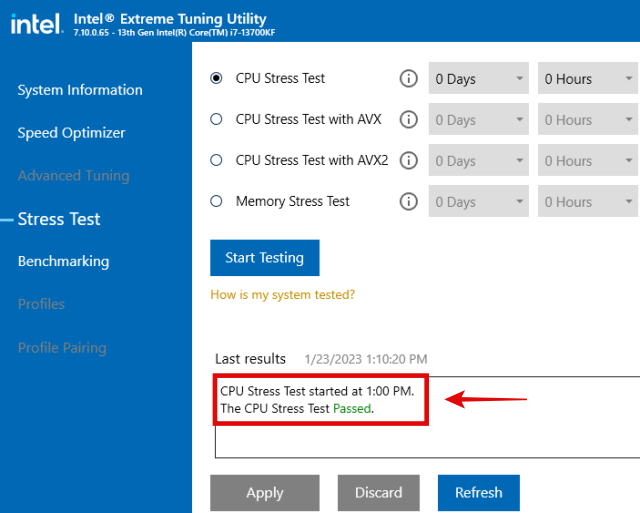
7. Next, navigate to the “Stress Test” tab in XTU. We will test our CPU here, but if the OC failed, then Intel XTU will already be restarting your system and setting back the settings to stock. This test won’t help us establish any performance numbers (that will come later). But we will do this test in XTU to perform a small, initial verification of the CPU’s stability under this automatic overclocking feature. Now, define the duration of the stress test at 10 mins. Next, click on ‘Start Testing‘ to begin the stress test.
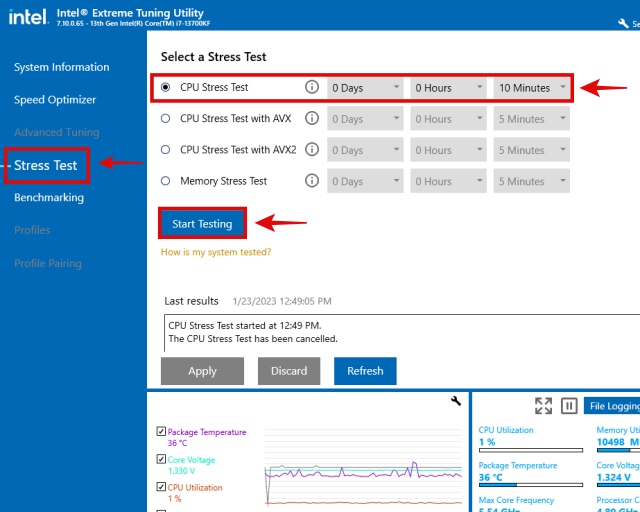
8. Now, the CPU stress test will run for the next ten minutes. You can observe the temperatures, thermal design power (heat outputted by the processor measured in watts), and a few other things in the bottom right. As long as your CPU cooler is capable, Intel Speed Optimizer’s automatic OC will be successful for most users. After the stress test is over, it will say “The CPU Stress Test Passed” in the log.
Note: This is a preliminary stress test. While you can increase the duration here, we prefer that you perform a proper stress test using the synthetic benchmark called Cinebench R23, which we will talk about in the final section. Intel XTU also has benchmarking tools, if you still prefer to use those.

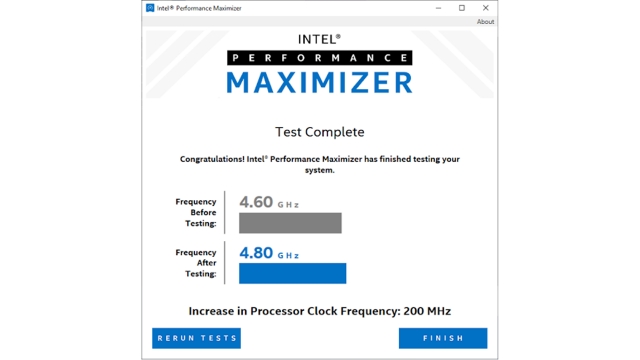
9. To overclock your Intel K-series processor that does not have Intel’s Speed Optimizer function, you can run the Performance Maximizer tool by Intel, which was introduced for previous generations. The chipmaker has shown the steps on how to download & install it, and also perform the OC, so go ahead and visit the link if the Speed Optimizer feature that was shown above is not available for your CPU.
10. There is one last thing you could turn on while you are in the Intel XTU app, i.e. Intel Multi-Core Enhancement (MCE). We enabled it in the overclocking section of our Intel i9-13900K review, but MCE is a feature that works with varying levels of benefits. In our testing, it did not result in better performance, instead excessive voltage was fed to CPU cores and we observed unnecessary boosted frequencies during idle workloads.
Voila! You have overclocked your Intel CPU successfully. Now that you have overclocked your CPU, it is time to perform a proper, extended stress test. Before deciding to use these settings 24/7, it’s important that you confirm the stability as well as the performance improvements in a synthetic benchmark, and your personal use-cases too. We will do that in the stress test and benchmarking section below.
How to Overclock AMD CPU: A Step-by-Step Guide
Once you have finalized your overclocking settings through Ryzen Master, and also confirmed the stability of your CPU, it is a good idea to apply these settings in the BIOS. After doing that, you can uninstall Ryzen Master if needed since your settings will be enforced at the BIOS level.
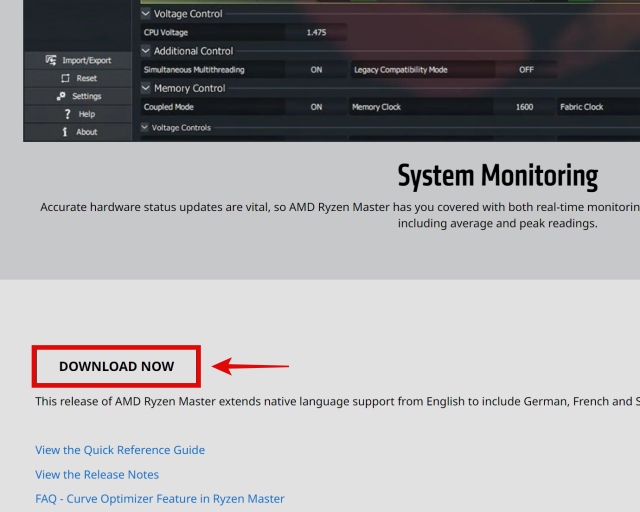
1. Start by downloading the AMD Ryzen Master utility from this link. You have to scroll all the way down to find the download button. Once you have downloaded it, go through the setup and install it. Next, restart your PC before using Ryzen Master.
2. Next, open Ryzen Master and go to either Profile 1 or Profile 2 options. Remember this is the Ryzen Master Profile you are going to set the overclocks in place with. Now, you will notice there is the option to enable “Auto Overclocking” and “Precision Boost Overdrive” here.
3. You need to turn on Precision Boost Overdrive first, and then click on “Apply & Test” using the button at the bottom. Your system will restart and then Ryzen Master will do a basic stress-test to ensure stability. If your system is stable, go to this section of the guide where we help you perform a proper, 30-minute stress-test and establish performance numbers too. Remember to do this, before continuing this step further.

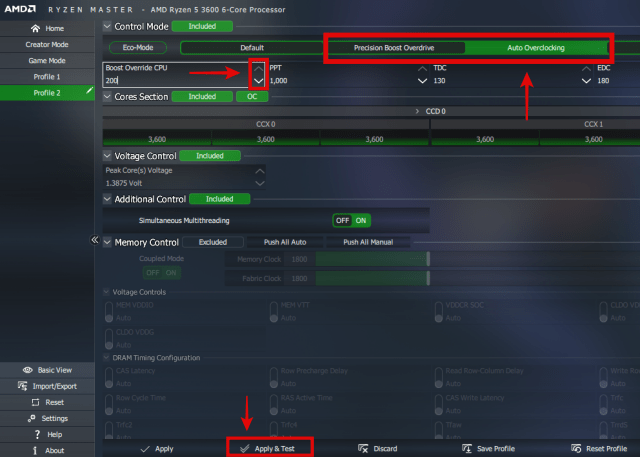
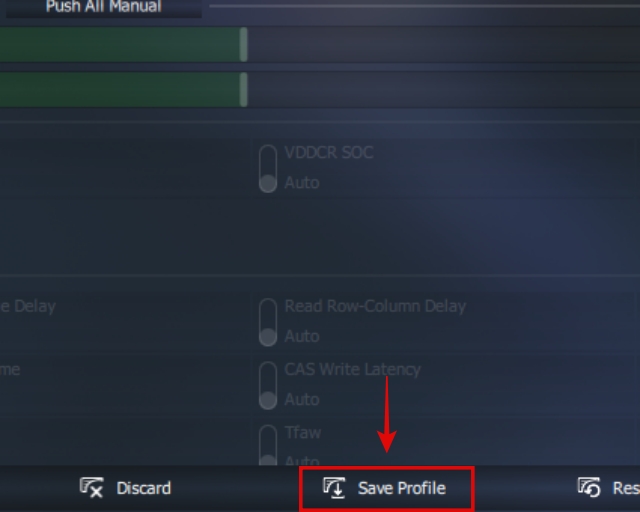
4. Now, if turning PBO gives you better performance and your system is completely stable, you can try enabling “Auto Overclocking” as well. Again, after turning it on click on “Apply & Test,” after which the system will restart and Ryzen Master will do a short stress test to ensure the setting’s stability. If it is successful, remember to click “Save Profile” to finalize your OC settings.
Auto OC is an extension of Precision Boost Overdrive and helps you to achieve even faster single-core frequencies. PBO helps in achieving boost clocks more often, and you can get a decent boost in performance when combined with Auto Overclocking. Several users have also seen worse performance compared to stock especially in gaming, so make sure you refer to the benchmarking & stress-testing section of this guide after enabling Auto Overclocking.
In Auto Overclocking, there is also an option called “Boost Override CPU.” You can increase this using the arrows highlighted in the demonstration above but make sure to run a stress test after every incremental increase that you do. You will notice that there are other settings here as well, like PPT, TDC, and EDC. We will explain this if you wish to tune Auto OC or PBO settings further.
- PPT: This refers to Package Power Tracking, and this setting defines the maximum power that can be delivered to your motherboard’s socket, which is where the CPU is installed. You can increase this with increments but remember to stress-test as well before jumping on to the maximum allowed increment. Why does ours say 1000, when Ryzen 3600 has a limit of 65W? That’s because these overclocking features have fully unlocked the power limit.
- TDC: This refers to Thermal Design Current, and this setting defines the maximum amperage to be delivered to your processor by the VRMs of your motherboard, during sustained loads. We recommend that most users leave this setting on default.
- EDC: This refers to Electrical Design Current, and this setting also defines the maximum amps to be delivered to your CPU by the VRMs, but the difference between TDC is that this one applies to short-term workloads. Again, we recommend this setting to be left on default for most users.
3. Congrats! You have now overclocked your AMD CPU. However, some things are left for us to do. After you have the final settings of your overclock in place, go to the stress-test and benchmarking section of this guide where we will use Cinebench R23. It is important to confirm your stability with the extended stress test, before you start using these settings everyday.
Advanced CPU Overclocking Guide: Manual OC for Experts
1. Firstly, research the maximum safe voltage range of your CPU. Many people have conflicting opinions as to what is considered safe, but the user experience is your best to get some numbers. There are people who have confirmed stability at extremely high voltages yet their CPU died a few years down the line. Hence, it is important to be very conservative, and on the safe side, when it comes to the voltage you set your CPU at. Overclocking doesn’t necessarily have to lower the lifespan of your CPU, as long as you run it at safe settings.
For our Ryzen 2700, Reddit’s /r/overclocking wiki mentions a recommended maximum Vcore of 1.38V for a load temp below 70 degrees Celcius, or 1.33V for a load temp below 85 degrees Celcius. We will use the recommendations going forward, but you should never assume something is safe until you test it out for yourself.
2. Now, enter your BIOS by pressing the F2 or Delete key as the system starts booting up. You can refer to this guide for help on entering the BIOS, as it includes two methods to go into the setup utility through Windows OS itself. Also, when your PC first starts up it always displays the key to enter BIOS for a few seconds.
3. Next, when you’re in the BIOS, navigate to the CPU overclocking or configuration section, with the help of your motherboard’s manual. For our ASRock motherboard, this was in OC Tweaker. Here, you can change the CPU Frequency and Voltage settings from Auto, to Manual. Then, you can modify the CPU frequency and voltage respectively here to manually overclock your CPU. You should incrementally increase both of these based on the recommendations that your research gave you, in the last step. After every incremental increase, do ensure stability by referring to our benchmarking & stress-testing section.
For us, the Ryzen 7 2700’s CPU frequency was set at 3200MHz which we were able to increase to 3900MHz. The voltage was set to 1.00V which we had to increase to 1.35V to successfully pull off the all-core OC of 3.90GHz. We believe we can lower the voltage for better thermals with some stress-testing by lowering it in increments of 0.05, to get as close to 1.3V as possible. Keep in mind that if the voltage is too low, it can result in a system crash. You can do something similar, but this was all just to give you an example of a basic understanding of manual overclocking. Every CPU’s optimal voltage range and max supported overclocked frequency will be different.
4. Good job! You have successfully learnt the basics of how to manually overclock your CPU. If you want to dig deeper in manual overclocking, there are other settings you can change too. There is the SOC voltage, and you can even set different frequencies for individual cores instead of doing an all-core OC like we showed you above. Doing that would require you to identify the best, most efficient cores first. Welcome to the world of manual overclocking. As you can see, a lot of experimentation and time can be spent with the vast amount of settings that are available for tuning your CPU. We recommend you to explore everything, research on what each option does, before you tinker with it.
How to Stress Test and Benchmark Your CPU
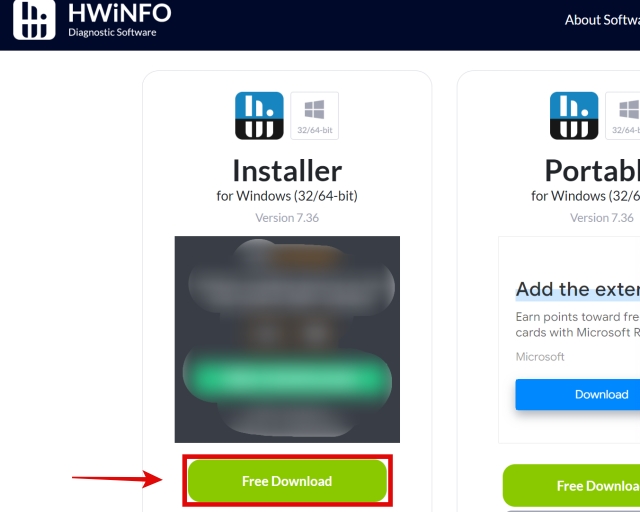
1. First, download & install HWInfo from this link. This is an excellent app for monitoring thermals, check for thermal throttling, and also verify things like your motherboard’s temperatures.
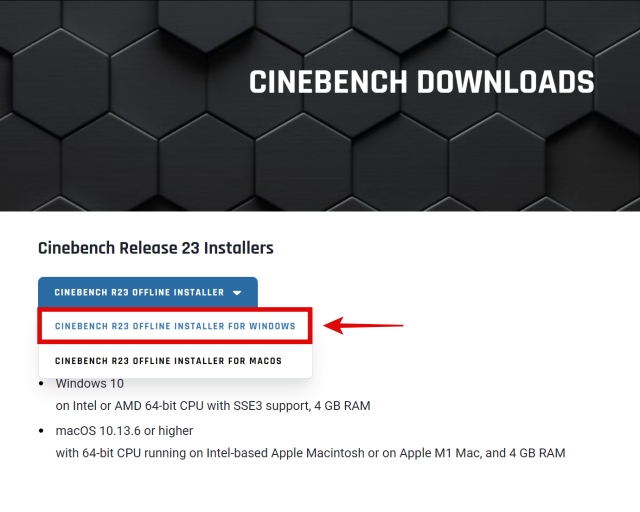
2. Next, download & install Cinebench R23 from this link. We will use it as a synthetic benchmark, for measuring the CPU’s multi-core & single-core performance.
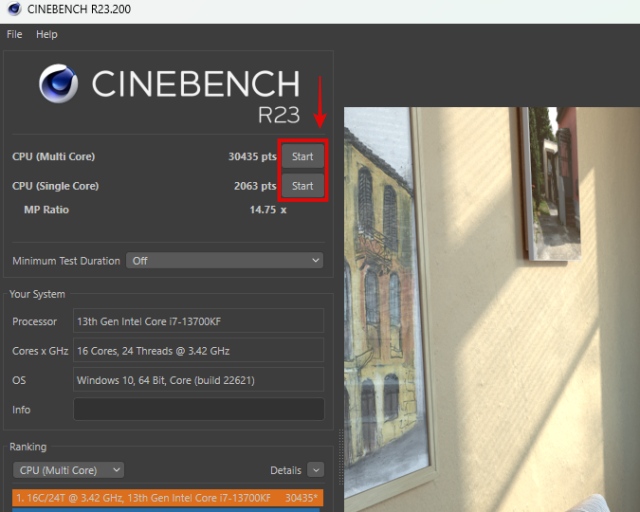
3. Now, open Cinebench R23. Next, click “Start” next to the Multi-Core and Single-Core options at the top left to run the benchmark. Note down the numbers you get. Compare the score to what you got previously when you first ran this benchmark on stock settings. Make sure there is an increase in either single-core or multi-core performance, which would mean the overclock has benefitted your performance for sure.
4. Next, you should test for stability by performing a stress test. To do so, define the Minimum Test Duration to 30 minutes. Then, start the CPU (Multi-Core) benchmark which will now loop for the next 30 minutes. If your PC does not shut off during this entire 30-minute period, it has successfully passed the Cinebench R23 30-minute stability test. But if it does, immediately go back to the stock settings.
We have had an experience where the PC would be completely stable in any workload, but not in this extended stress test. And that is why we recommend you perform a proper stress test with this synthetic benchmark, rather than relying on XTU or Ryzen Master for your stress test.
While this stress test goes on for the next half hour, you can use HWInfo to monitor CPU and motherboard VRM temperatures, and it will also tell you if the CPU is thermal throttling or not. Make sure you keep track all of these, and if any of them overheat beyond your expectations, you should optimize your settings further.
Typically, the maximum acceptable thermals for a CPU should be 95 degrees Celcius and the VRM temperature should be under 90 degrees Celcius. There will be times when you use your computer for extended workloads, so it is better to aim for overall lower temperatures, with a mild overclock, rather than try to completely exhaust your temperature overhead.


5. Next, verify that the overclock helps you get better performance for your personal use cases. This can be anything that is specific to your personal work with the computer, like gaming or content creation applications. Even if the overclock resulted in better scores in Cinebench, there might be no point to keep the overclocked profile of your CPU active if it doesn’t actually result in beneficial gains in your personal use cases.
Unless the applications that you run on a daily basis benefit from the overclock, we recommend you revert back to stock settings. The easiest way to do that is to use Ryzen Master or Intel XTU to revert back to the default profile, but if you used the BIOS, you’ll have to revert back the OC settings to ‘Auto’ instead of ‘Manual’ to go back to the stock profile.

6. CPU Stability and Performance testing is complete. You have successfully overclocked your processor, as well as verified the stability of your system in its overclocked state.
Should You Overclock Your CPU at All? Explained
Processors already have a feature called turbo boost, including the 13th Gen Intel Raptor Lake CPUs that all boost beyond 5GHz and up to 5.8GHz with the Core i9-13900K that we reviewed. You see, the way that turbo boosting works is, it mostly applies to the few best cores of your CPU, so your various workloads directly get the benefits of faster frequencies anyway.
Remember that your apps and games benefit from various different aspects of what your CPU is good at. For example, games benefit more from better single-core performance in CPUs. And productivity apps tend to take more advantage of its multi-core capabilities. So, the raw single-core or multi-core performance of a CPU is a better analytical to go on for judging performance, rather than its frequency (measured in GHz).
CPU overclocking is mainly about increasing the frequency, right? True. By overclocking, you will get faster frequencies like we were able to break the 6GHz barrier during the overclocking section of our Core i9-13900K review, linked above. But our results in that scenario in terms of performance numbers was actually slower than stock settings.
You see, a better GHz number isn’t really a factor when it comes to how capable your processor can be. Even the 10 year old FX-8350 was overclocked to 8.79GHz once, but that doesn’t make it better than the brand-new Ryzen 9 7950X3D with 3D-V Cache that boosts up to 5.7GHz. Overclocking will give you a small boost, but sometimes none as well. Maybe, the use case that you want the PC to achieve doesn’t benefit from your overclock, but for some other apps, it might. Everyone’s overclocking is going to be different based on their combination of hardware as well as what use-cases are they looking to see gains in.
The best advice I can give you regarding this is if you choose to overclock your CPU, never overclock in an unsafe manner to protect your CPU. Our guide is applicable to most users, and you will be able to extract decent gains in performance out of the various overclocking features we will show you how to enable. The risk level here is quite low, since we will use the various OC features provided by Intel/ AMD and the motherboards themselves.
On the other hand, the advanced section of this overclocking guide is only reserved for people who don’t mind taking a higher risk to manually overclock their CPU. Usually, the motivation to do that comes from trying to hit better benchmark numbers or get gains in multi-core workloads. Also, enthusiast SFF users (small form factor PCs) have been manually setting their CPU frequency and voltage to a static number for quite sometime, so that it never goes beyond their preferable TDP. Usually, this is an underclock since the CPU could manually turbo beyond the frequency they set.
Other than that, you must always test the stability of your overclock and also if it even resulted in better performance for your use-cases. If it didn’t, maybe it will perform better in certain applications that don’t fall under your use-case. But if it isn’t worth it to you, go back to the previous stock settings otherwise you’ll simply be running your CPU at worse temperatures, nothing else. We will definitely help you stress-test and test the stability of your CPU and also test the overclocking results to see if you got any benefits,.
We recommend most users to stay away from trying to manually overclock their CPU because the current modern era of CPUs and motherboards all already include excellent overclocking features by default. You can simply turn them on, and their risk level is pretty low. Apart from that, they also have turbo boost capabilities that benefit all workloads. In many cases, processors don’t perform optimally with manual overclocks with side effects such as higher idle temperatures, random temperature spikes, and occasionally, a performance loss.
Simply put, manual overclocking is mostly for enthusiasts who want to see how far they can push the CPU for experimental, or like we said before, to get the best benchmark results. Some like to reach the hall of fame in 3DMark with their extreme dual-GPU systems. Still, a small section of PC hardware enthusiasts likes to manually overclock their CPU, which can still be impactful depending on your processor.
Should you overclock your CPU then? It’s completely up to you. This OC guide should be helpful to pretty much anyone, and it will help you get a good amount of extra performance without too much risk. So, for most cases, stick to basic overclocking, which has a lot of merits rather than trying to manually OC, which comes with too much liability for most people.
Frequently Asked Questions
There are three main factors that determine how much you can safely overclock your CPU. The maximum safe voltage for your processor, the motherboard’s VRM quality, and your CPU Coolers capability. These factors ultimately decide how high you can overclock your CPU.
Yes. But, this depends upon the hardware, and how much of a boost the overclocking gave, in terms of the gaming performance. Test your overclock in benchmarking applications and the games of your choice to see if it did any improvement, otherwise go back to the stock settings.
If your CPU does not support overclocking, there is usually no way to manually overclock or set an Auto OC feature in place. However, you can still get better performance from Windows 11 with these simple tips and tricks, in which we also show you how to debloat the OS!
Many low-end to mid-range motherboards still support overclocking. The A520 Class of budget motherboards from AMD as an example, do support overclocking. Before proceeding to overclock, even if it is supported, you should judge your motherboard’s VRM quality first.
Undervolting refers to manually lowering the voltage of your processor down from its stock settings, usually for better temperatures, but it sometimes results in a performance boost too. Why? Because then the processor can turbo boost higher since the temperatures are lower.
Your PC could have stability issues, run at temperatures that cause throttling problems or even result in worse performance. To judge if your overclock is too much, make sure to stress-test your CPU using our dedicated CPU stress-testing guide linked above.
If your PC is crashing repeatedly, remove the BIOS battery for some time or use your motherboard manual to figure out how to reset the CMOS. After that, your motherboard will run at the stock settings again.


