
The motherboard is a major component in the PC building process. Most of your system components, including the CPU, GPU, RAM, and storage, among other things, are all installed on the motherboard. It is truly the backbone of your computer and is one of the first parts we install while building a PC from scratch. So you need to ensure that the motherboard has been installed correctly in the PC case before you proceed to install the GPU or connect the power supply. Now, installing a motherboard inside a computer case isn’t as mountainous a task as some might have you believe, but you need to keep a few things in mind. With that said, if you are building a new PC or upgrading your existing one, let’s look at how to install the motherboard on your PC.
We will also help you plug in your case’s front I/O perfectly, a step that is otherwise confusing for many PC builders. This is a step-by-step guide on how to install the motherboard inside your PC case.
Things to Remember Before Installing Motherboard
Gather the Necessary Tools
Although this might seem like an obvious prerequisite to building a PC, remember to gather and organize your tools in your workplace. In this case, you will primarily need a Phillips Head screwdriver. Also, make sure your workplace is clean and ground yourself before starting work on PC components. Use an anti-static bracelet during the installation process to avoid electrostatic damage.
Check Motherboard Compatibility with PC Case
Picking the right PC case is the next important step in the process. Depending on the size of your PC cabinet, it can either fit a full-size ATX, microATX, or mini-ITX board. As we described in our in-depth guide on different types of motherboards, you can learn what motherboards can fit into what type of PC cases.


So the PC case and motherboard you use should be compatible. For instance, a full-tower case can fit all three types of motherboards but a case with a smaller form factor can only fit a mini-ATX motherboard.
Install Core Components on Motherboard
Before you mount the motherboard inside your PC, make sure to install the core components and complete the basic build outside the case. We suggest you install the CPU on your motherboard, along with the RAM modules and memory sticks, before proceeding further with this guide. Also, you can install an air cooler or AIO prior to placing the motherboard inside the case.
Check for Required Power Connectors
Your motherboard either has a single 6-pin/8-pin CPU power connector or two 8-pin power connectors. High-end motherboards like the ASUS ROG Z790-E tend to have two power connectors to support higher power limits for unlocked CPUs. So, prepare your power supply cables accordingly for a successful installation of the motherboard.
Keep Your Motherboard Manual on Hand
Make sure you have the motherboard manual handy before starting work on the build. If you are missing your motherboard manual, you can download it from the manufacturer’s website. Why do you need it? Since not all motherboards are built the same, we might need to refer to the manual to confirm connectors for USB headers, RGB lights, Front I/O, and more.
Motherboard Standoffs Explained
So you unboxed your PC case and found small metallic screw-like pieces installed where you need to place the motherboard. Now, you are wondering what they are and what are they used for. Well, these small metallic pieces are called standoffs, and you need to install them in your PC cabinet to have the case ready for motherboard installation.

Each motherboard screw requires a standoff for installation, and its positioning is determined based on your motherboard’s size. As for why you need standoffs between your motherboard and case interior, the answer is simple. The standoffs make sure that the bare PCB of your motherboard doesn’t touch the case’s electrically conductive interior.
Your motherboard screws into the standoffs you placed in the case, which guarantees not only a secure installation but also helps avoid the risk of short-circuiting the board. So never screw in the motherboard directly, as positioning the standoffs correctly is a major step for installing the board.
How to Install Motherboard Inside a Case
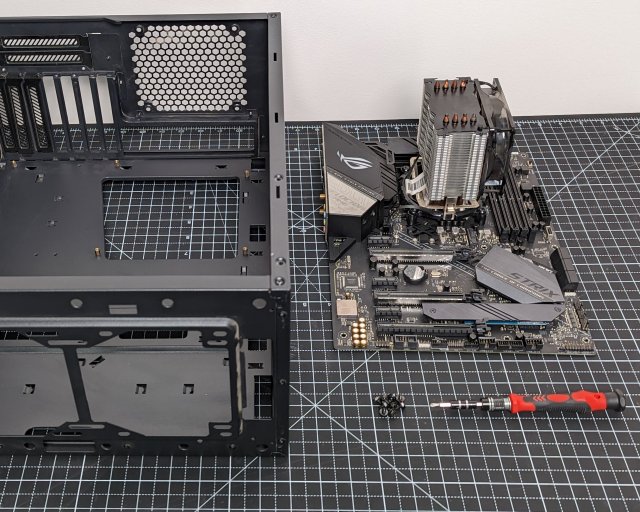
1. As stated above, we will first make sure the standoffs are in the right place before mounting the motherboard. Standoffs are usually pre-installed in the case for a specific motherboard size, but you might need to re-position them for your motherboard. So, get your tools and motherboard to learn how to position the standoffs correctly.
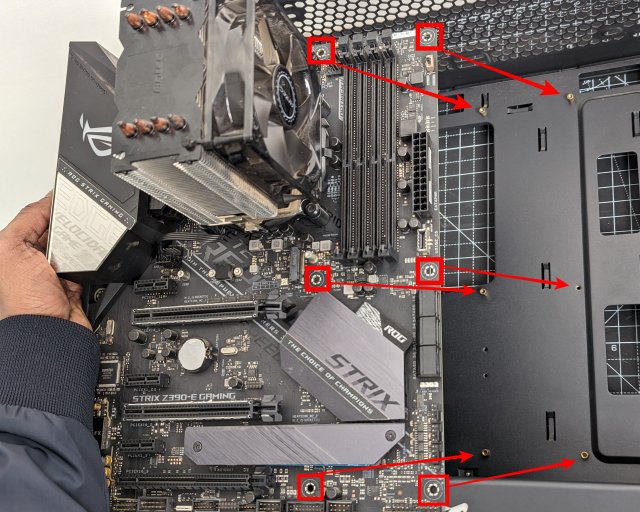
2. Now, position your motherboard inside the case above the standoffs installed in the case. The motherboard’s screw holes will line up to certain standoff positions. You might have to move your motherboard around inside the case and align the holes to the standoff points. Next, assess whether the current standoff positions work for your motherboard installation or not.
In the demonstration below, we have highlighted a few of the motherboard screw holes to their standoff locations. You can see that one of the standoffs in the middle row is missing here, so we will need to install it manually. Move to the next step to learn how to do that.
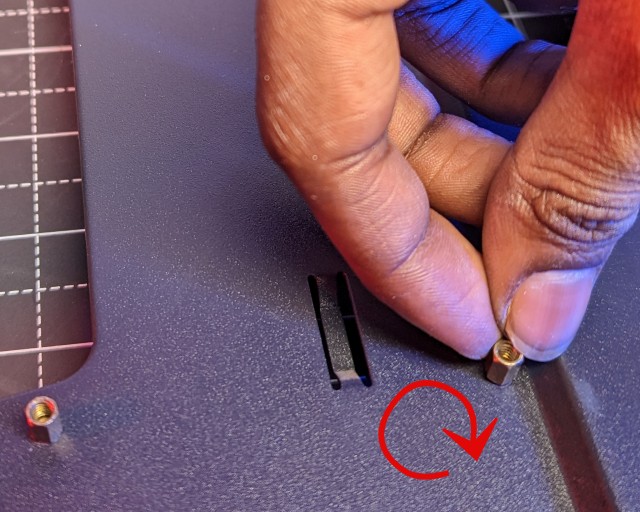
3. If the standoffs are not in the right positions, you need to note down the correct positions for installing them in your case. Then, set the motherboard aside, and remove any incompatible standoffs (turn counter-clockwise and use a plier if they are tight). Next, position your standoff at the correct screw holes for your motherboard and screw it in by rotating clockwise with your hand.
Note: If none of the standoffs are installed in the case, you will need to note down all the required positions based on your motherboard. Then, screw in the standoffs at the corresponding positions one by one.
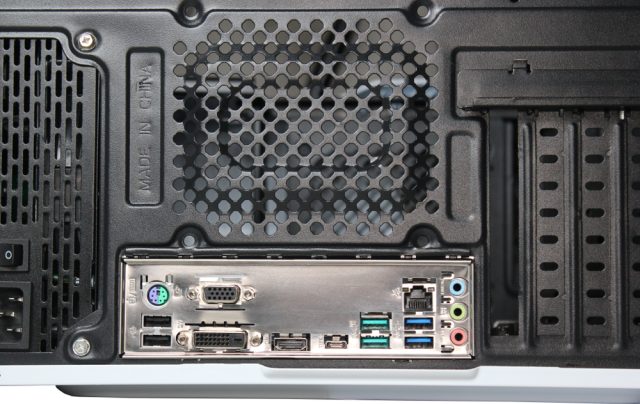
3. Next, add in the I/O Shield if required. Don’t forget about the I/O Shield because it protects your motherboard’s ports instead of leaving them exposed. In our case, the motherboard comes with a pre-installed I/O Shield. But many low-end and budget motherboards come with an I/O Shield (metallic sheet with I/O port cutouts) in the box, and you need to install it manually. For example, here’s what a motherboard looks like with an I/O shield covering the ports.

5. Next, position the motherboard inside the case by first lowering the left side down. Make sure the various ports align with the I/O shield cover. Then, locate the standoffs and lower the right side of the motherboard, making sure they align perfectly with the holes and the board firmly rests on top of the standoffs. Once positioned properly, screw down the motherboard with your Philips head screwdriver.
Note: Never screw in the motherboard too tight. By screwing in the motherboard tightly, you may damage the PCB of your board. This voids the warranty if marks are left by the screws. Focus on tightening the motherboard screws till they feel just right, not too tight.


6. Well, you have successfully mounted the motherboard inside your PC case, but there are a couple of things left for us to do.
Get the motherboard manual and navigate to the ‘Front I/O headers’ section. Here, you will find an explanation of where to plug in the front I/O ports, power switch, reset switch, and front audio ports, among other things. Plug in the front I/O connectors one by one, in accordance with the information in your motherboard manual. In the manual, you will also find the location for USB headers, so plug in these to make the USB 3.0 or USB Type-C ports on the front functional.
Note: If you look closely, the proper locations of where to plug in Front I/O headers are also often printed on the motherboard itself.


7. After that, you need to connect the main power cable and other component cables once you have installed the PSU (power supply) in your build. We cannot elaborate where to connect each cable or connector on the motherboard in this guide. But no two motherboards are made the same, so you will have to use the manual to figure that out for yourself.
8. That’s it! You have successfully installed your motherboard inside the PC case. You can move on to putting together the rest of your PC build, installing components like the graphics card, PCIe add-on cards, and storage drives.
That’s pretty much everything you need to know about mounting a motherboard in a case if you are building your first PC or upgrading an older computer. If you followed the steps above carefully, you would have installed the motherboard in your PC successfully. Although you need to be careful of a few things, the process was pretty straightforward, right? Once you have installed the board, you can connect all the power connectors, install the air cooler on CPU (after applying thermal paste on the CPU), and turn on the PC to see if it works perfectly. If you have any doubts or face any issues during the installation, do let us know in the comments below.
No, the process of installing the motherboard inside the case is not different for AMD and Intel motherboards. The only thing to keep in mind is the size of the motherboard, as it does impact the installation process, and where you have to position the standoffs.
Verify that your case supports your motherboard by checking for compatibility in the specs sheet. The mini ITX, micro ATX, or Full ATX motherboards can all fit in a full-tower ATX case, but a mini ITX case cannot take a micro ATX motherboard. So make sure you pick the correct case for your PC build. You will need to use a different motherboard or case if they’re not compatible.
No, you cannot install the I/O shield without removing the motherboard. So remember to install the I/O Shield before mounting the motherboard in the PC case. You must remove all motherboard screws and cables, install the IO shield, and repeat the motherboard installation process if you forget the I/O Shield.
You may get the driver packages for all the various motherboard components through the manufacturer’s website. Windows Update performs driver updates automatically for your components.
You can buy more standoffs for your PC case through a local vendor or online through Amazon. If you have a new PC case, you will find standoffs pre-installed or in the case packaging, so you can start installing the motherboard right away. But it should be noted that you might need to buy standoffs if you are using an older case.
If you want to stick to one graphics card, only a few storage devices, and don’t need a big-size AIO or air cooler, mini ITX might be the right choice for you. With ATX motherboards, users get to expand their system with way more storage devices, a second graphics card, and more things too, which opens up many possibilities.

