After three developer previews, Google has released the first Android 12 beta today at Google I/O 2021. While the beta program is not meant for all users, you can enroll in the beta program if you can’t wait to check out all the upcoming Android 12 features coming to your phone. In this article, we explain how you can install the first Android 12 beta on your Pixel smartphone in a few easy steps.
How to Install Android 12 Beta (May 2021)
We have not only included the easiest method, which is to enroll for the Android 12 beta OTA update, but also a couple of other installation methods. Expand the table below and move to the method that you feel most comfortable with.
Android 12 Supported Pixel Phones
These are the Pixel phones to get the day-one Android 12 beta support. You won’t get the Android 12 update if you are using an original Pixel/XL or Pixel 2/XL. Check out the list of eligible Android 12 Pixel phones below:
- Google Pixel 3 and Pixel 3 XL
- Pixel 3a and Pixel 3a XL
- Google Pixel 4
- Pixel 4a and Pixel 4a (5G)
- Google Pixel 5
Install Android 12 Beta Using Android OTA Beta Program
The easiest method to install Android 12 beta on your supported Android phone is through Google’s official Android Beta program. Here’s how you do it:
1. Visit the Android 12 Beta program website. You will see your list of eligible devices, and all you have to do is click on the ‘Opt in’ button that appears below your device’s name. You have now enrolled your eligible Pixel device to get the beta update.
2. Once enrolled, wait for the OTA to reach your phone. Meanwhile, you can manually check for updates from “Settings -> System -> System Update”.

Sideload Android 12 Beta OTA
If you don’t want to wait until the official OTA reaches your device, you can sideload the update by flashing the OTA image. The best part? It doesn’t wipe your phone, and you can follow this even for devices with a locked bootloader. Do keep in mind that you should install ADB on your PC and enable USB debugging from the Developer Options of your phone before getting started. With that said, let’s get started with the steps:
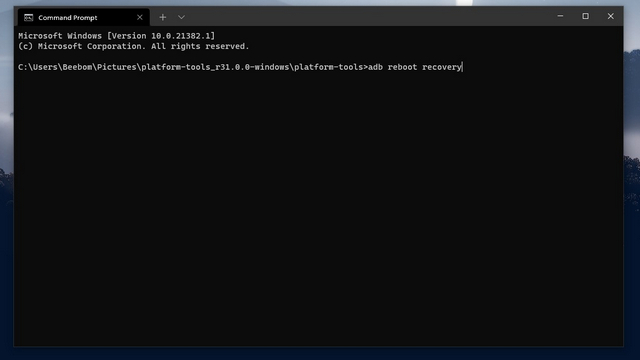
1. Download Android 12 beta’s OTA for your phone using this link and move it to the folder where you have installed ADB on your computer. After making sure you have properly installed ADB and enabled USB debugging, navigate to the folder with ADB and run the following command to reboot to recovery mode:
adb reboot recovery
2. When you are in recovery mode, choose the ‘Apply Update from ADB’ option. In case you’re not familiar with recovery mode, you can use volume buttons for navigation and the power button to confirm a selection.
3. The final step is to use the following command to start the installation process. Do keep in mind that <filename> here refers to the Android 12 beta build you downloaded earlier in Step 1.
adb sideload <filename>.zip
Once the update is complete, choose ‘Reboot system now’ to restart your Pixel phone. Congrats, your phone is now running the latest version of Android, and you can check out the new UI, themes, privacy features, and more.
Install Android 12 Beta Using Android Flash Tool
Announced in January last year, the Android Flash tool greatly simplifies the process for installing AOSP builds on compatible Pixel phones and Android reference boards. However, Google has since repurposed the tool to let users install new beta builds.
Before getting started, make sure you have enabled USB Debugging and OEM unlocking from the Developer Options menu on your phone. Then, follow the steps below:
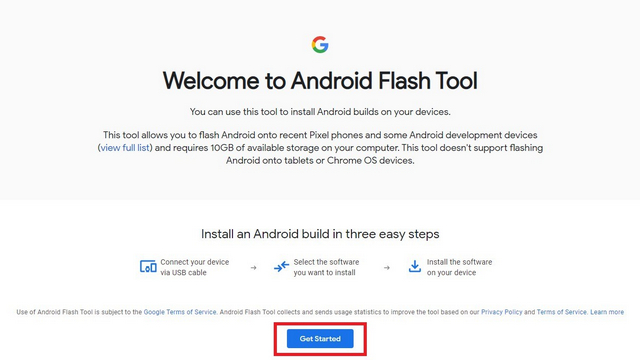
1. Connect your phone to your PC. If you are using a Windows 10 PC, you might have to install USB drivers from this link. Once that’s done, visit Android Flash Tool’s website and click on “Get Started”.
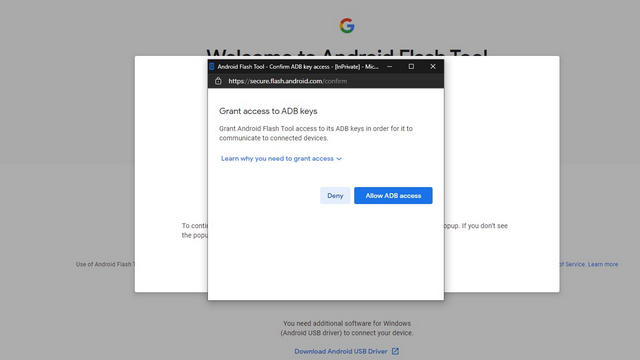
2. When the pop-up appears, click on “Allow ADB access”. You will now see the USB debugging authorization prompt on your connected Android device. Allow it to proceed further.
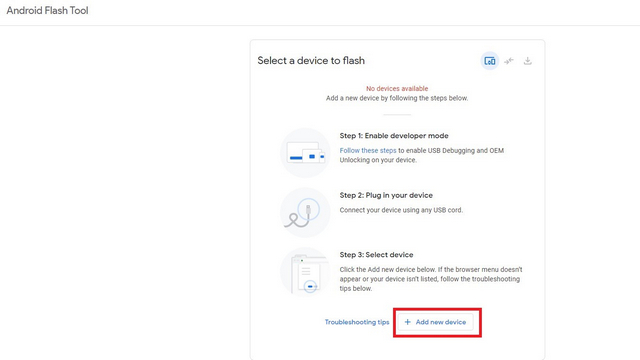
 3. Next, click on the “Add new device” button on the Android Flash Tool website to connect your Pixel phone.
4. You will now see your device in a prompt in the address bar at the top left. Select the device, and click on “Connect” to get started.

5. When the device is listed, click on “Flash Build” to proceed with the installation.

6. In the final step, choose the right beta build from the dropdown menu and click on “Install”. In this case, the build should be Android 12 Beta 1. You can also choose to relock the bootloader in this step.

7. Android Flash Tool will now download the beta build and the installation process should begin soon after. In case something goes wrong, you can use Google’s Pixel update and software repair tool to fix your device.
Install Android 12 Beta Factory Image
Another method you can follow to install Android 12 beta is by flashing the factory image. You can opt for this method if you want a fresh start with Android 12 and have an unlocked bootloader. As always, keep USB debugging enabled before getting started.
1. Download the factory image for your supported Pixel phone from here. Move the downloaded file to the ADB folder on your computer and extract it there. If you want to retain data, open flash-all.sh or flash-all.bat if you are on Windows using a text editor and remove ‘-w’ flag. That said, it is recommended to wipe the data if you are planning to flash the factory image.
2. Open Command Prompt by right-clicking in the ADB tools folder. Then, reboot into recovery mode using the following command:
adb reboot bootloader
3. Now, double-click ‘flash-all.bat’ if you are on Windows or run the command ‘flash-all’ if you are on macOS or Linux, and wait for the process to complete. That’s it. You have now successfully installed the Android 12 beta on your Android device.
Which Method Should I Use?
Since I have detailed all the methods you can follow to install Android 12 beta on your phone, you might be confused as to which method you should follow. Well, here’s what I recommend: Android 12 Beta OTA Program > Sideload Android 12 Beta OTA > Android Flash Tool > Android 12 Beta Factory Image.
While Android Flash Tool might seem easier on the surface than sideloading the OTA, things could go wrong if you are using an unstable internet connection. Besides, if you are familiar with ADB, I highly recommend sticking to the old-fashioned OTA sideloading method. Do let us know which method you chose and why in the comments below.
Install Android 12 Beta on your Phone
So, that’s how you can get an early taste of Android 12 on your eligible phone right now. If you don’t have a supported phone, go through our article on the best Android 12 features to know all the cool features Google has packed in Android 12. If you have any queries or suggestions, comments them down below and we will help you out.