Today, AirPods are one of the most popular true wireless earbuds, especially among Apple fans. That said, AirPods aren’t just for iPhones and iPads. While they pair to iOS devices in the most seamless way possible, you can also connect your AirPods to a laptop without any fuss. Yes, you’ve heard it right! Many people think that AirPods are made just for Apple devices. Fortunately, that’s not true. You can use your AirPods with other devices as well, including your Windows computer. Wondering how to do it? Here’s how to connect AirPods to a PC or Windows.
How to Connect AirPods to a Windows PC or Laptop
Note:
Before you proceed to connect AirPods to your desktop PC, make sure that the motherboard supports Bluetooth connectivity.
The steps to connect your AirPods to a Dell laptop, HP laptop, or any other Windows laptop are the same. That said, there’s a slight difference between how you pair Bluetooth devices on Windows 10 and Windows 11. You need not worry as we’ve mentioned both of them here.
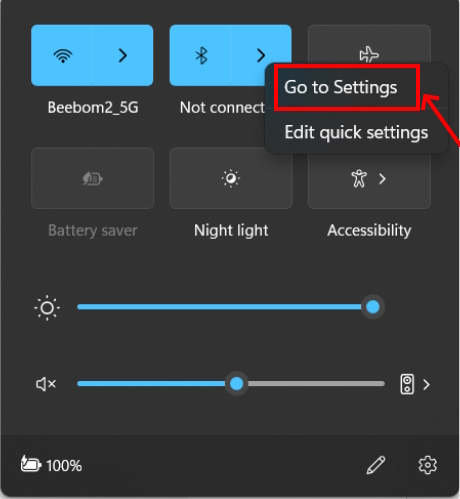
- To connect AirPods to a Windows 11 laptop, press Windows + A to access Quick Settings or Action Center and turn on Bluetooth. Then, right-click the Bluetooth icon, and choose Go to Settings.

- Then, click “Add device“.

- From the list of options, choose Bluetooth.

- To connect your AirPods Pro to a Windows 10 laptop, click the Windows icon and go to Settings -> Devices > Bluetooth & Other devices, and toggle on Bluetooth.

- Then, click Add Bluetooth or Other Device and select Bluetooth from the list.

- Now, bring your AirPods closer to your laptop. Don’t forget to check the AirPod’s battery level to make sure they have enough power.
- With both the AirPods inside the case and the lid open, press and hold the Setup button on the back side of the case for about 15 seconds. The status light will turn White and start blinking. Once you are here, release the button.

- After a few seconds, your AirPods will appear in the list of available Bluetooth devices on your laptop. Click on the name to connect your AirPods to your PC.

- You should see a pop-up saying, “Your device is ready to go”. Click Done and that’s it! You’ve successfully connected your AirPods Pro to your PC. You can now enjoy music and join calls on your laptop using your AirPods.

- If audio isn’t routed through AirPods, click the Volume icon, then click the small arrow and choose your AirPods. Now, the audio will be routed to your AirPods.

- To remove your AirPods from your laptop, go to Bluetooth settings, locate your AirPods name, click the three dots, and choose Remove Device.

Some features like automatic in-ear detection, gesture customization, and battery status of AirPods aren’t natively available on Windows laptops. That said, you can watch movies, take video calls, listen to music, and play games without any issues.
How to Connect AirPods to a MacBook
Thanks to the seamless connectivity within the Apple ecosystem, it’s even easier to connect your AirPods to a MacBook. If you’ve already connected your AirPods to an iPhone, they will automatically connect to your Mac that’s signed in with the same Apple Account. Otherwise, you can also connect your AirPods to a MacBook manually.
- Press & hold the setup button at the back of the charging case until the status light flashes white. Then, go to Apple Menu > System Settings > Bluetooth.
- Toggle on the Bluetooth and then locate your AirPods under the Nearby Devices section and hit the Connect button.

For more details on how to pair and use your AirPods/AirPods Pro with a MacBook, refer to our dedicated guide.
Yes, AirPods and AirPods Pro are compatible with Dell PCs and laptops.
First, put your AirPods in pairing mode. Then, go to Bluetooth Settings on your Dell laptop and choose Add a Device. Finally, choose your Apple buds and hit the connect/pair option.
Some of the possible reasons why your AirPods can’t connect to a laptop are:
1. Bluetooth is disabled on your laptop.
2. AirPods are already connected to another device.
3. Your AirPods are out of charge.
4. Outdated Bluetooth drivers on your computer.
Put both your AirPods inside the charging case with the lid open and press the setup button (at the back of the case) until you see the status light flashing white. This will put your AirPods or AirPods Pro in pairing mode.
The orange light on your AirPods or AirPods Pro indicates that they need to be charged.


