If you’re a PC gamer, there’s no denying the fact that you must be using Steam. Valve’s Steam is the global leader in digital distribution for games and game-related services. Steam even has its own client for easy and efficient game management. You might be a long time user of Steam, but it’s a fact that there are plenty of tools hidden beneath the various menus of Steam’s app and web portal alike, that you might not be aware of. Yes, I am talking about various Steam tricks that will help you enhance your overall Steam experience. So, without further ado, here are 15 cool Steam tricks you should know:
1. Add Non-Steam Games To Your Library
Surely not all the games you buy have been bought via Steam. You could have bought them off EA’s Origin, or other portals that offered you discounts when Steam didn’t. Either way, it can be a hassle to connect and socialize with your friends on that game without Valve’s Steam. Thankfully, Steam has an inbuilt feature that allows you to add non-Steam titles to your Steam client. To do so, follow the steps below:
- Open the Steam client and head to “Games” option in the menu bar. Select “Add a Non-Steam Game to My Library”.

- The process is pretty straightforward thereon. You’ll be presented with a list of programs and applications installed on your system. Simply select the checkbox next to the titles that you wish to add, and then click on the “Add Selected Programs” button in the bottom-right to add them to Steam’s list.

2. Batch Install/Uninstall Games
Sure the Windows inbuilt app for installing and uninstalling apps can be enough for most of your needs, but it still lacks the ability to actually clear everything from the system, which includes registry entries and other leftover data. Furthermore, the Windows service cannot uninstall apps collectively. But then again, why do you have to fear if you have Steam. Back in 2014, Steam added a new functionality to their client, which allows you to batch install and uninstall games from your library, thus saving you tons of space. To do so:
- Open up your Steam Library and switch to the “List View” by clicking on the list icon in the top right.
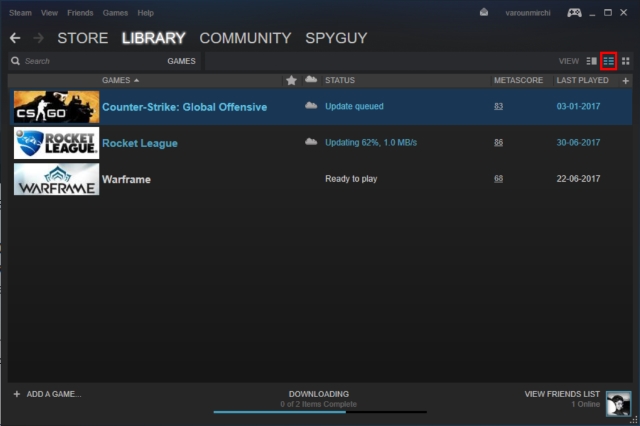
- Once done, you can select multiple games in your Library by holding down on the Ctrl button and selecting games with the left click of your mouse. Once you’re done selecting, simply right click and select “Install” or “Uninstall” depending upon your choice.

3. Backup Your Save Games
So you probably think that Steam Cloud backs up all of your games automatically, right? Well, it does and then it doesn’t. What I mean by that is that Steam only backs up the save game data to the Valve’s servers, and that too only of the titles that support this feature. But what if you run into a situation where your system crashes, or well, just about anything happens and you have to reinstall your games again. Sure, the purchased games do still stay in your library, but you will have to piss off your Internet Service Provider by again downloading the gigs of game data. Well, luckily for you, Steam helps you in backing up your entire game data to an external storage, to be easily restored in the future. If you want to backup your game data as well, follow the steps below:
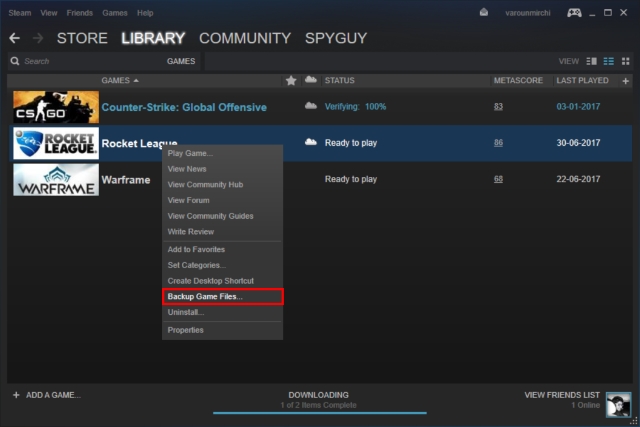
- Head over to your Library and right-click on the game of your choice and select “Backup Game Files”. A dialog box will pop up with a list of all your installed games, allowing you to select which titles you’d like to backup.
- A dialog box will appear allowing you to select the destination for the backup. Select the location of your choice by clicking on “Browse”, and once you’re done, click “Next” to proceed with the backup. Steam will now backup your entire game data to the selected location.

- To restore these backups, simply log on to your Steam account, then open the backup folder and run the “steambackup.exe” file and proceed with the on-screen instructions to restore everything safe and sound.
Note – While Steam’s backup facility is great, it will not back up mods, custom configuration files, or games that utilize third-party installers, or non-Steam games that you added to Steam using the above-mentioned method.
4. Share Your Games With Your Family
Steam is the premier portal for digital distribution of games. But it’s not possible for each and everyone to be able to afford all the games that one desires. Even worse, it hurts when you see your younger brother playing a game that you really wanted to play, but you spent your money on some other game. And now he won’t let you play via his account for he fears that you might screw up his save games and his various achievements in the game.
Well, Valve does understand this situation and has provided a simple and nifty solution, that is, Family Sharing. What this feature essentially does, is that it allows one family member to share his purchased game to another family member via Steam. To do so, follow our in-detail guide on how to share Steam games using Steam Family Sharing.

5. Display In-Game FPS Counter
So you just bought a new GPU for your system and it looks and performs great. But how do you show-off to your friends that can’t witness it? I guess we all know that numbers don’t lie. Well, at least in most cases. The number that I am referring to, in this case, is your FPS meter. For any gamer, the FPS meter is an essential tool of knowledge, that helps him/her decide what settings suit the system best for a decent session of gameplay. Ideally, if your FPS is in the range of 30-60, the game is considered to be playable. But how do you see this famous FPS meter that I am talking about in a game?
While some games do offer the ability to toggle an FPS meter within their games itself, it is not a uniform feature. But fret not, Valve has been able to fix it by providing a feature to show the FPS meter in all games that are added to Steam. To do so, follow the steps below:
- Head over to the “Steam” option in your menu bar, and select “Settings”.

- Once there, go up to the “In-Game” tab, and check the checkbox next to “Enable the Steam Overlay while in-game”. Once you’re done with that, simply head over to the “In-game FPS counter” option below that, and select the location for the FPS meter to suit your liking.

- And that’s it. Open the game of your choice and you’ll witness the FPS meter in the set location by you.

6. Change Install Location
So, your games are stored onto that sluggish hard drive of yours, and you feel the need, the need for speed? Maybe you want to push all your games to that blazing fast SSD, or maybe you got a new HDD that’s supposedly faster than the existing one, and you wish to move all your games there. Either way, I hope you do realize that simply moving the install folders will not do the trick, rather, it would mess up your entire game data. But fret not, Valve’s Steam provides you with a simple way to go about shifting your installed games, and that too with just a few clicks. To do so,
- Open up your Library and right-click on the game you wish to move, and select “Properties”.

- Under the “Local Files” tab, at the bottom, you’ll see a “Move Install Folder” button. Simply click on that and follow the on-screen instructions.

7. Change Steam’s Look and Feel
Now, who doesn’t love customizing the look and feel of anything to suit one’s liking. While the original Steam interface is quite great in itself, there is no reason why you shouldn’t change it to your preference. Well, Valve acknowledges that and has an inbuilt option for changing the Steam client’s skins. You can change your Steam client’s look by following the steps given below:
- Do note that while Valve does allow you to change the skins, it does not provide any additional skins within its client. You need to first download the skins you like from here, or, alternatively, build your own skins from scratch using the tool provided here.
- Once you’ve downloaded the Steam Skin, copy-paste those skins to Steam’s installation folder. The default location is “C:\Program Files (x86)\Steam\skins”.
- After pasting the skin files, open up the Steam client, and click on “Steam” option in the menu bar and select “Settings”.
- Once there, head over to the “Interface” tab and select the skin you just downloaded. Once done, press “Ok”. You will now be required to restart the Steam Client.
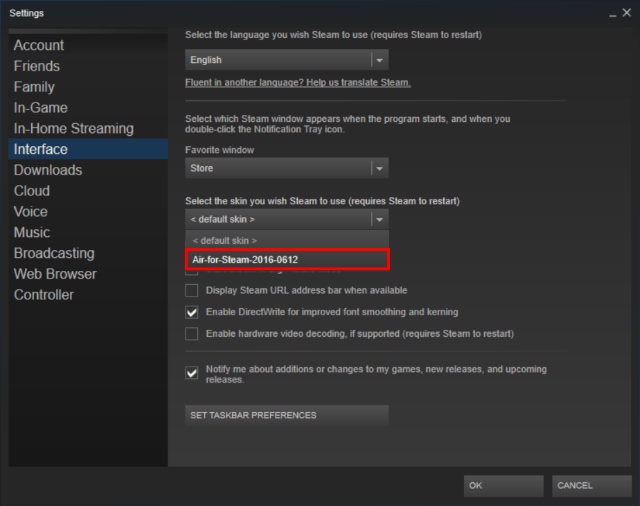
- And that’s it. You Steam Client will now restart and your new skin will be loaded up. If you wish to apply the same skin that I have used, it is the “Air For Steam” skin and it can be found here.

8. Power-Up With Enhanced Steam
Valve’s Steam service is practically the best digital game distribution service out there, but the Steam client is not flawless. It does come with its own set of criticism, missing out on some features that can really ‘enhance’ the overall Steam experience. The community did take this into consideration and moved on to develop “Enhanced Steam”, a web-browser extension that modifies the way you access Steam from your browser.
Enhanced Steam provides its users with plenty of new features such as game prices from other web portals, listing out game bundles, displaying the user how long it should take for him to finish the story line, remove the constant and annoying age verification prompts, and much more. To use Enhanced Steam, simply download the browser extension for your respective browser from here.

9. Steam Inventory Helper
As stated above, the Steam client is great, but not perfect. If you’re a user of the Steam client, surely you must have encountered the hassle that comes along with the process of managing your Steam Inventory. But that’s where Steam Inventory Helper comes in. Currently available just for Google Chrome, this browser extension makes the repetitive and clunky process of selling, buying, and trading on Steam much easier and more streamlined.
The extension comes with tons of new additions to the Steam Inventory, such as buying and selling items quickly without continuous confirmations, displaying the trade offers, adjustment of prices based on market fluctuation and much more. You can download the extension from here, and change the way you handle your Steam Inventory.

10. View Hours Spent on Steam
Surely there are tons of games in each of our libraries that we’ve spent countless hours upon. But what if I told you that there is a way to change that? No, I am not talking about removing the game, but instead, I am referring to the act of being able to change the ‘countless’ part to a rather measurable one.
The website – Steam Time, just goes on to show how many hours you’ve “wasted” while playing games on Steam. To do so, simply open the website here, and enter your Steam ID in the text entry box and select “show me:D”.

While I’ve just wasted 38 hours, that’s because most of my games were installed outside of the Steam client, but yours just might be bigger. I’d love to see the hours you’ve spent (or wasted) on Steam in the comments section below.
11. Fair Steam
How many of you out there actually believe that the videos shown on the Steam’s game description page are an actual representation of the game? If you do, then you couldn’t be more mistaken. Almost 90% of those videos are from the engine footage and not the real in-game performance. So what do you do at that time? You install Fair Steam, that’s what.
Fair Steam is a nifty little Google Chrome extension that adds actual gameplay video from YouTube into the Steam Store. This allows you to browse through the realistic rendering of the game’s elements in real time, and make a wise decision on whether to purchase the game or not. You can install Fair Steam from here.

12. What Can We All Play?
So, you’ve got a bunch of friends sitting idle at their homes on a lazy Sunday afternoon, and you decide to play a multiplayer game together. But how to check what all games can you play together? Ideally, you need to browse through each player’s profile and see what all games they have, and then check your library, and finally match the games list to ultimately obtain a list of common games. But luckily for you, there’s a website that can do this task for you. To do so, follow the steps below:
- Simply head on to What Can We All Play, and enter your Steam ID and your friend’s Steam IDs and click on Submit.

- The website will now scan through the list of games on each and every profile and finally show you the common games.

13. Check Your Account Value
Seeing the hours you’ve wasted is one thing, but seeing the money you’ve wasted is something totally different. Surely you must have bought various items from the store, and even accomplished quite a lot in the world of games available on Steam. But how to show off all of this in front of the world? Well, there’s a nifty little portal available that evaluates your profile, to see what is your Steam account’s value.
To evaluate yours, simply head over to the SteamDB Calculator’s website and enter your Steam ID along with the currency of your choice. Then, click on the “Get Disappointed with your life” button. The website will now display the value of your Steam account, and if you have something similar to my ratings, certainly, you will be disappointed as well.

14. How Long To Beat
You must have surely installed some story based games onto your system, and despite spending multiple hours on that game, you must have felt that maybe this is getting nowhere. The thought of “how long till I finish this godforsaken game?” has crossed almost every gamer at least once during their gaming sessions. Luckily, there is a site that can answer that question for you.
Simply head over to How Long To Beat and enter your Steam ID. The portal will now analyze all of your games, and your progress in them as well, and then display the total amount of hours that are required further in order to complete the game.

15. Speed Up Your Steam Downloads
Steam’s servers have been praised time and again for being one of the best for any gaming portal. That being said, it is quite possible that you might not be making the most out of them, and could be suffering with slow or not up to the mark download speeds. If that is the case, you can check out our in-depth tutorial on how to increase download speed in Steam.

SEE ALSO: Top 15 Cheap Steam Games You Should Check Out
Make The Most Out Of Steam With These Steam Tricks
Be it with the help of the official client, or the web portal, Steam is definitely the premier portal to satisfy all your gaming needs. I hope that with the help of our list of some of the best Steam Tricks, you will be able to make the best out of Valve’s services. So, try out these Steam tricks and share with us your experiences in the comments section to let us know how these tricks have helped you out.


 Sanmay Chakrabarti


 Matthew Wilkins


