- Banner patterns are items that apply a completely new design to a Minecraft banner. Some are rarer than others.
- To apply them to a banner, place a banner, dye and a pattern in the loom, and craft the banner with a new design.
- There are 10 banner designs in Minecraft, including Flower Charge, Globe, Snout, Flow, Guster, Thing, Skull Charge, Creeper Charge, Field Masoned, and Bordure Indented.
If you love collecting rare items in Minecraft or simply love playing around with different banner designs, then you must already know all the cool banner patterns. Often used to express yourself, the Minecraft banner patterns add a detailed and completely different design to your banner. However, knowing all banner patterns in Minecraft and how to make them can be difficult. For those times and more, we have compiled this handy guide for you.
What are Banner Patterns in Minecraft?
The Minecraft banner patterns are special, reusable items that can give your banners unique designs when used in the Loom. Using the banner patterns, you can create complex shapes such as the face of a flower, creeper face, globes, brick textures, and more. Keep reading to learn all about the available patterns in the game.
Every Rare Banner Pattern & How to Get Them
There are 10 special Minecraft banner patterns, belonging to three main rarities: common, uncommon, and rare. So, here is a detailed overview of all Minecraft banner designs:
Guster


- Location: Trial Chambers reward chest
- Rarity: Rare
The Guster banner pattern is an item you can get only inside trial chambers and was added to the game after the Minecraft 1.21 Tricky Trials update. Your job is to defeat trial spawner challenges, get the trial key, unlock the vault, and get lucky enough to get this item. It has only a 3.6% chance of being ejected. The Guster banner pattern adds a silhouette of the Breeze mob, with a swirling tornado and angry eyebrows.
Flow

- Location: Trial Chambers Ominous vault
- Rarity: Rare
The Flow banner pattern is the most difficult banner design added to Minecraft 1.21 Tricky Trials update. Similarly to the Guster pattern, you can only get it inside the trial chambers. First, you have to trigger ominous trials and defeat the ominous trial spawner challenge.
Then, you should be lucky to get the ominous trial key, which you can use on an ominous vault to get the Flow banner pattern. There is a 15% chance of this happening, which is not that great the things you need to do first.
The Rare “Thing” Pattern


- Recipe: Paper + Enchanted Golden Apple
- Rarity: Rare
The Thing banner design is crafted by combining a piece of paper with the enchanted golden apple. Yes, you read that right, enchanted golden apple! This rare item is viewed as one of the biggest treasures in the blocky world of Minecraft, so it can be difficult to spend it on making a banner pattern.
But thanks to the ancient city and trial chambers, the enchanted golden apple is not that difficult to find. The Thing banner pattern adds the Mojang logo to the banner. So, if you want to add a touch of exclusivity to your Minecraft banner, get The Thing.
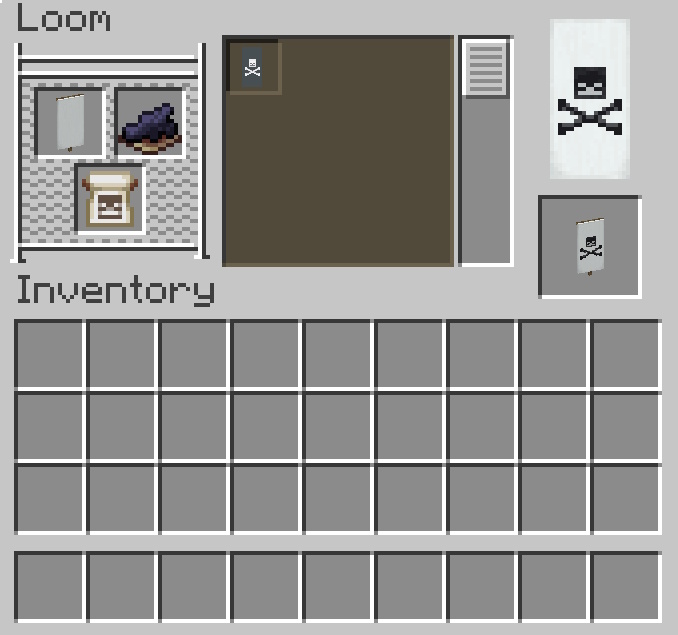
Skull Charge
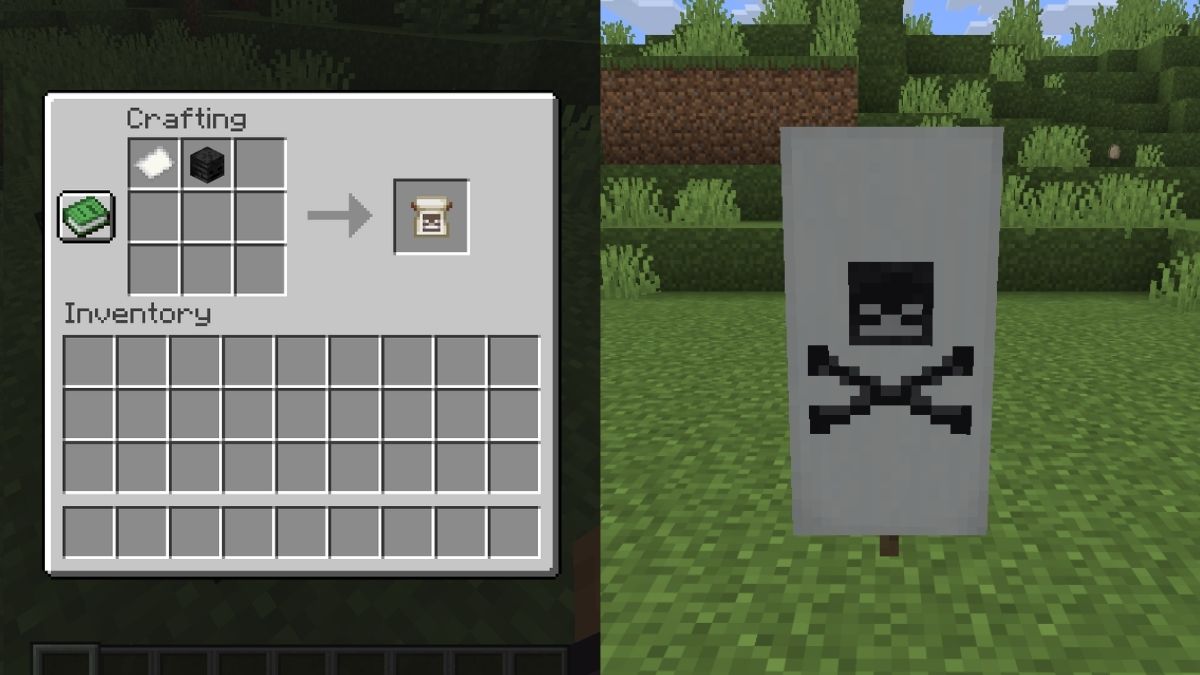
- Recipe: Paper + Wither Skull
- Rarity: Rare
The Skull Charge banner pattern is made using a wither skeleton skull and a piece of paper. The wither skeleton skull is a rare drop from the wither skeleton in the Nether fortresses, but the looting Minecraft enchantment makes it more likely to drop.
This pattern creates a skull and two crossed bones, which is a familiar pirate design that all One Piece lovers will enjoy.
Creeper Charge
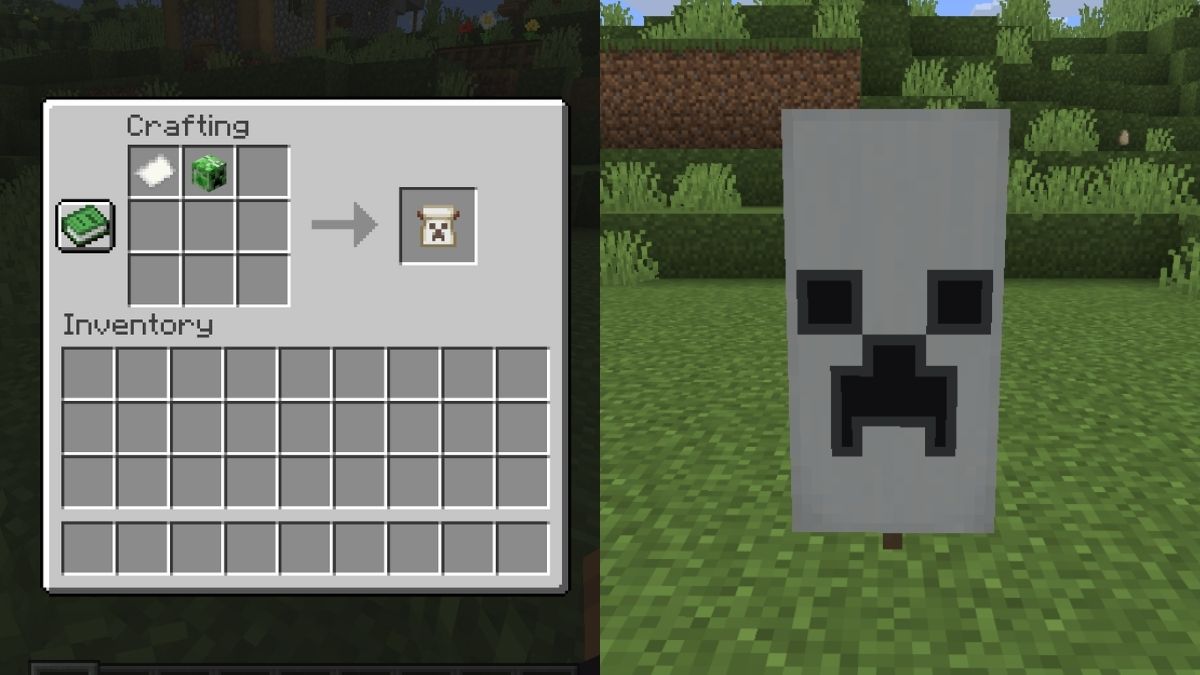
- Recipe: Paper + Creeper Head
- Rarity: Uncommon
The Creeper Charge banner design is extremely difficult to get. This design adds a creeper face to the banner. While not preferred by all, I like it. It requires you to complete multiple steps before getting it. First, you need acharged creeper. You can make it by striking a normal creeper with lightning.
For that, you need a trident with channeling enchantment. Once you create a charged creeper, it needs to blow up and kill a regular creeper, which will cause it to drop its head. We will combine this head with a piece of paper in a crafting grid to make the Creeper Charge pattern.
Flower Charge
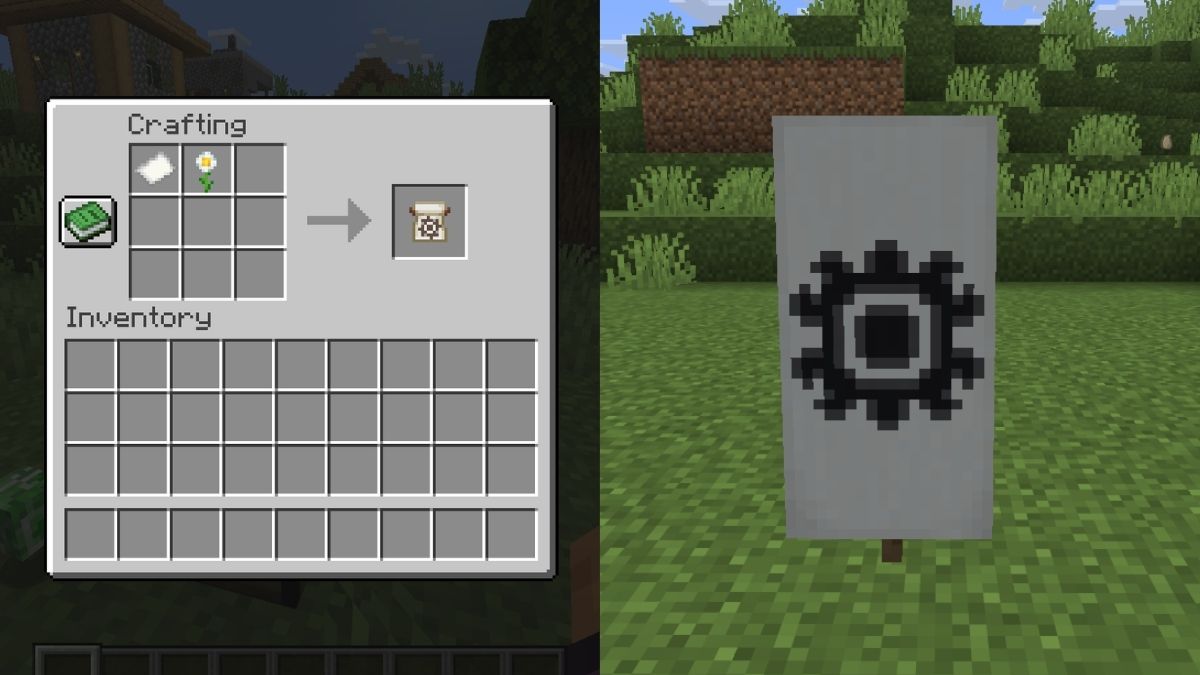
- Recipe: Paper + Oxeye Daisy
- Rarity: Common
The Flower Charge pattern can be obtained by combining a piece of paper with an oxeye daisy flower. This flower is fairly common and can be found growing on top of grass or dirt blocks in plains, sunflower plains, flower forests, and meadows Minecraft biomes.
This pattern creates a large flower design on a banner that also looks like the Sun.
Globe

- Location: Trading with Cartographer
- Rarity: Common
The globe banner pattern is sold by a master-level cartographer, one of the many villager jobs, for 8 emeralds. Thankfully, it’s easy to learn how to find a village and the best villager trades to get started.
The guides above will also help you in locating this structure and obtaining the emeralds needed for leveling up a cartographer. To stay consistent with the blocky world of Minecraft, the Globe pattern adds a cube Earth design to your banner.
Field Masoned
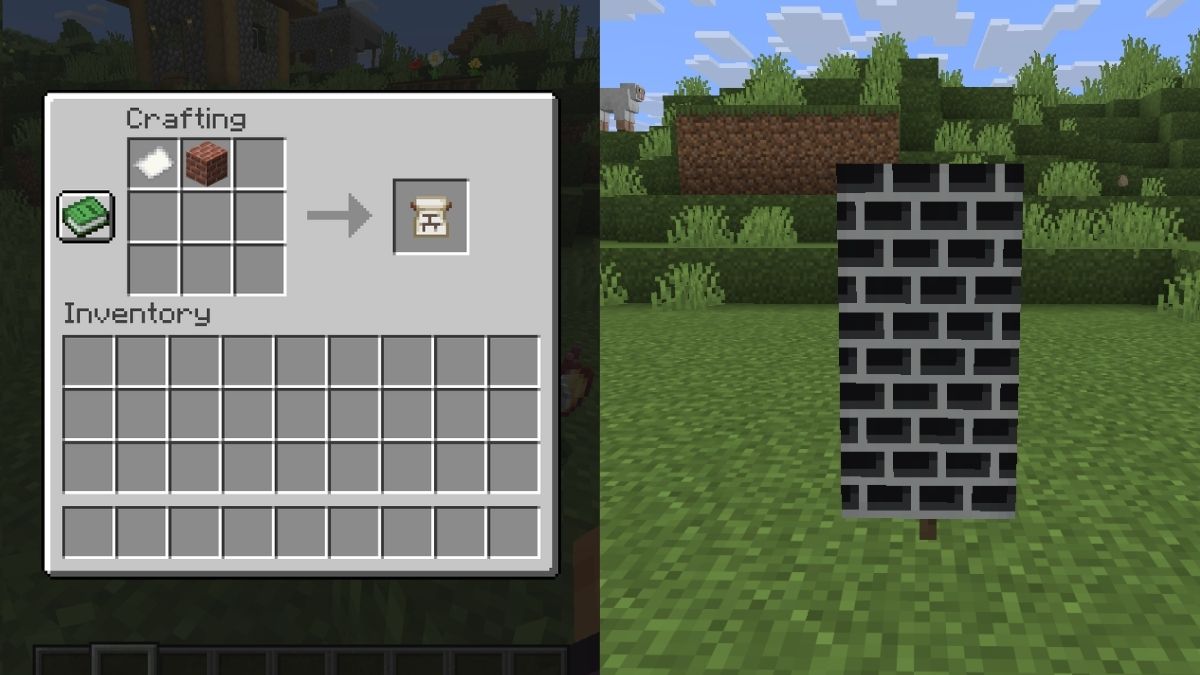
- Recipe: Paper + Bricks
- Rarity: Common
The Field Masoned banner pattern is only available in the Bedrock edition and can be obtained by placing a piece of paper and a brick block in the crafting grid. As you would expect, it adds a brick design to your banner.
Bordure Indented
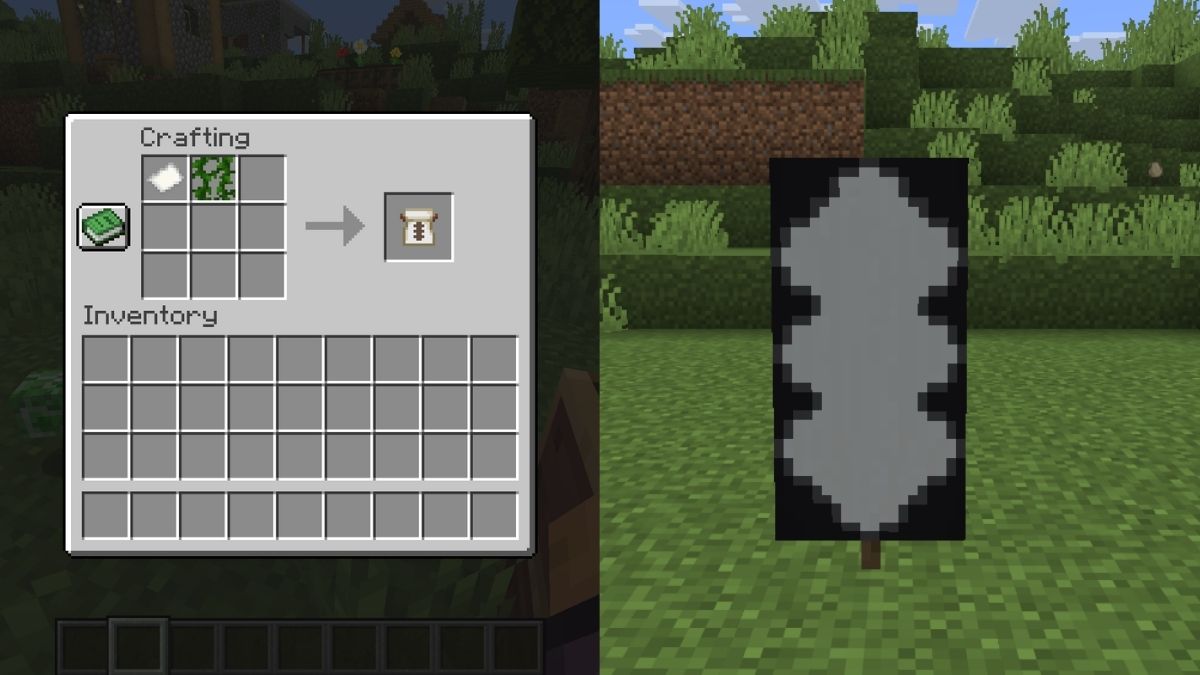
- Recipe: Paper + Vines
- Rarity: Common
The Bordure Indented pattern can be crafted with a piece of paper and a single regular vine. This block commonly generates on trees in jungle and swamp biomes, as well as in lush caves. This Bedrock-exclusive banner pattern adds a zig-zag border to your banner.
Snout

- Location: Bastion Remnant chest
- Rarity: Uncommon
The snout banner pattern is one of the possible loot items in Bastion Remnants in the Nether dimension. There is a 10% chance of you finding it, so approximately 1 in 10 chests should have it.
As the name suggests, this pattern adds a snout design of a piglin mob to the banner. So, while you cannot craft this banner, I still found the search to find it worth it.
How to Use the Loom for Custom Designs
To utilize banner patterns, you’ll need a banner of any color, the loom block, and any color dye. Once you have all the materials, follow the steps below:
- Place the loom in your world and interact with it to open its UI.
- Now, place the banner with or without a design in the banner slot in the top left-hand corner.
- Add a dye in the slot next to it and place the banner pattern in the bottom slot on the left side of the loom’s interface.
- You’ll now see a preview of the design appear on the right. The design will be colored to match the dye you chose.
- Click on the banner on the right, craft it, and apply the pattern.

You now know how to get all the banner patterns and how they look on banners in Minecraft. The best thing is that the banner pattern won’t get used up in the process, so you can reuse it as many times as you want. The Banner patterns not only look cool but are also helpful in creating various other custom designs using the loom. Here are some designs available by default in the Loom:
Pattern Name Description Base Dexter Canton A small square at the bottom left corner. Chief Sinister Canton A small square at the top right corner. Base A rectangle covering the bottom. Pale Dexter Stripe on the left side Pale Sinister Stripe on the right side Pale Stripe in the middle, vertically Fess Stripe in the middle, horizontally Bend Stripe diagonally starting from the top left. Saltire Cross Base Indented Three triangles at the bottom part
While working with Minecraft banner patterns, you might often get confused between the Loom and the Crafting table. The following table clearly shows you the difference.
Features Loom Crafting Table Primary purpose Apply design to banners Craft banner pattern items, other banner bases and more. Banner pattern designs Has 30+ basic designs No design Used for Shield designs No Yes
5 Pro Tips for Better Banner Designs
There is only a six-layer design limit you can apply to a banner in Minecraft, so use it wisely. Here are some of the best pro tips to make better banner designs:
- Use the Banner Pattern Items for Slot Efficiency: Making complex shapes using different base designs can use up the layers, so consider using the above banner patterns to save some slots.
- Mix Center Charges and Borders: Layer ordering matters, and therefore, borders should go early, while the center charges should be applied later to make them visible among the layers.
- Duplicate Banners Easily: You can duplicate the banner by using a blank banner of the same base color. So, there’s no need to use up your dyes.
- Use Gradients: Consider applying the gradient on your banner patterns to add depth before you apply any unique designs.
- Build a Loom Room: Have an organized loom room with storage chests to prevent unnecessary crafting of items. This is because you can always reuse the banner patterns an unlimited number of times.
With that, what is your favorite banner pattern design? Share with us in the comments below!
Yes, you can add multiple different Minecraft banner patterns to the same banner. The more recently added design will appear above the older one.
There are 10 unique banner pattern designs in Minecraft, and in addition to them, there are more than 30 default basic banner patterns on the loom.
The Guster and Flow banner patterns are considered to be some of the rarest ones in Minecraft, as they can only appear in the loot chests of the Trial chambers.