
We have previously explored how to overclock your graphics card, but today, we will explain how to undervolt your GPU. In this article, we have included the complete step-by-step process to undervolt your graphics card, so it can run at lower temperatures. There are numerous factors to consider when attempting this process, as you are changing the core functionality of your hardware by modifying its voltage. We will make sure to guide you through the right procedure to safely undervolt your Nvidia, AMD, or Intel graphics card.
Undervolting can be a tedious process if done incorrectly. Your PC can suffer from system crashes and graphical glitches if you don’t lower the voltage settings in the correct increments. However, that being said, let’s dive right in and look at the step-by-step process!
Things To Do Before Undervolting Your GPU
- Ensure that you have correctly installed the graphics card; go through our guide on how to install the GPU in your PC.
- Download and install the following programs on your Windows system:
- MSI Afterburner for the undervolting process.
- HWiNFO for monitoring the voltage, temperatures, etc.
- 3DMark Basic Edition for stress-testing the GPU and ensuring stability
A Step-by-Step Guide to Undervolt Your GPU
Step 1: Get Your GPU’s Current Voltage Settings
First, launch HWiNFO. Select Sensors-only while launching it and then click Start. Next, open 3DMark and run the Time Spy benchmark. Once it has been completed, go to HWiNFO, and scroll down to find the GPU Core Voltage and GPU Clock. Now, note down the values under the “Maximum” column. You now have your current voltage settings for the maximum GPU frequency your card runs at.


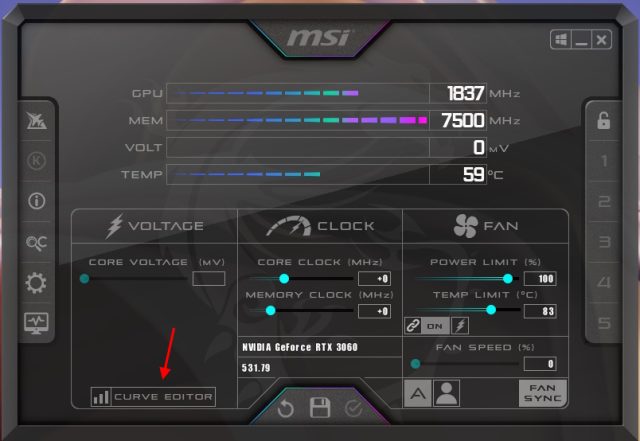
Step 2: Open the Curve Editor in MSI Afterburner
Next, launch MSI Afterburner and click on the “Curve Editor” option. Now don’t be scared, though. While things are going to get slightly complicated, you will learn how to undervolt your GPU in no time.

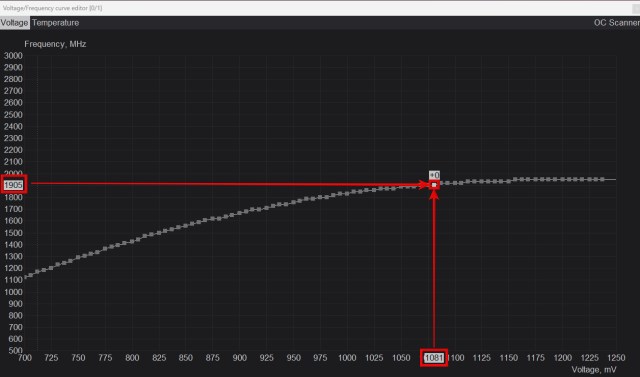
You will see many squares corresponding to different points in this curve graph expressing the voltage & frequency curve of your GPU. You need to understand which point corresponds closest to the stock voltage & frequency setting of your GPU, which we penned in the previous step. We have shown what point this was for our GPU in the demonstration below. By the way, some variance is expected and is normal, since a GPU operates in a dynamic manner.

Step 3: Adjust the GPU Voltage in MSI Afterburner
Now, click on the square corresponding to a lower voltage increment (represented on the Y axis), by around 10 or 20 mV. This is the recommended increment to begin undervolting with. In our case, since the stock voltage is 1081mV, we selected a square that corresponds to 1068mV, which would be -13mV.
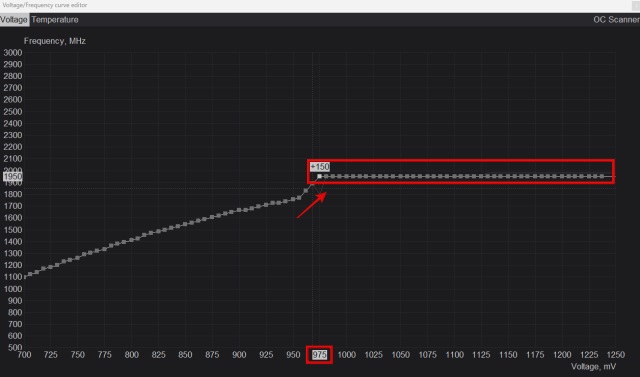
If you are confused, look at this demonstration below, which highlights the original point and the lower voltage point which we will proceed to modify in the next step.

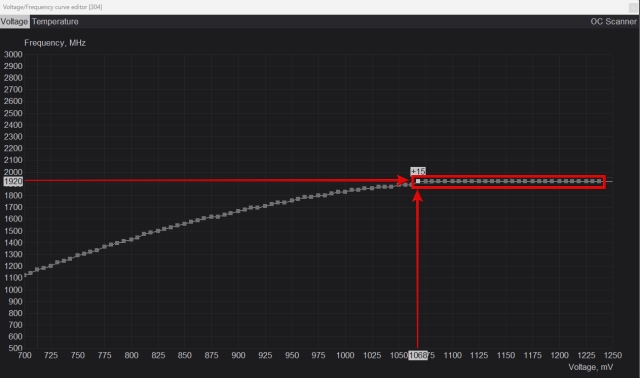
Press the UP arrow key till the square corresponds to your stock core clock, which we noted in step one. Then, select every square point on the right and move them down or up as required, making sure they are on the same frequency. This ensures the GPU won’t boost beyond that core clock frequency.
Basically, doing this will make the GPU run at that stock core clock, but at a lower voltage setting. Hence, we will have undervolted the GPU. Don’t close anything yet, read the next step for applying this setting.

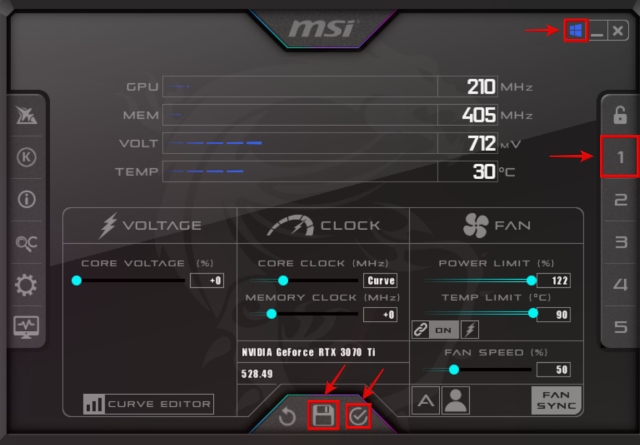
To apply the undervolt, drag the Voltage/Frequency curve editor window to the left (don’t close it!) to see the MSI Afterburner window. Then, click on the tickmark next to the save button to apply the settings, and MSI Afterburner will automatically adjust the entire curve based on this setting. Now, click on Save, followed by one of the numbers on the right, to save this profile.

Step 4: Benchmark GPU and Adjust Undervoltage
Time to test out this GPU undervolt setting. Launch 3DMark again, and this time we will do a 30-minute stress test for the GPU to ensure stability at this voltage setting.
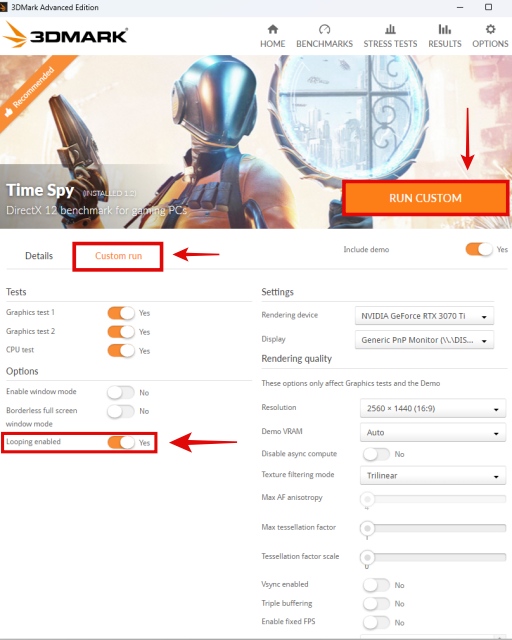
To do that, navigate to “Benchmarks“, click on Time Spy, and then click on Custom Run. Here, click the “Looping enabled” setting to enable it. Then, click on “Run Custom” and the stress test will start. Let the app run for 30 minutes, and then close the 3DMark Time Spy benchmark.

If things were stable and your PC did not crash, you can undervolt further. Repeat step 3, but you first need to revert the settings by clicking the Reset (↺) button. This time around, you can select a square at a lower voltage increment but remember to only go down by about 10 or 20 mV.
Apply the settings, and test again using 3DMark Time Spy for 30 minutes, which is explained in Step 4. Hopefully, your PC didn’t crash or have any issues, and if so you can repeat this entire process while remembering to note down the last stable setting you already tested.
Once you experience a system shutdown or observe some display or graphics glitches, it means you have reached the maximum undervolt potential for your GPU. In our case, we experienced instability below 950mV, hence, we decided to settle at 975mV as the final undervolt setting, which we optimized further with a slight boost in frequency at 1950MHz.
Measuring this shows that we were able to undervolt our GPU by 106mV, a pretty solid result. So now, at this final undervolt setting, you will have the same GPU performance, but at drastically lower temperatures & noise levels.
Note: When you have your final undervolt setting, remember to save it as we had shown at the end of Step 3.
And voila! You have finished the process of undervolting your GPU. In the next section, we will show you the benchmarking results of our graphics card, to measure how much we lowered the power consumption and temperature of the GPU.
Step 5: Check Temperature After Undervolting GPU
As you can see below, we observed a drop of 4.1 degrees Celcius in our GPU core temps. The GPU Hotspot temps went down by 5.1 degrees Celcius, and before it was nearing 90 degrees C. This is a decent result and clearly shows the benefits of undervolting a graphics card. Even though our GPU which is an RTX 3070 Ti is quite efficient and runs cool, the coil whine issue is annoying.
With this UV setting, a lower manual fan setting can be used and even in GPU-heavy tasks such as gaming & content creation, none of the temperatures go above 85 degrees Celcius. Hence, less noise was produced and the coil-whine issue we had was also gone.


For many other users, especially with GPUs that are less efficient or run at higher temperatures, undervolting will be even more beneficial. For example, an RTX 4090 was undervolted by QuasarZone.com, and they observed that after the GPU only suffered an 8% performance loss with a significant reduction in power consumption undervolting & lowering the power limit. Hence, less heat & more desirable temperatures.
Frequently Asked Questions
Yes, it is safe to undervolt the GPU as long as you do it in small increments and settle on a stable setting.
Some PCs have overheating issues, which can be easily fixed through undervolting. So, your FPS can definitely increase after undervolting GPU since your PC will be able to run at lower temperatures and maintain the performance levels it is supposed to.
If you undervolt your GPU too much, your PC could suffer from stability issues, glitched out graphics, or random system shutdowns. When that happens, you must revert back to the stock settings, or optimize your undervolt so that no instability is present.
Undervolting your GPU by a small, healthy increment can reduce its temperature. By extension, your fans will last longer as they’ll need to spin to 100% less often. Lower temperatures have also been linked to longer life in the experience of many users, while overheating can cause hardware to die earlier.
This should be decided by the user, as per their personal preference – are you happy with the current performance levels? Then, undervolt your GPU. And if not, you can try overclocking it instead.
Yes, undervolting can cause games & other programs to crash, if it is an unstable voltage setting is in place. If there is not enough voltage to run the GPU at the stock clocks, it’s definitely an indicator of an unstable undervolt.


