
This problem is faced by nearly every Raspberry Pi user. You have a Raspberry Pi running at home, and want to execute a command on it. The issue is, you are outside your home, on your mobile network, and have no way to access your Pi. You can get a static IP address, or use one of the dynamic DNS services to enable access to your home network. However, that is just too inconvenient for most people and takes too much effort for little gain. In addition, it opens your Raspberry Pi to brute-force attacks, since the SSH port is now exposed to the world.
The good news is, there is a more convenient, and more secure method – simply email the commands you wish to run on your Raspberry Pi. This way, all you need is an email client and a working internet connection on your Pi. No logins, and no static IP’s. What’s more, this method not only works with the Raspberry Pi, but with any Linux distro with the Bash shell and cURL installed. Sounds cool? Here is what you need to set it up:
Requirements
Getting Started
Set Up IFTTT Recipe
We will use IFTTT to distribute commands delivered by e-mail to Dropbox. After setting up an IFTTT account, you will have to use the “Run bash commands on Raspberry Pi by e-mail” recipe. Simply, go to this IFTTT recipe, and click on Add.


Set Up Dropbox Uploader
We need Dropbox Uploader –
1. On your Raspberry Pi, get the prerequisite software cURL and wget. You probably already have these installed, but we will install them just in case:
[sourcecode]sudo apt install wget curl[/sourcecode]
2. Create a folder where we will set it up. Here, I’ve created a directory called raspi_email in my home folder:
[sourcecode]mkdir ~/raspi_email
cd ~/raspi_email[/sourcecode]
3. Get the Dropbox Uploader script from GitHub, and mark it executable:
[sourcecode]wget https://raw.githubusercontent.com/andreafabrizi/Dropbox-Uploader/master/dropbox_uploader.sh
chmod +x ./dropbox_uploader.sh[/sourcecode]
4. Run the dropbox_uploader.sh script. You will see an output like this:


5. Now you need to create a Dropbox app. Log in to Dropbox, go to this URL, where you will see a screen that looks like this:


6. As in the image above, first choose the Dropbox API, then select Full Dropbox in the type of access needed. Finally, Name your app whatever you like.
7. After your new app is successfully created, scroll down to the OAuth2 section, and click on the Generate button to generate an access token. You will now see a generated access token where the Generate button was. Copy this token, paste it in your terminal, and press Enter:


8. To verify that your account is working, execute the command ./dropbox_uploader.sh list – you should see a list of the files in your Dropbox account.
Set Up Raspi Runner
On your Raspberry Pi, download the Raspi Runner script in the raspi_email folder we created previously:
[sourcecode] cd ~/raspi_email
wget https://raw.github.com/enkydu/Raspi_Runner/master/raspi_runner.sh[/sourcecode]
Make the script executable, and run it:
[sourcecode]chmod +x ./raspi_runner.sh
./raspi_runner.sh[/sourcecode]
You will now see a prompt like the image below. When the script asks for the full path to your Dropbox Uploader, enter the path to your Home directory (probably /home/pi/), followed by the name of the folder in which you downloaded the dropbox_uploader.sh script. If you followed this guide word by word, you will enter /home/pi/raspi_email here.


Set Up Crontab
Once the basics are in place, it is necessary to schedule the running of Raspi Runner. For example, you can set it to check for emails every 5 minutes.We will use crontab for this. On your Raspberry Pi, run:
[sourcecode]crontab -e[/sourcecode]
On the bottom of the file, add the following line:
[sourcecode]*/5 * * * * /home/pi/raspi_email/raspi_runner.sh > /dev/null 2>&1[/sourcecode]
Of course, in the above example, replace pi with your username, and raspi_email with the folder you placed the raspi_runner.sh script in. Now save your crontab.
Usage
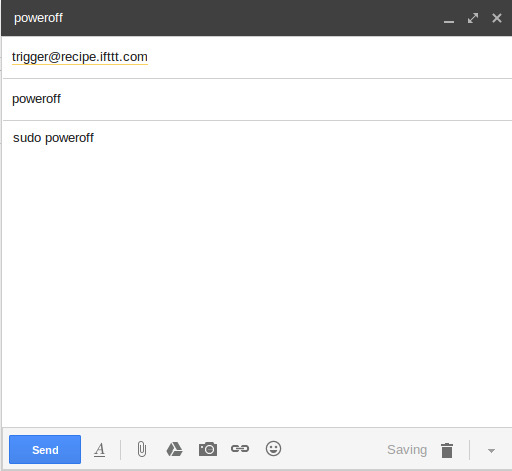
Simply send an email with the commands you wish to execute on your Pi to trigger@recipe.ifttt.com from the email address you used to set up your IFTTT account. The body of the email will contain the command. You can add whatever subject you like to the email, but it is recommended that you do add one. In the following example, I am commanding my Raspberry Pi to shut down:

After the amount of delay you set in your crontab, the raspi_runner.sh will run and execute the command contained in your email.
SEE ALSO: How to Set Up and Get Started with Raspberry Pi 3 (Starter Guide)
Run Commands Remotely On Your Raspberry Pi Using IFTTT
So this is how you can use IFTTT, Dropbox, and some command line magic to run commands remotely on your Raspberry Pi. Of course, as mentioned in the beginning, this method will also work with any Linux or Unix-like system with the Bash shell installed.
Stay tuned for more Raspberry Pi tips and tricks in the future. If you have trouble setting it up, or want to share some of your own cool IFTTT tricks with us, make sure to drop us a line in the comments section below.

