- To add a new signature in Outlook web, click on Settings > Account > Signatures.
- In order to add or change a signature on Outlook mobile app, tap your profile picture > Settings > Account > Signature.
- You can change your signature in Outlook by going to Insert > Signatures...
Sure! A plain old “best regards” and “Yours sincerely” does the job, but if you want to add a professional touch to your emails, which showcases your brand and leaves an impression on the recipient, you need to get an email signature. So, if you want to know how to add a signature in Outlook or change one for that matter, then you have come to the right place.
How to Add Signature in Outlook
Like I said, there is nothing complicated when it comes to adding your signature to Outlook, whether we are talking about the website or the mobile app. Take a look for yourself.
Method 1: Add Signature in Outlook Website and Desktop App
Here’s the process to add your unique email signature to the Outlook web and Windows apps.
- Open the Outlook (website) or Windows app, and click on the cogwheel icon at the top right.

- Using the left sidebar, go to Account > Signatures.

- Now, in the text box below “+ New Signature”, enter the name of your new signature.
- After that, use the bigger box below it to create your Outlook signature.
- You can add text, images, resize, change font, or customize them accordingly.

- Next, click on the Fox New Messages: box and select your new signature.
- Again, click on For Replies/Forwards: box and pick your signature.


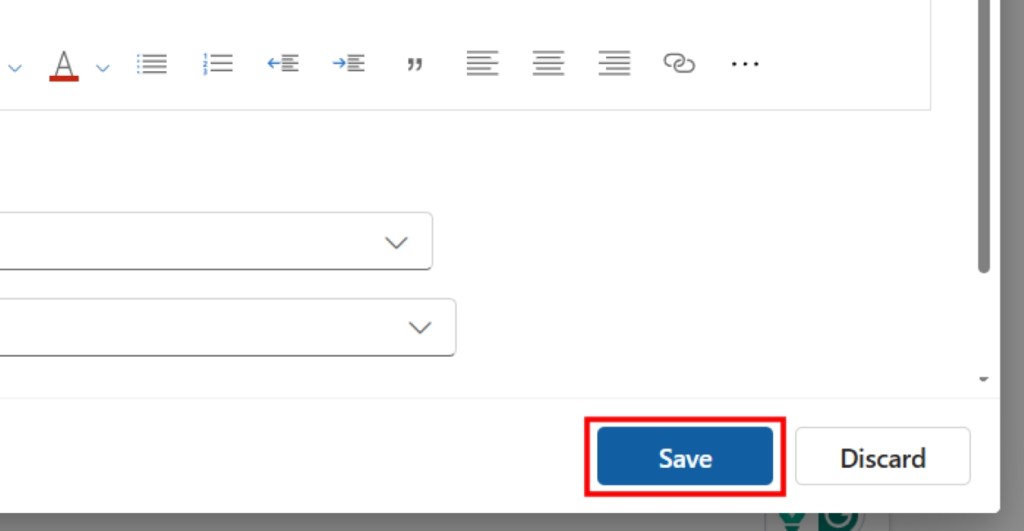
- Once you’re done, hit Save.
Method 2: Add Signature in Outlook App on Android and iPhone
Now, let’s check out the steps to add a signature to the Outlook mobile app.
- On the Outlook app, tap on the profile icon in the top left.
- Now, hit the cogwheel icon at the bottom left.
- Here, select the Signatures option under “Quick Settings”.


- The next page is where you will create your email signature.
- Like the desktop version, you can add images, resize them, add text, choose different font options, or add links to them as well.
- Once you have made the changes, tap on the tick sign at the top right to save the signature.

How to Change Signature in Outlook
Now, if you don’t like the new signature you’ve just created, you might want to edit it or change it to a new one. Well, that’s pretty much the same process as adding a signature. But if you still need help, the steps to change the email signature for desktop and mobile versions are below.
Method 1: Change Signature in Outlook Website and Desktop App
Let’s see how easily you can edit your current email signature in Outlook Web and the Windows app.
- Open the mail in Outlook where you want to edit your signature.
- Next, click on the Insert tab from the toolbar tray at the top.

- Pick the Signature option, and then click on Signatures…
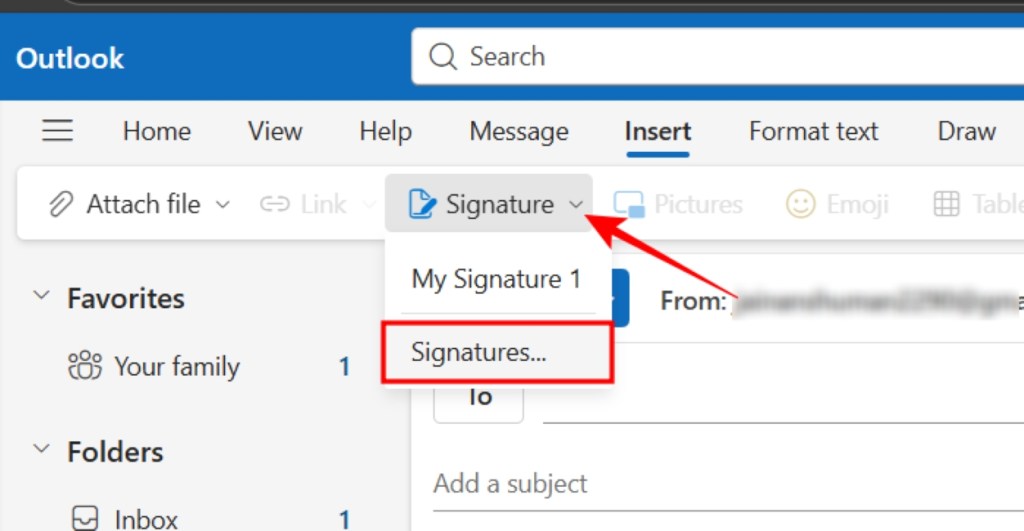
- This opens up the Signature editing window again, where you can change the signature accordingly.
- After you have made all the changes, click on Save.
Method 2: Change Signature in Outlook App on Android and iPhone
Since the mobile version of Outlook doesn’t feature a Signature option in the email draft screen, we will need to use the settings route like above to make changes to the signature.
- On the mobile app, tap your profile picture at the top left.
- Now tap on the cogwheel icon at the bottom left.
- Tap on Signatures, and in the editing window, you can change your email signature.
- Next, tap on the tick sign at the top right once you are done.
So that is how easy it is to add or even change your email signature in Microsoft Outlook. With this new signature, you will come off as more professional in every email that you send, which is great if you want to establish a good first impression with a potential client or employer. That said, if you do need help doing the same on Gmail, you can check out our guide to add a Gmail signature. As always, you can reach out to us in the comments below for any other queries.