With Black Friday, and Cyber Monday deals, iPhone users have been treated to something no one was looking forward to – a constant stream of spam invites that cluttered up their calendars, and flooded their iPhones with notifications. The worst part about these invites, is that if you “Decline” them, it only floods your calendar with even more invites, as the spammer realizes that it’s a valid Apple ID. So, if you have been annoyed by these pesky invites, worry not, here is how you can stop iCloud Calendar spam invites:
Delete the iCloud Calendar Spam Invites you Already Have
The first logical step, is to clear up your calendar, and delete all the spammy invites you have received. To do this, simply follow the steps below:
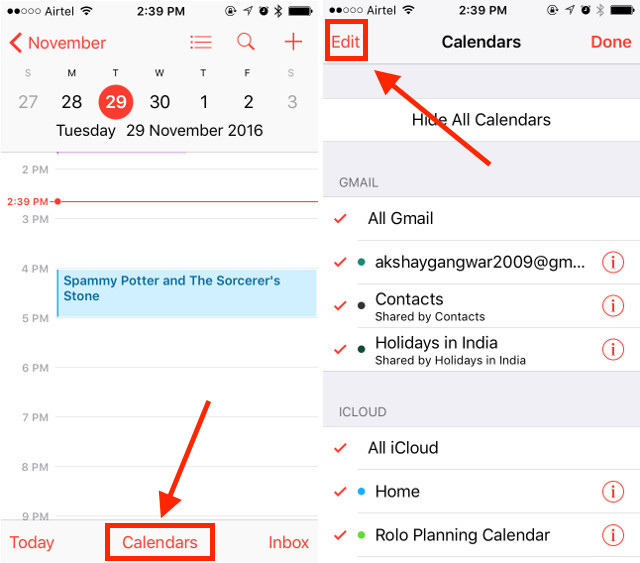
1. Launch the Calendar app on your iPhone, and tap “Calendars” on the bottom of the page. Tap on “Edit“.

2. Tap on “Add Calendar“, and create a new calendar for the spam invites. Give it any name you want, I’m choosing “Obliviate“.
3. Now, tap on the Spam event you want to delete, and then tap on “Calendar“.
4. Change the calendar for the spam event to “Obliviate”. Go back to the home screen, and tap on Calendars (at the bottom of the page) again.
5. Tap on the “i” aka info icon next to “Obliviate”. Then, scroll down, and tap on “Delete Calendar“.
Once you delete the calendar, any spam invites you added to it will be deleted, and the spammer will not get to know that you deleted their invites. So, there will be no more flood of spam invites in your calendar.
Block Future Calendar Spam Invites
While we succeeded in deleting the spam invites without informing the spammer about our valid ID, it still doesn’t mean that we won’t ever receive any more of these. So, if you don’t want to get flooded with more of these spam invites, here is how you can prevent them from coming in:
1. Log into iCloud.com on your Mac. You should do this from a desktop web browser, and not from your iPhone. Click on “Calendar“.
2. Then, click on the “settings cog” icon in the bottom left of the screen, and click on “Preferences“.
3. In the Preferences, click on “Advanced”, and under the “invitations” section, select the radio button next to “Email to xyz@yourappleid.com“.
This will forward all of your event invitations to your email ID. While this doesn’t mean that you will not get the spam invites, however, your email provider will automatically filter out the invites that look like spam, and will only notify you of the genuine invitations.
SEE ALSO: Why and How to Enable Two Factor Authentication for iCloud
Get rid of iCloud Calendar Spam Invites
Now that you know how you can delete spam invites, and prevent future ones from flooding your notifications, you should go right ahead and follow these steps to free your calendar from the spam. Also, if you know of any other way to block these iCloud calendar invites, do share it in the comments section below.