No matter how carefully you record an audio file, there is always some noise. While this noise might not be much of a problem for personal voice recordings, if you think about sharing these files with a wider audience, it becomes a big issue. Noise in an audio recording makes for an unpleasant listening experience. However, some amount of ambient noise is a good idea, at times, as it makes the audio sound more natural, instead of making it sound synthesized. Most of you, who are beginners to audio recording and editing might think that procedures such as removing noise are for highly trained sound engineers, but it’s actually a very easy process.
In this article, I will tell you exactly how you can remove noise from your recordings. It’s very easy, and only takes a little bit of patience for larger recordings. I’ll be covering the procedure using two of the most prominent audio editing apps out there: Audacity (download) and Adobe Audition CC (download).
Use Audacity to Remove Noise
Audacity is one of the most famous applications for audio editing and recording out there. It is completely free and thus, is the go to choice for most budding audio artists and for hobbyists who don’t want to spend a lot of money on proprietary audio software. Audacity happens to have all the features that one might need for recording and editing their audio clips. To remove noise from an audio clip using Audacity, you will have to follow the steps outlined below:
Note: I would recommend making copies of your audio files before editing them on Audacity, just in case something goes wrong.
1. Launch Audacity and open the audio clip that you want to remove noise from.
2. Select a sample of pure noise from the audio clip. This is the part of the clip where you are not speaking, and only the background noise can be heard.

3. Next, go to Effect -> Noise Reduction and click on “Get Noise Profile“. This will grab the sample that you selected in the last step as a Noise Profile. In this dialog box, you can adjust the settings for the noise reduction, including the amount of reduction to be applied (in dBs), the sensitivity, and the frequency smoothing that you desire in the output audio.

4. Go to Effect -> Repeat Noise Reduction. You will see a dialog box telling you that the noise reduction is in process, and once the dialog box closes, you will be able to hear a significant decrease in the noise levels in your audio.

Once you have done this, you can even see the difference in the waveform itself, the noise portion will have decreased significantly, or a lot, depending on your settings.
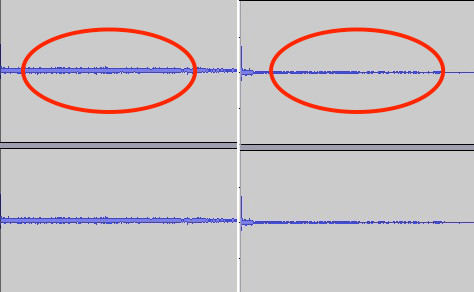
If you need to further reduce the noise in your audio sample, just repeat the steps above until you achieve the desired amount of noise reduction. Not as tough as it sounds, right?
Use Adobe Audition CC to Remove Noise
If you would rather use a proprietary tool for your recording purposes, you can go with Adobe Audition. Audition is a really great recording studio, and it comes with all the features that Audacity has, along with a nice, clean interface. I, personally prefer Audacity, but if you like Audition, fret not, the process is pretty much the same.
1. Launch Adobe Audition, and load the recording that you want to remove noise from. Once done, select a part of the audio waveform that is pure noise. Pure noise is the part of the clip where you are not speaking, and only the background sound (noise), is audible.

2. Click on Effects -> Noise Reduction/Restoration -> Capture Noise Print.

3. Then, select the entire audio clip, by pressing Cmd + A on Mac, or Ctrl + A on Windows. Click on Effects -> Noise Reduction/Restoration -> Noise Reduction (process).

4. In the dialog box that appears, click on “Apply“. Audition will apply the noise reduction to the entire audio clip. If your audio clip is very long, this might take a while.

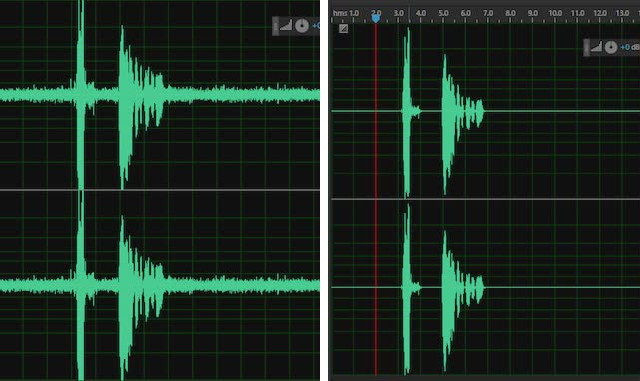
Once the process is done, you can play back your recording and you will notice a significant reduction in the amount of noise in your recording. The difference is clearly visible in the waveforms as well.
SEE ALSO: Top 10 Audacity Alternatives You Could Use
Remove Noise from Your Audio Clips Using These Methods
While proper equipment definitely makes a difference to the quality of your audio recordings, nothing can really prevent noise in your recordings unless you invest a lot of money to record in a full blown audio recording studio. However, these ways will let you edit your audio files to make them sound professional without being heavy on the pocket. There are a lot more features in Audacity and Adobe Audition that you can use to edit an audio the way that you want it, so make sure you explore all the different effects.
We would like to hear about your experience with noise reduction, and any tips and tricks you might want to share about removing noise in a more efficient manner. If you have any concerns, comments or issues, feel free to drop us a line in the comments section below.