
With the announcement of Windows 11, Microsoft made it easier for general users to access the early release of Windows 11 Insider builds. In a few clicks, you can upgrade to Windows 11 from Windows 10 seamlessly. However, that also means all your junk and temporary files are carried over to Windows 11, which could make the experience cluttered and buggy. So if you want to remove all those leftover files from Windows 10 and free up disk space after upgrading to Windows 11, follow our nifty guide.
Free Up Disk Space After Upgrading to Windows 11 (2021)
Here, we have explained three nifty methods to free up disk space after upgrading to Windows 11. The first two methods are similar but accessible via different interfaces, and the last one lets you remove all the leftover files created by apps. You can expand the table below to move to the relevant section.
Method 1: Clean Up Junk Files via Windows Settings
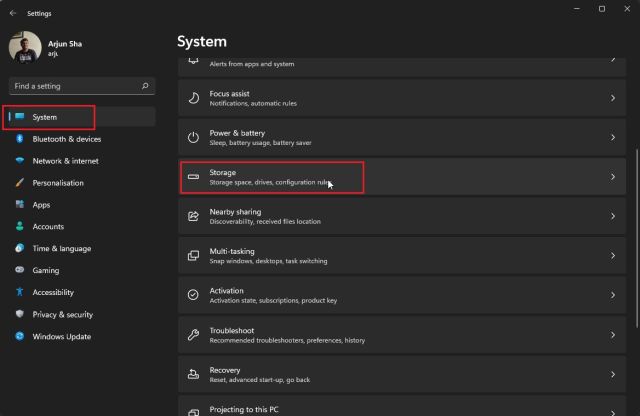
1. First, press the “Win + I” keyboard shortcut on Windows 11 to open the Settings app right away. Here, navigate to “System -> Storage“.

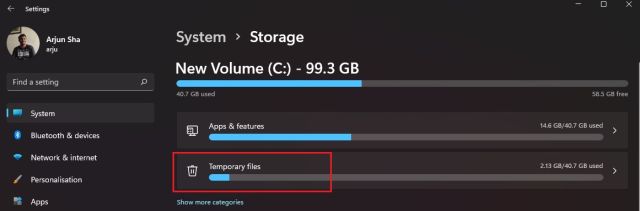
2. Next, click on “Temporary files“.

3. Your Windows 11 computer will take some time to process all the files, and within a minute, it will display all the files that you can remove to free up disk space. Here, we suggest unchecking “Downloads” as you might have some valuable files over there.
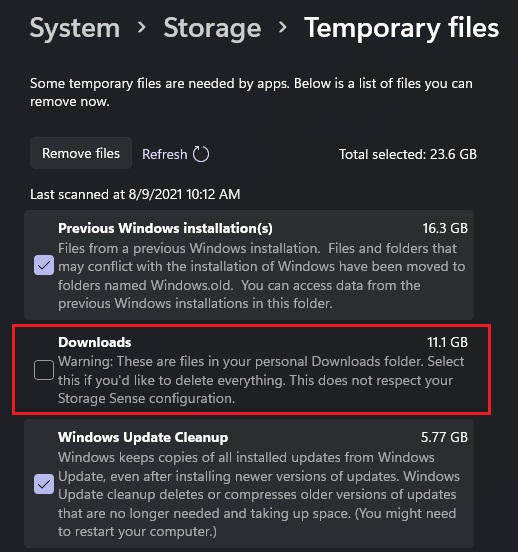

4. Now, look for “Previous Windows Installation” and “Windows Update Clean-up” and select them as well. These take up most of your disk space, so make sure they are ticked off before you proceed further.


5. Now, click the “Remove files” button, and that’s it. All the temporary and leftover files from Windows 10 will be deleted immediately, and a huge chunk of storage will be released on your Windows 11 PC.
Note: Keep in mind, these files are safe to remove, but after deleting them, you can’t go back to Windows 10 seamlessly. To learn more about how to roll back to Windows 10 from Windows 11, follow our linked tutorial.


The Storage section in the Settings also lets you delete large files and unused apps with utmost ease. So if you want to free up more space on your Windows 11 PC, we suggest you go to Settings -> System -> Storage and uninstall apps you no longer use. Also, it would be great if you delete massive video files or app installers you no longer need.
Method 2: Use the Built-in Clean Manager
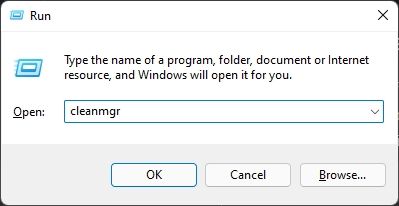
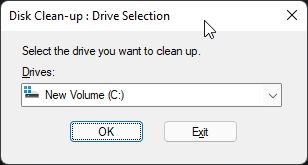
1. Press the “Windows + R” keyboard shortcut to open the Run window. Here, type in cleanmgr and hit Enter.

2. You will now see a pop-up window asking you to select a drive. Select “C” drive and click “OK”. The Disk Clean-up utility will start scanning your PC for temporary files eating up disk space after upgrading to Windows 11.

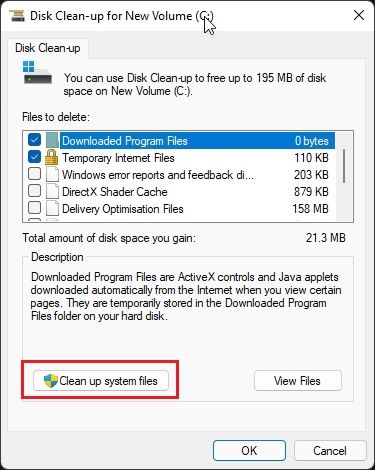
3. Next, click on “Clean up system files” on the next window that appears. You may get the same pop-up as the above step again. Select the “C” drive and hit Enter.

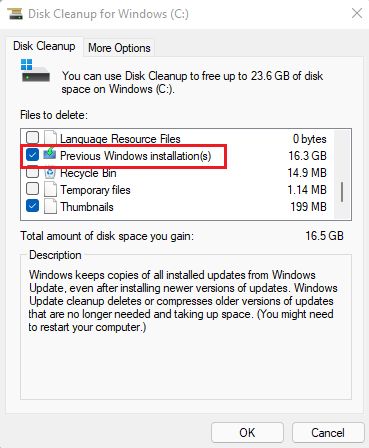
4. Here, scroll down and look for “Previous Windows Installation” and “Windows Update Clean-up” options. Make sure they are selected and click on “OK”. You can also enable the checkbox for other options if you don’t want those files.

5. Finally, all the files you no longer need will be removed from your Windows 11 PC, and you will get some much-needed free disk space. Do note that performing this action also means you can’t go back to Windows 10 easily. You will have to install Windows 10 from a USB drive manually.
Method 3: Remove Temporary Files in Windows 11
You should be able to release most of the disk space on your Windows 11 PC after using one of the above methods. But if you want to remove all the temporary files dumped by apps while running Windows 10, follow the steps below:
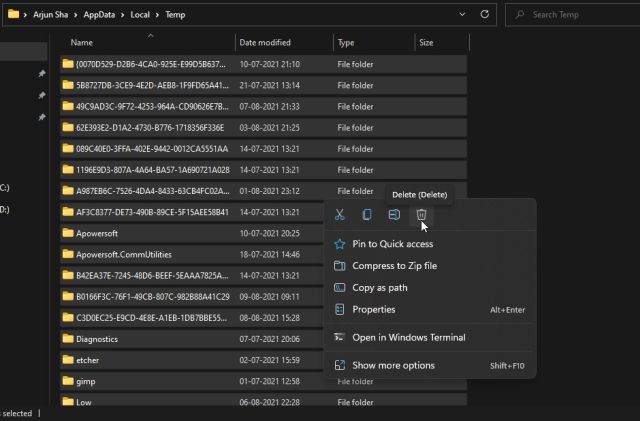
1. Open the Run window again using the “Win + R” shortcut. Now, type %tmp% and press Enter.
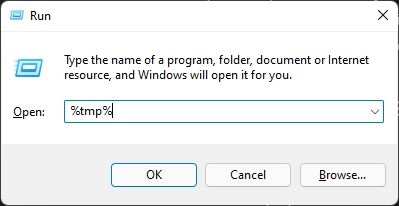
2. Under the “Temp” folder, select everything and delete it immediately. You won’t be able to delete some of these files as they might be in use by some active apps, so you can leave them out. This step will mostly free up the clutter on your Windows 11 PC.

Remove All Temporary Files and Clean Up Disk Space on Windows 11
So these are the three ways you can follow to free up disk space after upgrading your PC to Windows 11 from Windows 10. We know that clean installing Windows 11 from USB is the best way to have a clutter-free and smooth experience. But those users who have upgraded via the Windows Insider Program might carry a huge block of junk files that are frankly not needed. Anyway, that is all from us. If you want to learn about the new Focus Sessions feature on Windows 11 or wish to find out the IP address of your Windows 11 PC, head over to our linked tutorials. And if you have any questions or can’t delete junk files, let us know in the comment section below.

