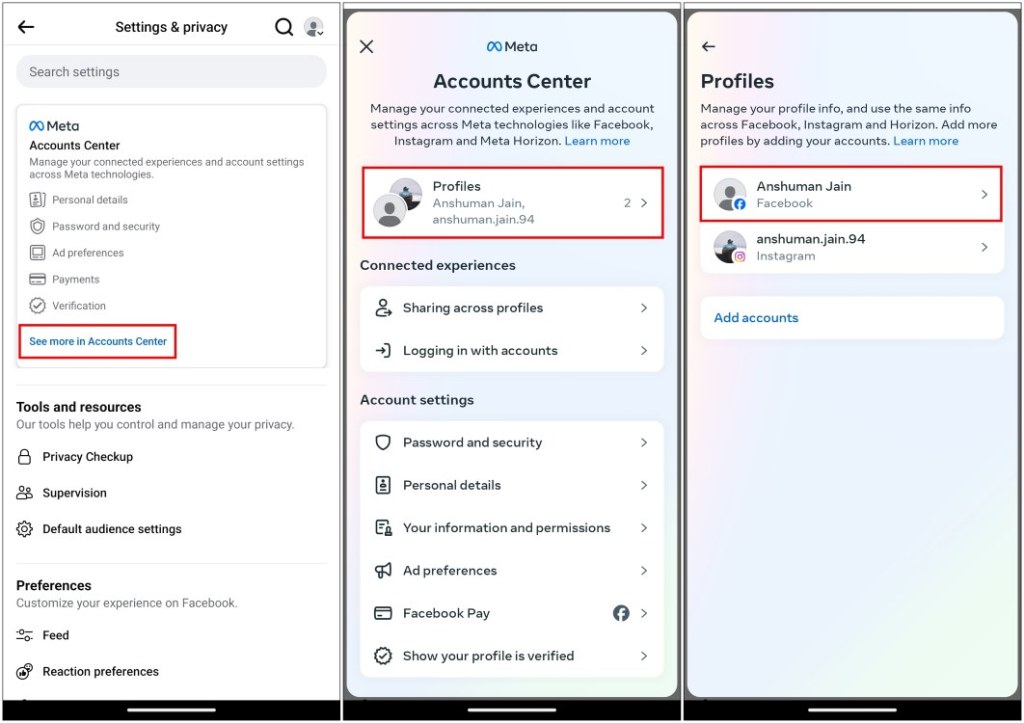
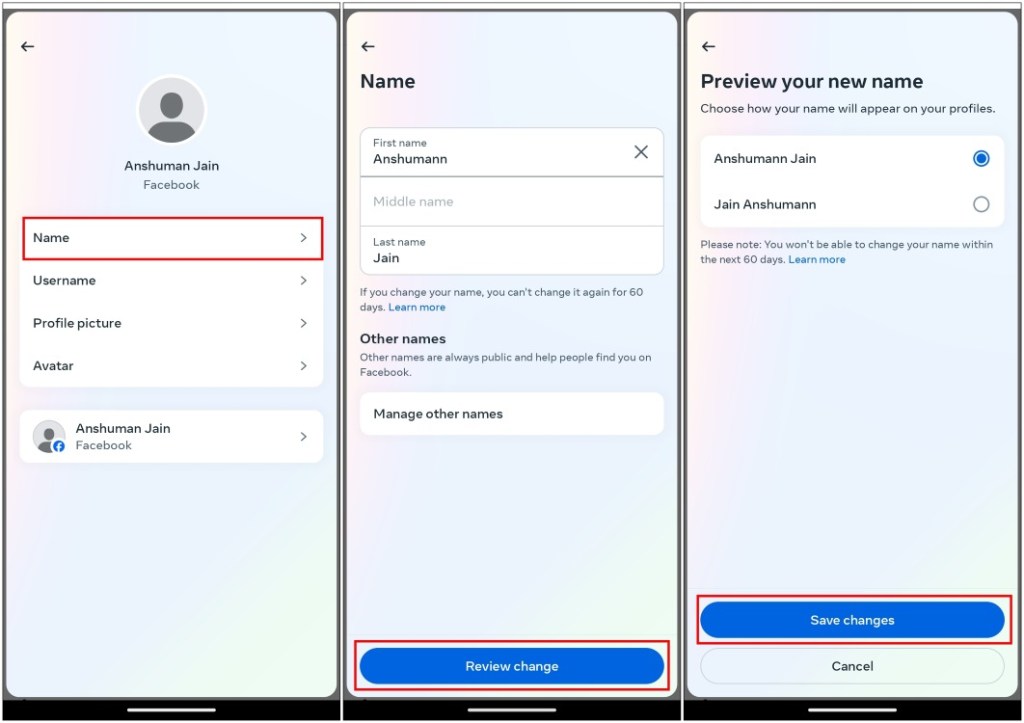
- To change your name on Facebook, go to Settings & privacy > Settings > Account Center > Profile > Name.
- The process is identical for Android, iOS, and the web version of the social media platform.
- Make sure you are using your real name and not anything that goes against Facebook guidelines unless you want to risk your account getting banned.
We were all young and thought ourselves to be pretty cool when we created our Facebook accounts, but years later, that “cool” Facebook name you’ve set for yourself sounds pretty dumb, isn’t it? So if you’re wondering – “How do I change my profile name on Facebook?” then it’s your lucky day. In this article, we’ll show you change your current name display name with a new one on Facebook.
Method 1: Change Your Name on Facebook Website
To change your current profile name on the Facebook website, just follow these easy-to-follow steps.
- Click on the Profile icon in the top right corner.
- Then click on Settings & privacy > Settings.
- In the Settings page, click on See more in Accounts Center.
- Now select the profile whose name you want to change.
- Click on Name, then type the new name.
- Now click on Review change and select how you want your name to appear.
- Once selected, click on Done.
Method 2: Change Your Facebook Name on Android
If you are using Facebook on your Android phone, then here is how you can change your name in the app.
- Tap the hamburger menu at the top right.
- Tap on Settings & privacy, then Settings.
- Inside Accounts Center, tap on See more in Accounts Center.
- Select Profiles and then choose the profile to change its name.

- Tap on Name and enter your new name.
- Press Review change, and pick from the list of preview names.
- At the end, tap on Save changes.

Method 3: Change Your Facebook Name on iPhone
The process to change your profile name on Facebook is pretty similar in the iOS version of the app as it was on Android. Let’s take a look at it.
- Tap the menu icon at the bottom right.
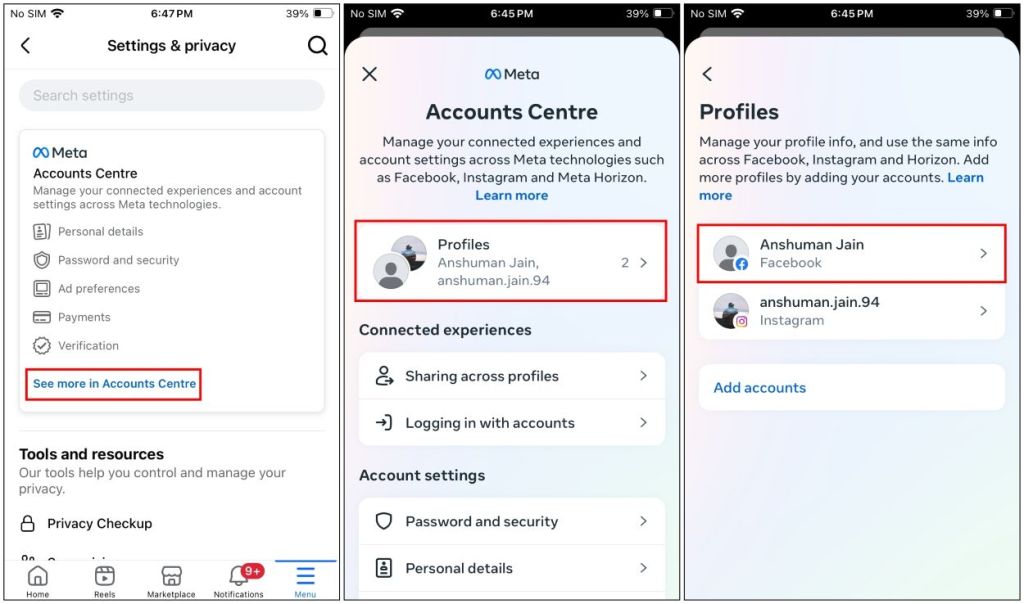
- Here, go to Settings & Privacy > Settings.
- Tap on See more in Accounts Centre > Profiles.
- Select the Facebook profile for which you want to change the name.

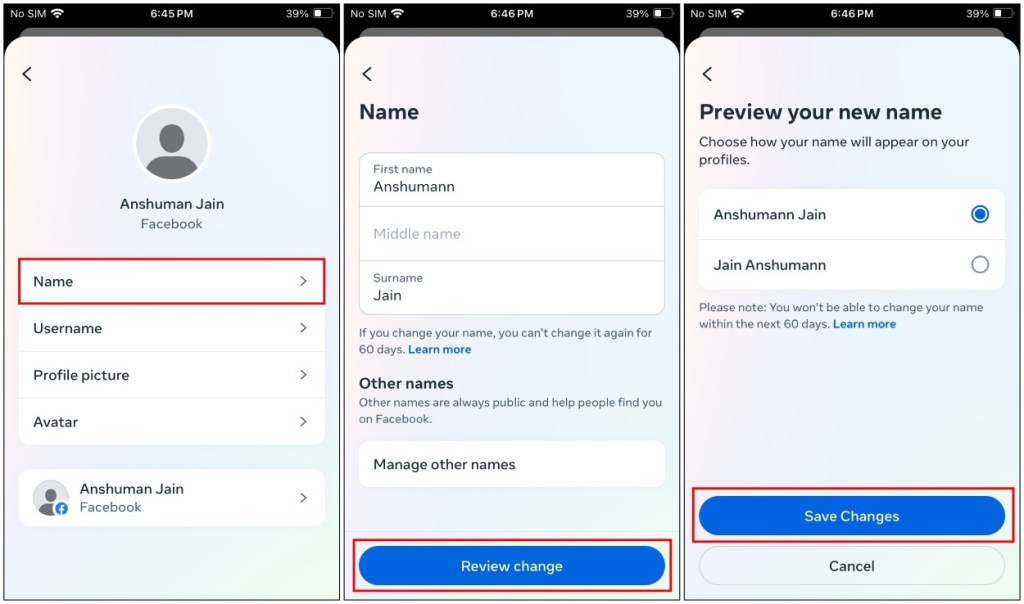
- Choose the Name option, and type in your new Facebook name.
- Press Review change, then pick from a list of name previews.
- Lastly, tap on Save Changes.

Things to Consider Before Changing Your Facebook Name
Facebook has a set of stringent ‘Name Standards’ that all users must follow. If your new name does not adhere to it, you may not be allowed to change your name at all. They can even ban your account for failing to abide by its community standards. So here’s what you should remember before changing your name on Facebook.
- The name on your account should be the name that your friends call you in everyday life. This name should also appear on a form of ID or document from our ID list. If your authentic name doesn’t appear on any government ID, you can choose from the list of other accepted IDs.
- Nicknames can be used as a first or middle name if they’re a variation of your authentic name (such as Bob instead of Robert).
- You can also list another name on your account (e.g., maiden name, nickname, professional name).
- Profiles are for individual use only. You can create a Page for a business, organization, or idea.
- Impersonating anything or anyone isn’t allowed.
Other than these, here are some other things you cannot include in your Facebook name. All of these are directly quoted from the official Facebook community policies.
- Symbols, numbers, unusual capitalization, repeating characters, or punctuation
- Characters from multiple languages
- Titles of any kind (e.g., professional, religious)
- Words or phrases in place of a name
- Offensive or suggestive words of any kind
- Words or phrases that go against Community Standards (example: slurs, representing dangerous individuals)
That’s how easily you can switch to a new name on Facebook and avoid getting embarrassed by people who are trying to add you as a friend. Just be sure to follow Facebook’s guidelines to avoid getting banned. However, if you have had enough of Facebook’s policies, check out how you can delete Facebook from your life for good. Do let us know if you have any queries related to this guide in the comments below.


