Have you ever had a large number of images on your Mac, that you needed to sort through, resize, and export to the same format? I regularly have to do just that, and if you’re like me, you probably want to do it as quickly as possible, as well. Well, fortunately, there exists a very simple, and rather intuitive method in macOS Sierra, that will let you resize a number of images at the same time. You can also convert a number of images directly. First, let’s take a look at how you can batch resize images in Mac:
Batch Resize Images in macOS Sierra
The default app on a Mac to open, and perform basic edits on images, is Preview. While this app looks incredibly simple, it hides a plethora of features that make it extremely useful. One such feature, is the ability to resize a large number of images, in one go. To do this, you can simply follow the steps given below:
1. Select all the images that you want to resize, and open them all in Preview, by pressing “command + O“.
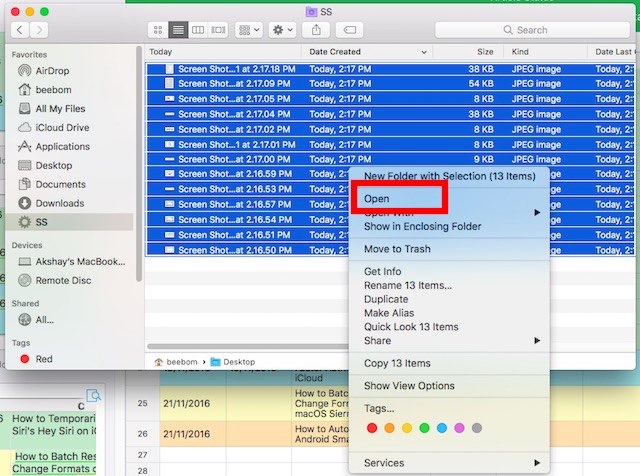
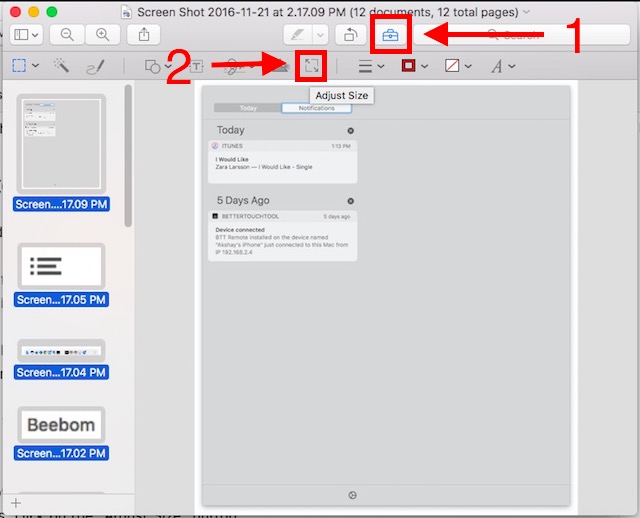
2. In the Preview sidebar, you will be able to see the thumbnails for all the images that you have opened. Select any one of them, and press “command + A” to select all. Now, click on the “Show Markup Toolbar” button in Preview. When the markup toolbar opens, click on the “Adjust Size” button.
3. In the dialog box that opens, enter the width, or the height value that you want for all the images, and click on “OK“.
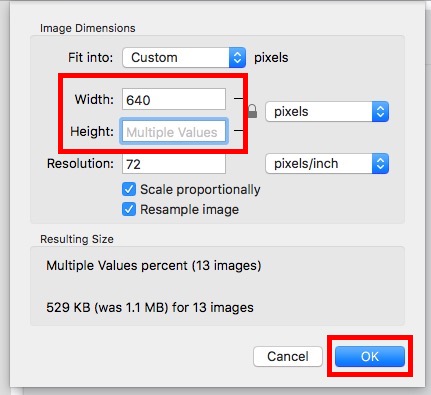
Note: Enter only the height, or the width, in order to preserve aspect ratio. If you enter a height, or width value that is larger than the height, or width of some images, they will be expanded to fit into the value you entered.
Once you click on “OK“, all the selected images will be resized to fit the values that you entered. Easy, right? You can use this method to quickly resize a large number of images to fit into the values that you want for them.
Batch Convert Formats of Multiple Images in macOS Sierra
Another cool thing that you can do with Preview, is converting the formats of a number of images in one go. You can use this method to quickly convert a large number of images from JPG to PNG, PNG to JPG, and more. In fact, you can use this method to quickly convert images into any of the formats supported by Preview. To do this, simply follow the steps given below:
1. Select all the images that you want to convert the format for, and open them in Preview.

2. In the Preview sidebar, select any one of the images, and then press “command + A” to select all. Go to “File -> Export Selected Images“.
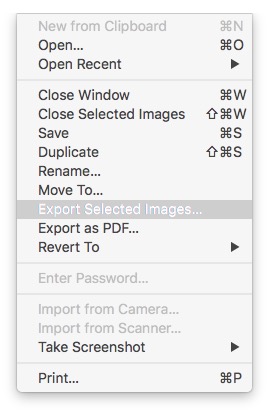
3. In the dialog box that opens, click on “Options” to view the format you’re exporting to. From the drop-down menu, select the format you want to convert the images to, and click on “Choose”.
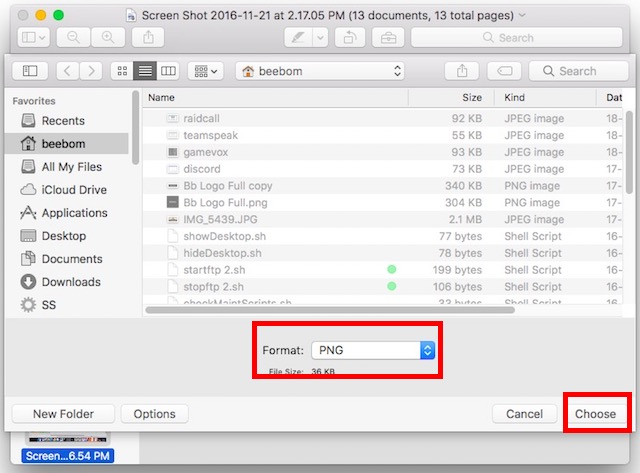
Once you do this, all of the selected images will be exported to the format you selected. You can use this method to quickly export a number of images into any of the formats that are supported by Preview.
SEE ALSO: How to Batch Rename Files in Mac Without Using Third Party Apps
Batch Resize and Convert Your Images Faster With Preview on Mac
Preview is an application that hides a surprising amount of power, and can single-handedly do a lot of the things that you might be using a third-party app, or website for. You can use these methods to quickly sort through all your images, and perform tasks such as batch renaming, resizing, and even converting image formats, easily. There are a lot of other options in Preview, and you should definitely play around with them to unearth more of it’s hidden capabilities. Also, if you face any issues with using Preview for batch resizing, or converting image formats, or if you know of any easier method to do it, feel free to let us know in the comments section below.


