There was a time when remotely accessing and sharing your Windows PC required a ton of steps. You had to jump through a lot of hoops, just to get the connection going, not anymore. Now, there are a lot of softwares which can help you do that very easily, and CloudBerry Remote Assistant is probably one of the better ones out there. CloudBerry Remote Assistant allows you to remotely connect to a Windows PC, using just a few simple steps. Also, it offers SSL encrypted connection which basically means that your connection will be pretty secure. There are also a lot of other cool features which makes remotely accessing your desktop as fun as it can be. So, let’s get into the details of the software and check them out, shall we?
Key Features
As I mentioned earlier, CloudBerry Remote Assistant brings a ton of cool features, however, there are three main features which we are mainly going to focus on today. Apart from these three features, there are several other cool features which make the whole remotely controlling your PC experience smooth and hassle free. So, here are the CloudBerry Remote Assistant’s key features:
1. Access, Control, And Share Windows PC Remotely
Well, this obviously had to be the first one, after all this is the primary function of the software. You can easily set up the links between two PCs with just a couple of steps. When you are sharing your PC, you can decide if you just want to give just the viewing rights, or, full access. Also, you can instruct the software to show a prompt when someone is trying to access your PC. In the prompt, you can choose to allow the remote device to connect to your PC or not. These features are really handy, as you are always in control when you are sharing your PC.
2. Encrypted Connection
When you are accessing a PC remotely, one of the biggest concern is about the security of the connection. If your connection is not secure, anyone can easily piggyback on your connection, and access the data same as you do. Thankfully, CloudBerry secures your connection by encrypting it with SSL-encryption. The SSL-encrypted connection ensures that your data is fully secure and you are the only one (or the people you have shared your access code with) who can access it.
3. Encrypted Sessions
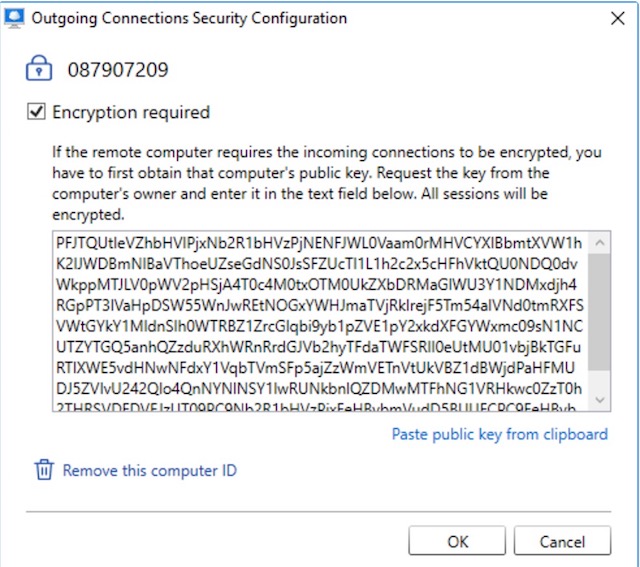
With its latest update, Cloudberry is also including the ability to encrypt your sessions using the RSA algorithm. The software now comes with a Security Configuration button that enables you to configure all of the encryption settings. You can choose to encrypt the incoming traffic by using the Security Configuration button. The Remote Assistant will generate a public key which you can share with the authorised personnel who will be connecting to your computer. When connecting with your computer, the person will use the same public key (provided by you) on his end to encrypt the session. Once you both have done that, all your future sessions will be encrypted by default. This is a very handy feature, as now you are in control of your sessions. You can choose to encrypt or decrypt your sessions as per your requirement.
4. Voice Chat
The software also allows you to use voice chat over the connected PCs. You don’t have to do anything other than making sure that your microphone access is not denied. If both the connected PCs have given the access to their microphones, you can easily voice chat with each other. You don’t need to open any additional windows or anything like that. It comes in really handy if you are explaining something to the person on the other side.
5. Invitations Link
This is one of the newest features which have been introduced with the latest version of the software. Previously, you had to share your Computer ID and password (we will get into the details in the next section) if you wanted to give someone access to your PC. However, this meant that the person which had your code could theoretically access your device anytime until you quit out of your software. Although you still had to allow the connection to go through on the prompt, there was always a risk factor involved.

With this new update, you no longer have to share your Computer ID and password. You can just generate a time bound link and share it with the person you want to give access to your PC. After the link has expired, the person will no longer have access to your PC. This adds an extra layer of security to this software.
How to Set-up CloudBerry Remote Assistant
To set up the remote network, first of all, you will have to install the CloudBerry Remote Assistant on both the PCs. After you have installed the app, follow the following steps.
1. Launch the app, and note down the Computer ID and Password for both the computers.

2. Now, type in the Computer ID and the password of the PC you want to access in the given fields on the right side, and then, click on connect. Remember, you will enter the details on the PC from which you will be accessing the other PC.

3. On the other PC, a prompt will appear asking to approve the connection. Tell the person on the other side to accept the request and change the access authority to either Full Control or View Only mode, depending on your requirement.
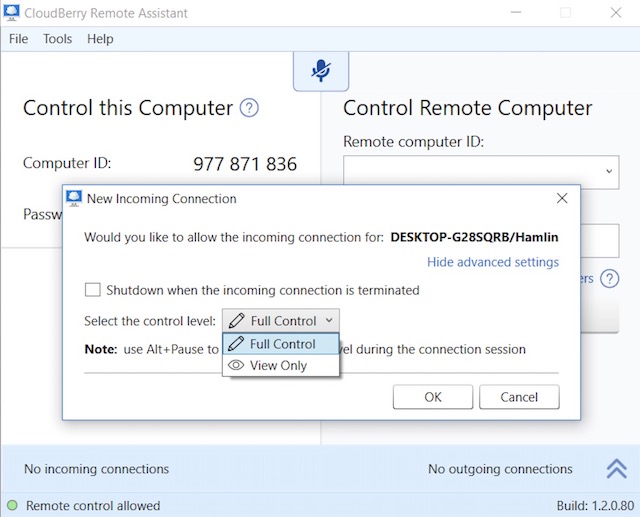
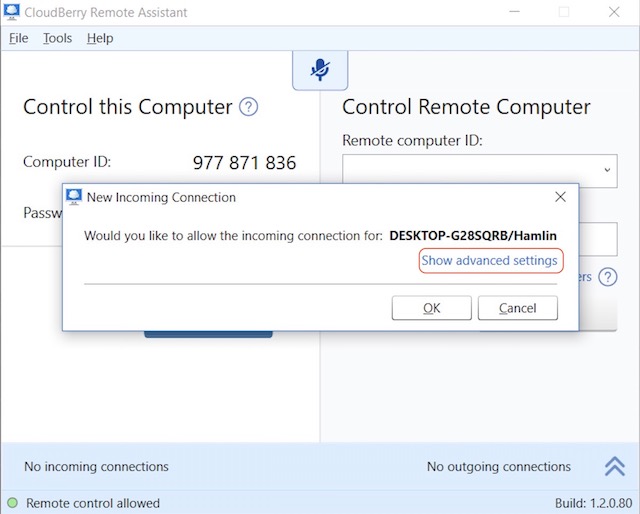
4. If he cannot find the option to change the permissions. Tell him to click on the “advanced settings” and the options will appear.
5. Once he hits okay, you will be able to access the computer remotely. Don’t panic if the wallpaper of the remotely accessed computer turns black, the software automatically does that to minimise the data, that is being transferred over the network.
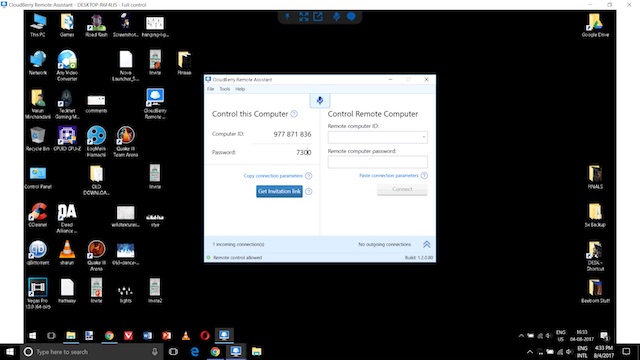
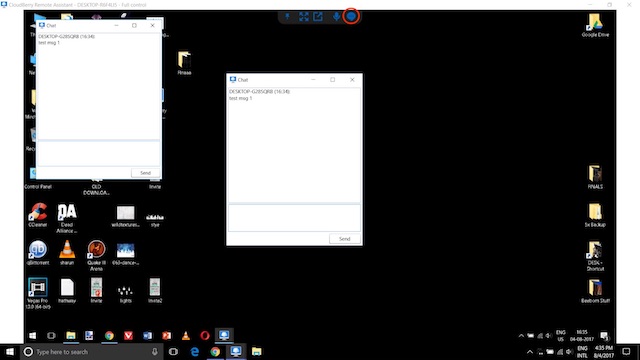
6. That is how simple the process is. Now you can also chat with the other person while you are accessing their PC. In the picture below, you will find a messaging icon marked in red. Click on the icon to initiate the chat. As mentioned earlier, the voice chat is already active if both the microphones are turned on.
The User Experience
As you might have guessed by now, the user experience is pretty smooth. The software is lightweight and installs instantly. The connection takes no more than a few seconds to get online, once you input the required details. The text-chat UI does feel a little bit old, but that is an added functionality, and it would not have mattered, even if the feature was not there altogether. Voice chat works perfectly. About, the only problem I encountered while using this software was that even after allowing full access, I could not remote control the computer properly. Some clicks were not getting registered on the remotely controlled PC. However, that might also be because of a network lag. Other than that, the user experience is pretty good. The UI is not very fancy, but it does what it is supposed to do.
Pricing and Availability
The best part about this app, apart from its usability, is the fact that it is totally free. You don’t have to pay anything to use this software, and that is always awesome. Also, there are no ads, so you are not giving up anything just because it is free.
Pros:
- Easy to set up and use.
- SSL-encryption
- Inbuilt Voice and Text Chat
- Free to use
Cons:
- The UI feels a little old.
- Sometimes the clicks don’t register on the remotely controlled device.
Control and Share Your PC Remotely For Free
CloudBerry Remote Assistant gets all the basics right. It is easy to set-up and use. There’s no hassle when connecting a PC to access it remotely. The connection is secure with SSL-encryption and there’s built in chat support (voice and text). There’s a lot to like here especially considering the fact that the software is free to use. But, don’t just take my word for it, download the app and check it out for yourself. After you use it for a while, let us know your thoughts about the software in the comment section below.
Download CloudBerry Remote Assistant (free)


