
In January this year, Tasker made a significant announcement that would allow users to execute core system tasks on Android without root privilege. It sounds like a fascinating idea, and to be frank, the new changes have made things much easier for users who are still on the fence against rooting their device. So in this article, I bring you a comprehensive look into how Tasker is able to achieve system-level tasks without root privilege. And to demonstrate that, I will be showing how you can change preferred network type with Tasker without root permission. Having said all of that, let’s now go through the article and learn the steps in detail.
Change Preferred Network Type With Tasker
Here, we have enlisted all the sections so you can skip to the relevant part in a jiffy. First, we have explained the new permissions and then have moved to the steps. Even if you are a beginner in Android automation, you can follow this guide and learn how to use Tasker more effectively.
- ADB Permissions Explained
- Grant ADB Permissions (One-time Process)
- Change Preferred Network Type With Tasker
Automate Network Change on Android
ADB Permissions Explained
Before we go through the steps, I want to discuss the new ADB permissions that you are going to grant in this tutorial. The first one is WRITE_SECURE_SETTINGS which allows an app to read or write the secure system settings. This permission is not available to third-party apps so you need ADB to manually allow Tasker to interact with system settings.
Next is the ADB WiFi permission. It’s kind of sensitive permission and generally, users are discouraged to grant this permission. What this permission does is, it permanently opens a port on your Android device which can be accessed by any other app installed on your smartphone. That said, you will always get a security prompt before an app can access that port. So if you get a USB Debugging prompt out of the blue — that you have manually NOT invoked — then instantly cancel it. Malicious apps can use this port to control your device if allowed.


Now coming to what this permission does. Well, as I said above, the command actively keeps the port open on your device and Tasker uses it to push ADB shell commands within the device itself. The wireless ADB feature is intended for wireless PC-smartphone tethering, but here, Tasker uses it internally (through the open port) to push ADB commands without requiring a PC. And that’s why you are able to achieve tasks on Tasker which required root permission earlier.
So to sum up, DO NOT approve debugging permission if a prompt appears out of the blue. Only if you have manually invoked the command then only allow it. In case, you want to remove all ADB authorization, you can do so from Settings -> About Phone -> Developer Options -> Revoke USB Debugging Authorization. Also, you can disable “Wireless ADB Debugging” to permanently disable the port.
Grant ADB Permissions (One-time Process)
1. First of all, install the Tasker app ($3.49) on your Android device. It’s a paid app, but well worth the price.
2. Next, set up ADB on your computer and connect your Android device to the computer. To verify the connection, run adb devices in the Terminal/CMD window, and hit enter. If it returns a serial number then you are good to go.


3. Now, you need to run the below command to grant Write Secure Settings permission to Tasker. It won’t return any output, but changes will be made.
adb shell pm grant net.dinglisch.android.taskerm android.permission.WRITE_SECURE_SETTINGS


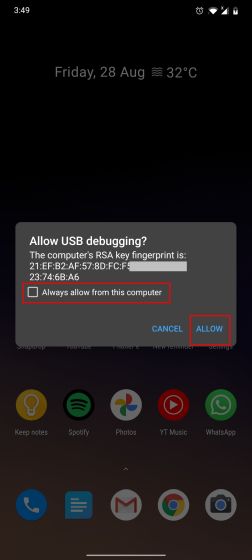
4. Next, you need to grant the ADB WiFi Permission. Run the below command and hit enter. A prompt will appear on your Android device. Make sure to enable “Always allow from this computer” and then tap on “Allow”.
adb tcpip 5555

5. Having done that, disconnect your device from the computer. You have granted all the required permissions and now everything can be done on the Android device.
Change Preferred Network Type With Tasker
Now that you have learned and granted all the necessary permissions, let’s take up a simple example: change the preferred network type on Android devices with Tasker. You can do other things too like turn on/off mobile data, Airplane mode, WiFi and much more. However, for this article, we will stick to this simple guide.
1. Open Tasker and grant the initial permissions to the app. After that, move to the “Tasks” section and tap on the “+” button. Choose a name here, for example, I have set “4G” and then tap on the “Done” button.


2. Next, tap on the “+” button and search for “network”. Here, open “Mobile Network Type“.

3. Next, open the drop-down menu and choose “4G” or whatever your network type preference is. Now, go back and you have successfully created a task. If you want, you can add more operations under one task. For example, I disable WiFi as well when I switch on 4G.

4. Just to make the tutorial complete, I am making another task called “2G/3G” so that I can easily switch between the network types. Follow the same steps as above: Tap on the “+” button and create a task. Then search for network and then choose “2G and 3G” from the drop-down menu.

5. You are almost done. You can test the tasks by tapping on the “Play” button at the bottom-left corner. If the network changes according to the configuration then you are good to go.

6. You can also create a profile and automate the task based on time, home WiFi connection, and other conditions. However, here I am not automating the task, but creating a toggle under the Quick Settings menu. Open “Tasker” and move to “Preferences“. Here, switch to the “Action” tab.

7. Now, under Quick Settings Tasks, tap on the “search” button and choose the task. Do the same for another task as well.

8. Finally, bring down the Quick Settings panel and tap on the edit button. Here, look for Tasker toggles and move them to the Quick Settings menu. And there you have it. You can simply tap on the toggle to activate the task and change the network type instantly. Keep in mind, due to some bug, both the toggles always appear active but that is not the case. You need to tap on it to activate the task.

Learn the New ADB Permissions and Change Preferred Network Type with Tasker on Android
So that is all about it. You just need to enable two ADB permissions and you will be able to execute many operations with Tasker that required root earlier. All you have to do is: do not grant debugging permission to random prompts. Apart from that, you can toggle system settings, control overlays, manage permissions right from Tasker without requiring root. Anyway, that is all from us. If you are facing any issue then do comment down below and let us know. We will surely try to help you out.


