AirDrop is one of the most convenient ways to share files across Apple devices. After all, you can seamlessly transfer pretty much anything using AirDrop, and it’s decently fast as well. However, there are times when AirDrop just stops working as expected. So, if AirDrop is not working for you, here are some things you can try to fix the problem.
1. Check if Your Device Supports AirDrop
If AirDrop is not working for you, one of the first things to check is whether your device supports AirDrop or not. Here are the devices that support AirDrop:
- iPhones running iOS 7 or later
- iPads running iPadOS 13 or later
- Macs released in 2012 or later, and running OS X 10.10 or newer macOS versions
2. Ensure Your iPhone is Unlocked
If your iPhone supports AirDrop but isn’t showing up in the list of available devices, it could be because it’s either powered off or locked. Make sure you unlock your iPhone, and it should show up on the list of devices for AirDrop. On the other hand, if you have sent an AirDrop and it is stuck on waiting, ask the receiver to keep their iPhone unlocked as well.
3. Check AirDrop Settings
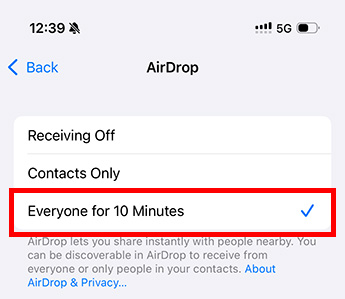
Another reason why AirDrop might not be working on your iPhone or Mac is due to your AirDrop settings. There are three options you can choose from:
- Receiving Off: No one can AirDrop files to you
- Contacts Only: People saved in your contacts can AirDrop content to you
- Everyone for 10 Minutes: Everyone nearby can AirDrop files to your device
In case your AirDrop is set to “Receiving Off” you will not be able to receive any files on your iPhone or Mac. Here’s how to adjust AirDrop settings on your Apple devices:
Adjust AirDrop Settings on iPhone
- Go to Settings -> General -> AirDrop
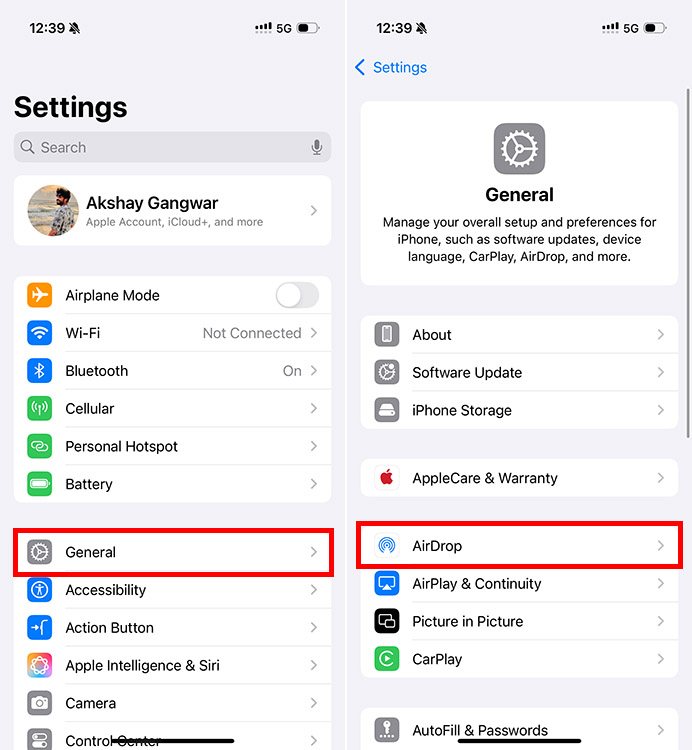
- Select “Everyone for 10 Minutes” to ensure you can receive AirDrop files
Adjust AirDrop Settings on Mac
- Go to System Settings -> General -> AirDrop & Handoff
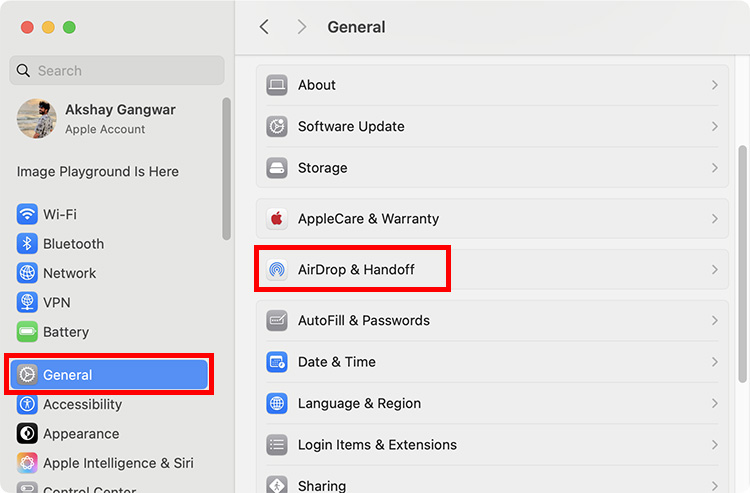
- Select “Everyone”

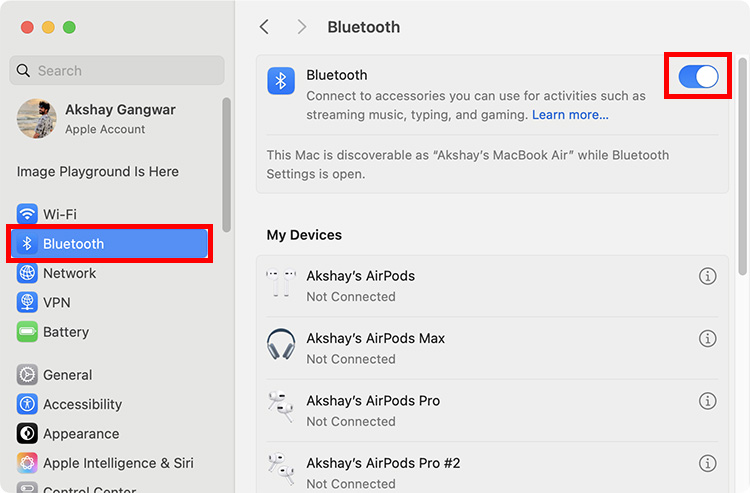
4. Enable Bluetooth and WiFi
AirDrop uses Bluetooth and WiFi to discover devices and share files. So, if AirDrop is not working for you, it’s possible that your Bluetooth or WiFi is turned off. Here’s how to enable Bluetooth and WiFi on your devices:
Enable Bluetooth and WiFi on iPhone
- Go to Settings -> WiFi. Turn on the toggle to enable WiFi
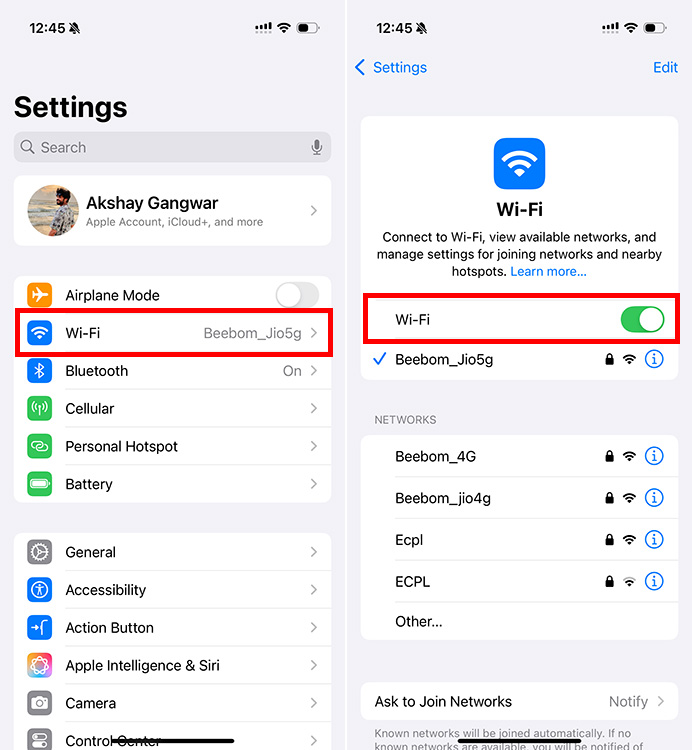
- Go to Settings -> Bluetooth. Turn on the toggle to enable Bluetooth

Enable Bluetooth and WiFi on Mac
- Go to System Settings -> WiFi and turn on the toggle to enable WiFi
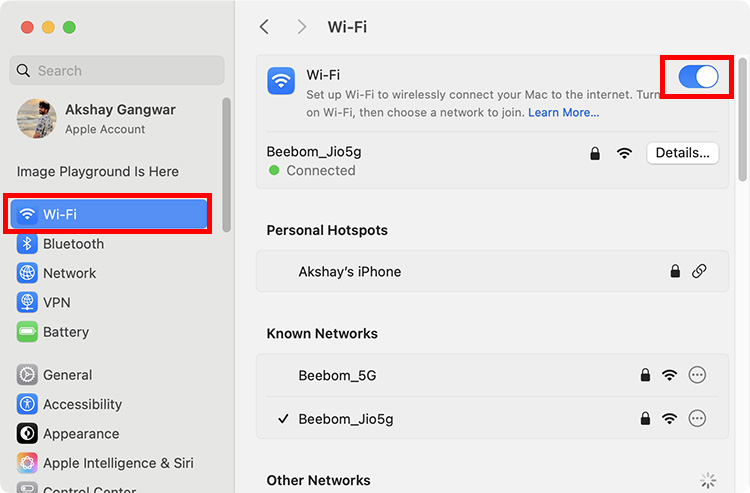
- Go to System Settings -> Bluetooth and turn on the toggle to enable Bluetooth
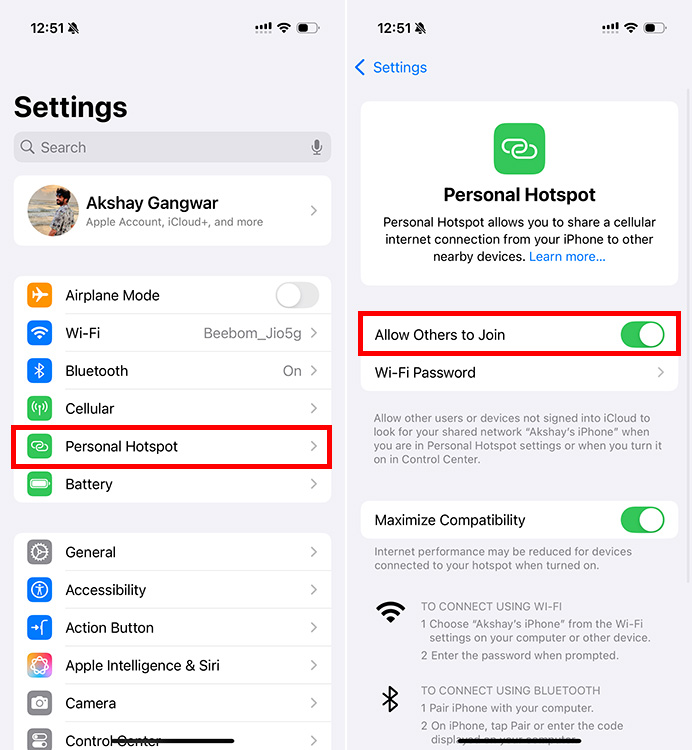
5. Turn off Personal Hotspot
Since AirDrop depends on WiFi and Bluetooth to share files, you can’t use it while Personal Hotspot is turned on. If you have Personal Hotspot enabled, here is how you can turn it off:
- Go to Settings -> Personal Hotspot. Here, turn off the toggle next to “Allow Others to Join”
6. Bring Your Devices Closer
Even though iOS 18 brings support for continuing AirDrop transfers over the internet, you do need to start them off while both the sender and the receiver are close, and within Bluetooth range of each other. So, if AirDrop is not working for you, try moving your devices closer to each other and see if that solves the issue.
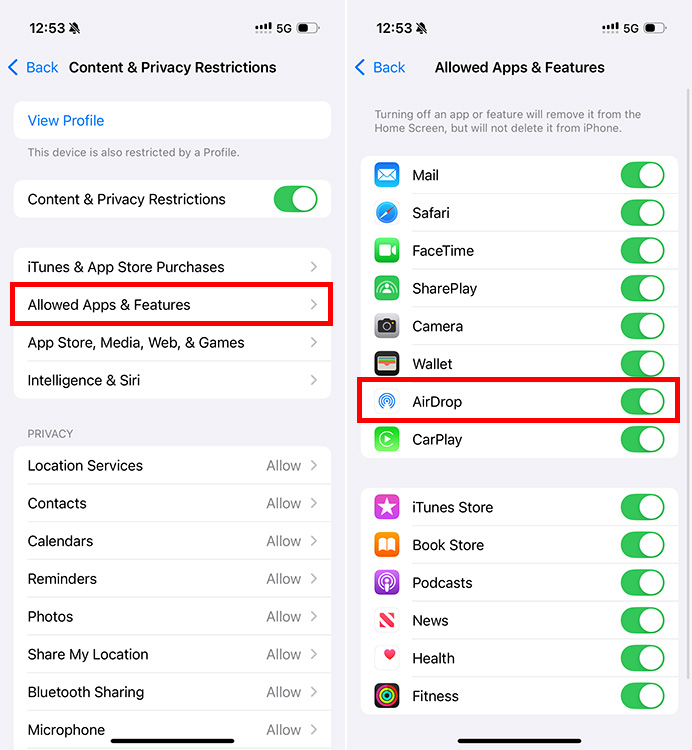
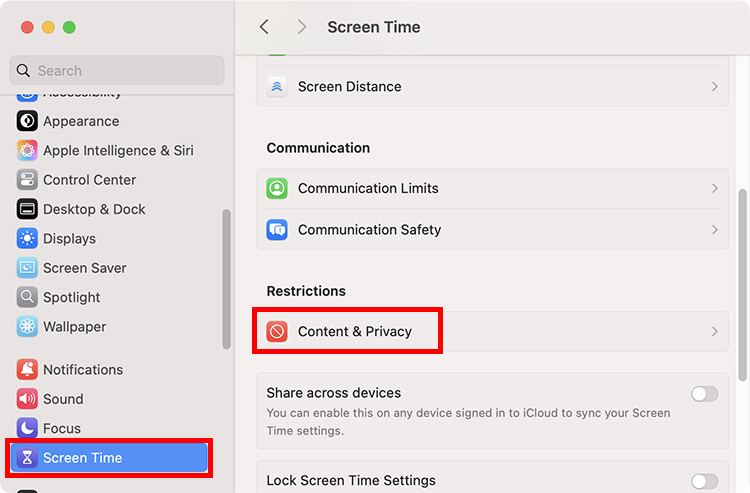
7. Remove AirDrop Restrictions
If you can’t enable AirDrop on your iPhone or Mac, or the AirDrop option is greyed out, it is likely due to the Content and Privacy restrictions on your devices. Here is how to remove AirDrop restrictions from your iPhone and Mac.
Remove AirDrop Restrictions on iPhone
- Go to Settings -> Screen Time -> Content & Privacy Restrictions
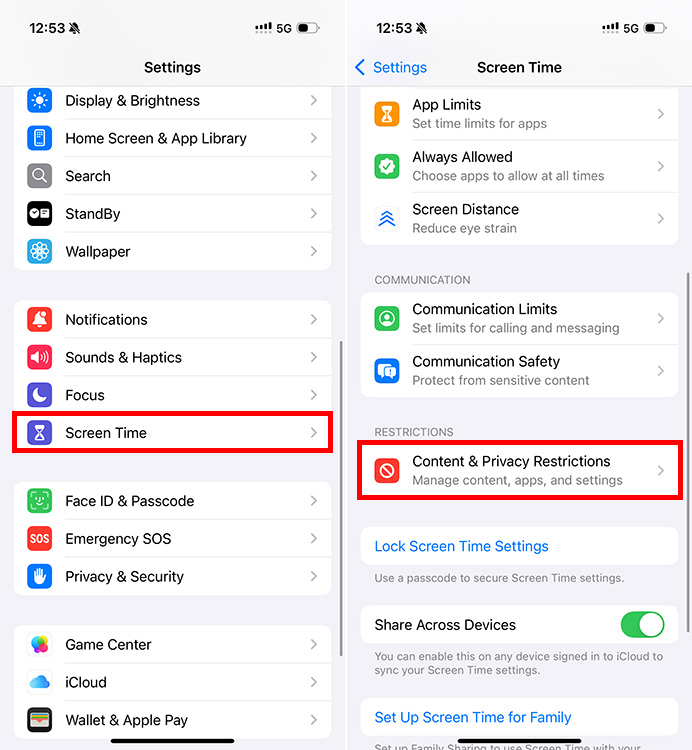
- Tap on “Allowed Apps & Features” and enable the toggle next to AirDrop
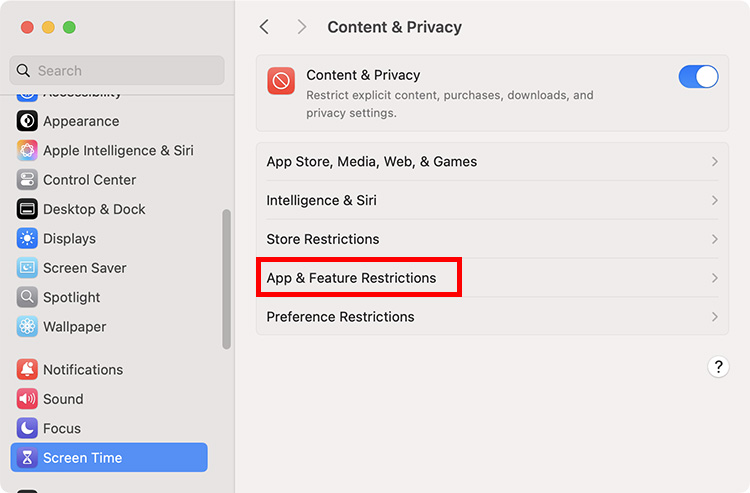
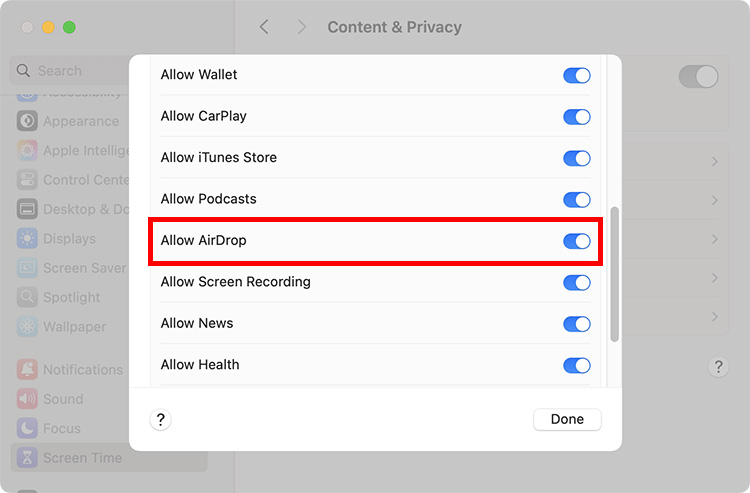
Remove AirDrop Restrictions on Mac
- Go to System Settings -> Screen Time. Click on “Content & Privacy“
- Click on “App & Feature Restrictions“
- Enable the toggle next to AirDrop
8. Restart Your Devices
The old cliche of turning your devices off and turning them back on is a useful one for solving many (maybe even most) software issues. If AirDrop is not working on your iPhone or Mac, you should try to restart your iPhone or Mac and see if that fixes the problem.
9. Update iOS and macOS
One often overlooked reason behind AirDrop not working is usually outdated software. So, if you’re experiencing persistent issues with AirDrop on your devices, make sure that your iPhone, iPad, and Mac are all running the latest versions of iOS, iPadOS, and macOS respectively.
You can check for updates by heading to Settings -> General -> Software Update on your devices. If there are any pending updates, you will be able to install them right there.
10. Reset Network Settings
If nothing else has worked so far, it’s time to take a nearly nuclear step — resetting network settings. This can ensure that any issue with an obscure network setting gets resolved and can fix issues with AirDrop as well. So, if you’ve tried everything else and AirDrop still isn’t working, go ahead and reset network settings on your iPhone, which should resolve the problem.
Here are some of the possible reasons for AirDrop not working on iPhone or Mac:
1. Devices are quite far from each other.
2. Incorrect AirDrop settings.
3. Older software versions
4. Bluetooth won’t work on your iPhone or iPad.
5. Wi-Fi problems.
6. Expired iCloud login sessions.
7. Corrupted network settings.
8. Using a personal hotspot.
9. You’re connected to a VPN.
Open the Control Center from the top right corner of the screen, and click the AirDrop icon. You can then choose Contacts Only or Everyone.
The most common reasons why AirDrop isn’t working and is stuck waiting include software glitches, older iOS or macOS versions, devices powered off or locked, Wi-Fi or Bluetooth aren’t working, or the devices aren’t in the acceptable Bluetooth range.
Here’s why AirDrop isn’t working for contacts only or your iPhone AirDrop won’t find anyone:
1. The recipient has enabled Receiving Off in AirDrop.
2. The recipient device is powered off, locked, or in sleep mode.
3. The other person has enabled Airplane or DND mode.
4. The devices are more than 30 feet apart.
5. If the recipient has enabled Contacts Only in AirDrop settings and you aren’t in his contacts, you’ll get stuck with the AirDrop ‘No People Found’ problem.
To enable AirDrop for everyone on iPhone or iPad, open Settings -> General -> AirDrop -> Everyone. On your Mac, go to Finder -> AirDrop -> Allow me to be discovered by -> Everyone for 10 Minutes.
One of the most reported Apple AirDrop issues is AirDrop working one-way only. Many users have shared their experiences where AirDrop works on Mac to iPhone but not on iPhone to Mac. If you’re also facing similar AirDrop problems, try the following:
1. Verify receiving isn’t off on Mac.
2. From the Mac’s Firewall settings, double-check that “Block All Incoming Connections” isn’t enabled.
3. Head to Control Center -> AirDrop and choose Everyone for 10 Minutes.
Incorrect AirDrop settings, Bluetooth errors, using a Personal hotspot or VPN, or network glitches may cause AirDrop to fail.